Molly and Mama

Studio for Pretty Stitches - Inspiring ideas for Felt, Stitchery and Patchwork

  • Home
  • Start Here!
  • PATTERNS
    • PDF Pattern Shop
    • Paper Pattern Stockists
    • Pattern Corrections
  • TUTORIALS
  • Classes
  • BOOK
  • Contact

Felt Cat Tutorial – Sew A Softie 2018

July 3, 2018 By Lauren at Molly and Mama 18 Comments

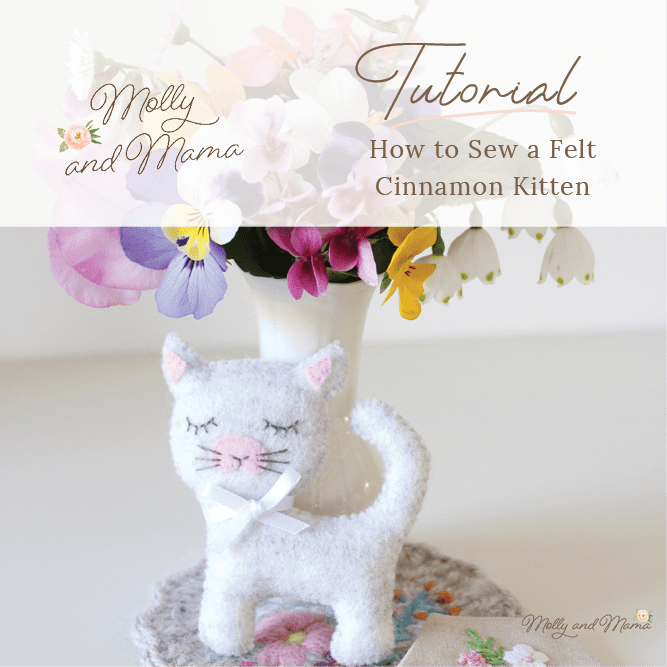
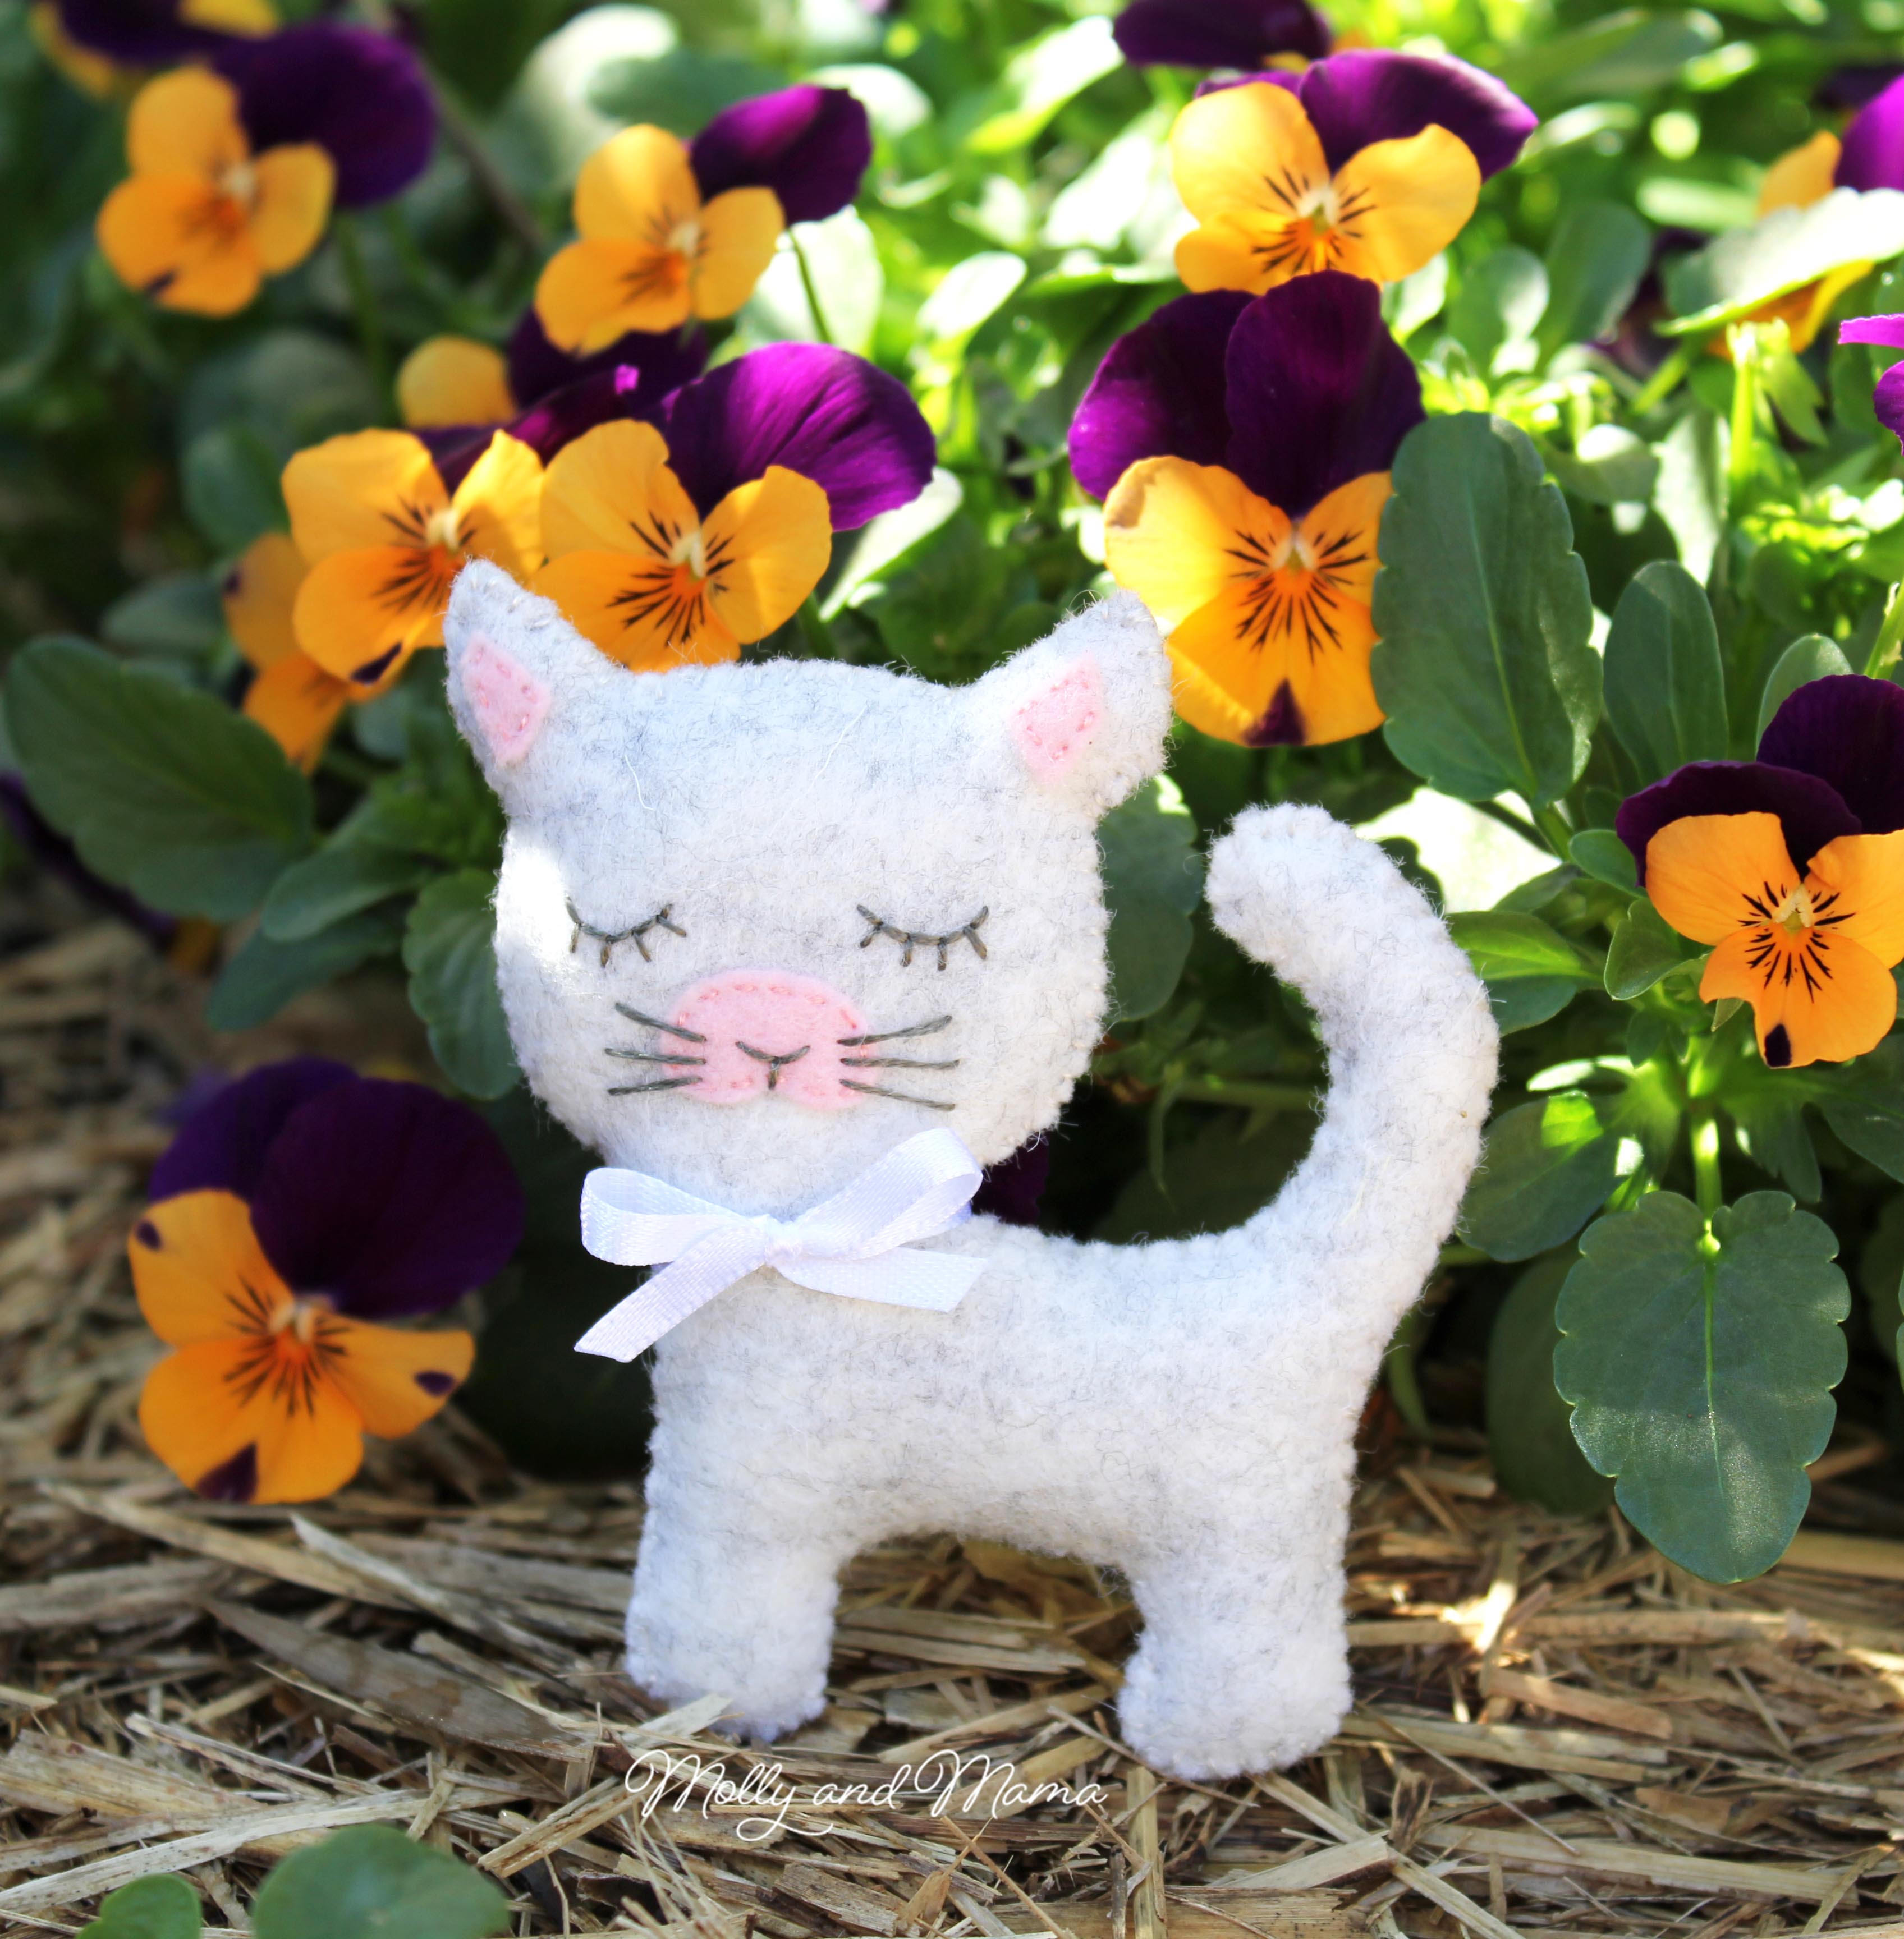
Let’s Make Cinnamon, the cutest little felt kitty cat!

Today is my turn on the blog hop for Sew A Softie month! Wishing a very warm welcome to those who have found their way here for the first time today. We’ll be making a sweet little felt kitty cat called Cinnamon! She’s super simple and straightforward. You can modify the details to make it even easier. Or you can embellish her to really make her your own.

If you’re wondering what Sew A Softie is, Trixi (the founder) explains that it is ‘an initiative that aims to ignite a love of hand sewing in a new generation’. That’s exactly the reason for my own blog, so when I saw Trixi’s month-long celebration of sewing with kids, I just knew I had to join in! If you’d like to see more Sew A Softie tutorials, head to the website, or join the Facebook group for daily updates and links for the entire month of July.

If you’re new here, take some time to look around. Head to the Tutorials tab too, because I have some really sweet projects you might like to make after this one!

I design for beginners and I like to make my instructions really clear. So if you have any questions, feel free to get in touch. I hope you learn some new tips and tricks in this tutorial that you can use in your other sewing projects too.

What’s a Softie? A soft toy!

Tips for Kids: The instructions here seem long, but they’re detailed so that you can learn lots of tips to make sewing easier and more successful. So perhaps have an adult read them through first, to help you.

Now, on to the sewing!

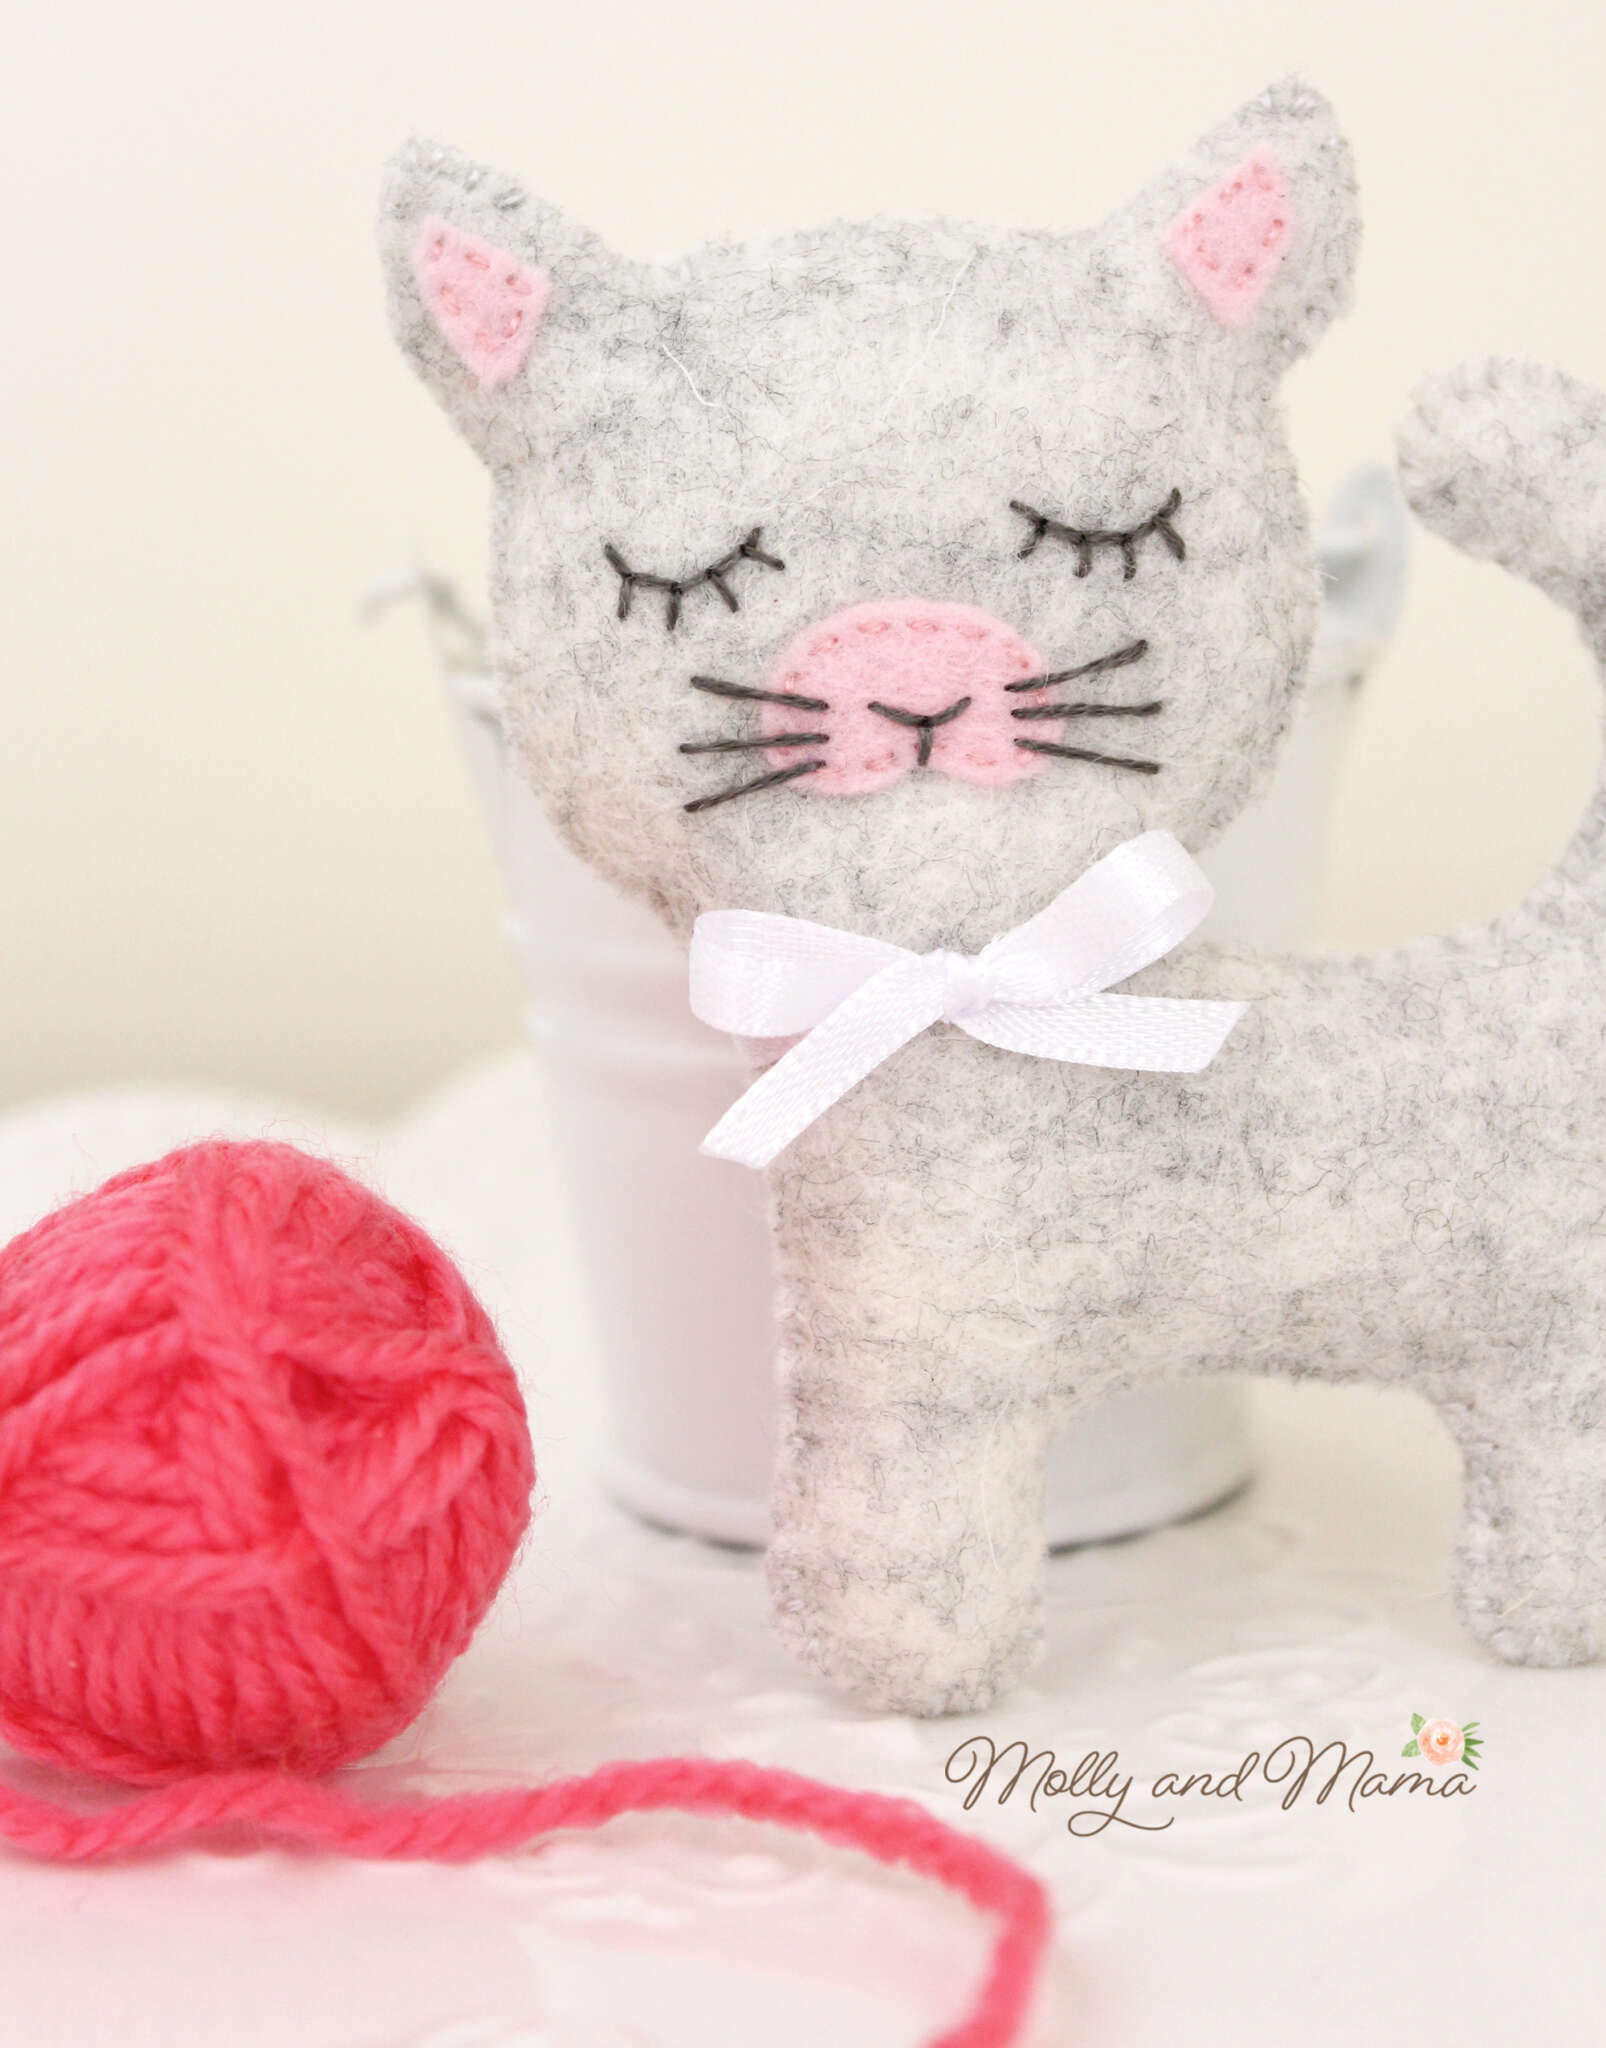
FINISHED SIZE: Cinnamon Kitty measures approximately 3.5″ tall and 3″ wide.

YOU WILL NEED

  • 8 inches (20cm) x 4 inches (10cm) of cat coloured felt (preferably wool felt; here’s why – Tips for working with Wool Felt)
  • 1 inch (2.5cm) x 2 inches (5cm) of pale pink felt
  • small handful of polyester hobby fill or toy stuffing (use cotton wool balls at a pinch)
  • 6 stranded embroidery thread (like DMC floss) in colours to match your felt and also in black, brown or grey
  • embroidery needle
  • print out of the template
  • pen
  • small embroidery scissors with short, sharp blades for cutting felt

OPTIONAL ITEMS

  • freezer paper
  • appliqué or craft glue
  • small piece of fine paper lunch wrap or tissue paper
  • erasable marker
  • ribbon, buttons, or other embellishments

INSTRUCTIONS

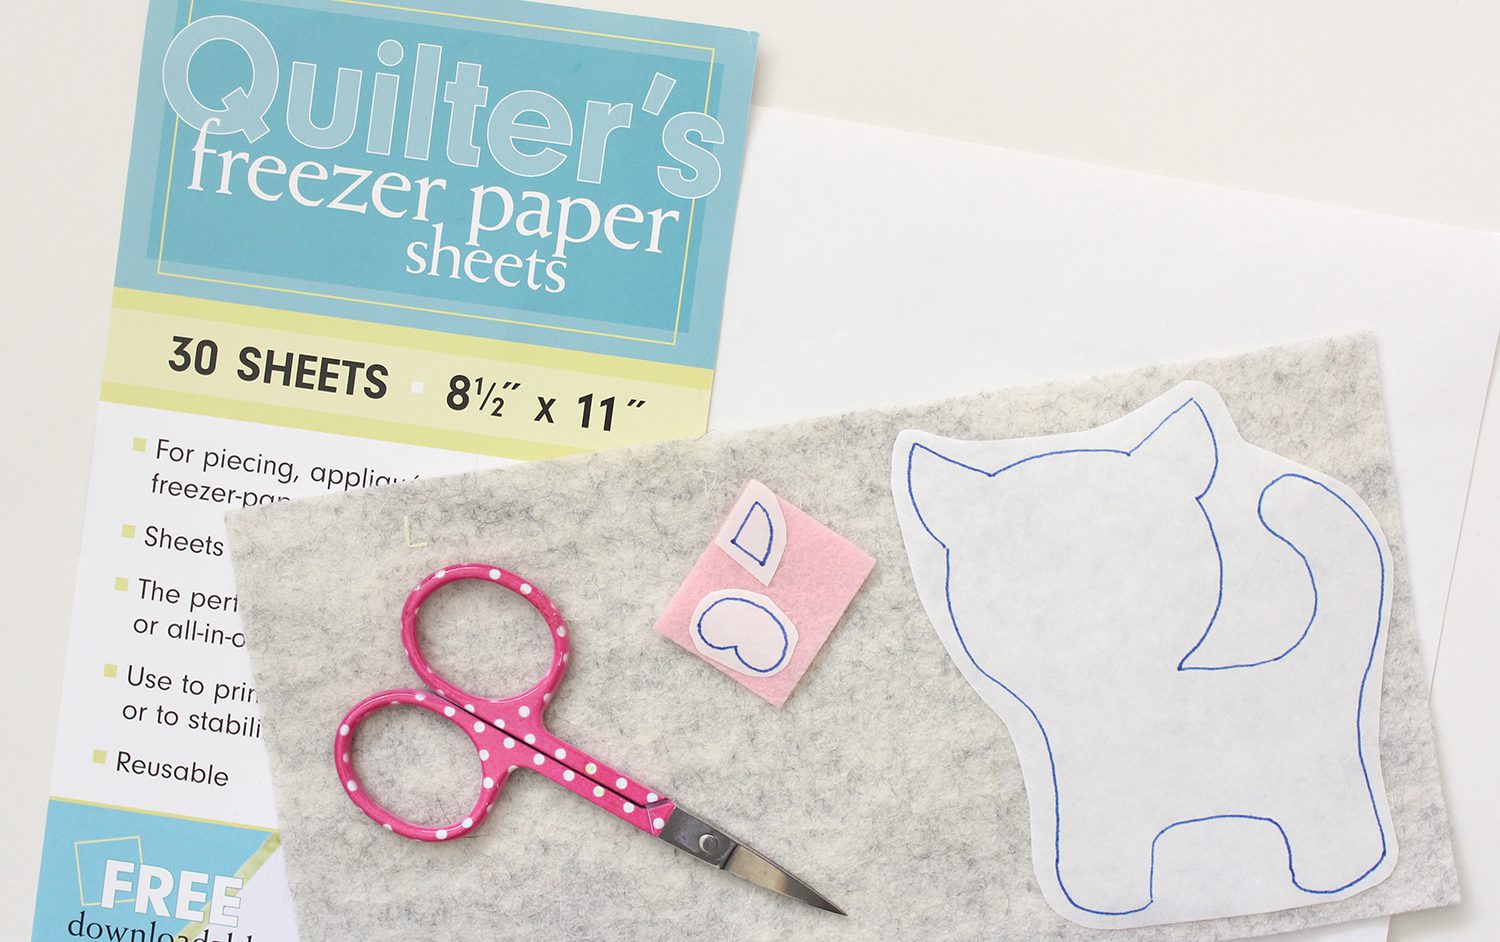
1. Print out the TEMPLATE. Ensure you print at 100% with no cropping or scaling. To make larger or smaller kitties, simply adjust the print size.

DOWNLOAD TEMPLATE HERE 

2. Cut out 2 cat bodies (from cat coloured felt) and one nose and two inner ears (from pale pink felt). There are a couple of ways you can transfer your pattern template to your felt, in preparation for cutting. When cutting your felt use small and sharp scissors that have short blades (like embroidery scissors). This will give your felt a neater edge, and you’ll also find your shapes are more accurate.

Pinning the Template: Roughly cut around the outside of your template leaving a small margin between the paper edge and the template lines. Lay your paper template over your felt and pin it in place. Carefully cut out the template by precisely following the template lines. This method won’t be suitable for cutting out small pieces of felt though. You can stick the template pieces in place with low adhesive sticky tape, and peel off the tape after cutting out each shape. Alternatively, you can also use freezer paper to help with this process. It’s a much easier method to use!

Using Freezer Paper: Freezer paper can be purchased online, or often at your local Quilting Store. It comes in a pack of pre-cut sheets (suitable for your printer), or is sold by the metre from a large roll.

Print (or trace) your template onto the paper side of the freezer paper. Roughly cut around each template piece and lay it on the felt.  Using a warm iron, run it over the paper side of the template*. The heat will help the plastic underside of the freezer paper to adhere to your felt. Cut out the template pieces on the line, and then simply peel the paper away. It comes away easily and leaves no residue. Keep the freezer paper templates as these can be reused a number of times.

*This process is best suited to wool felt. Test a small area of your felt with the iron and paper before commencing. Please be sure to cover your felt with a press cloth (or scrap piece of cotton fabric) so as not to damage it (especially if the felt is not 100% wool).

When you have all of your felt pieces cut, you’re ready to start stitching!

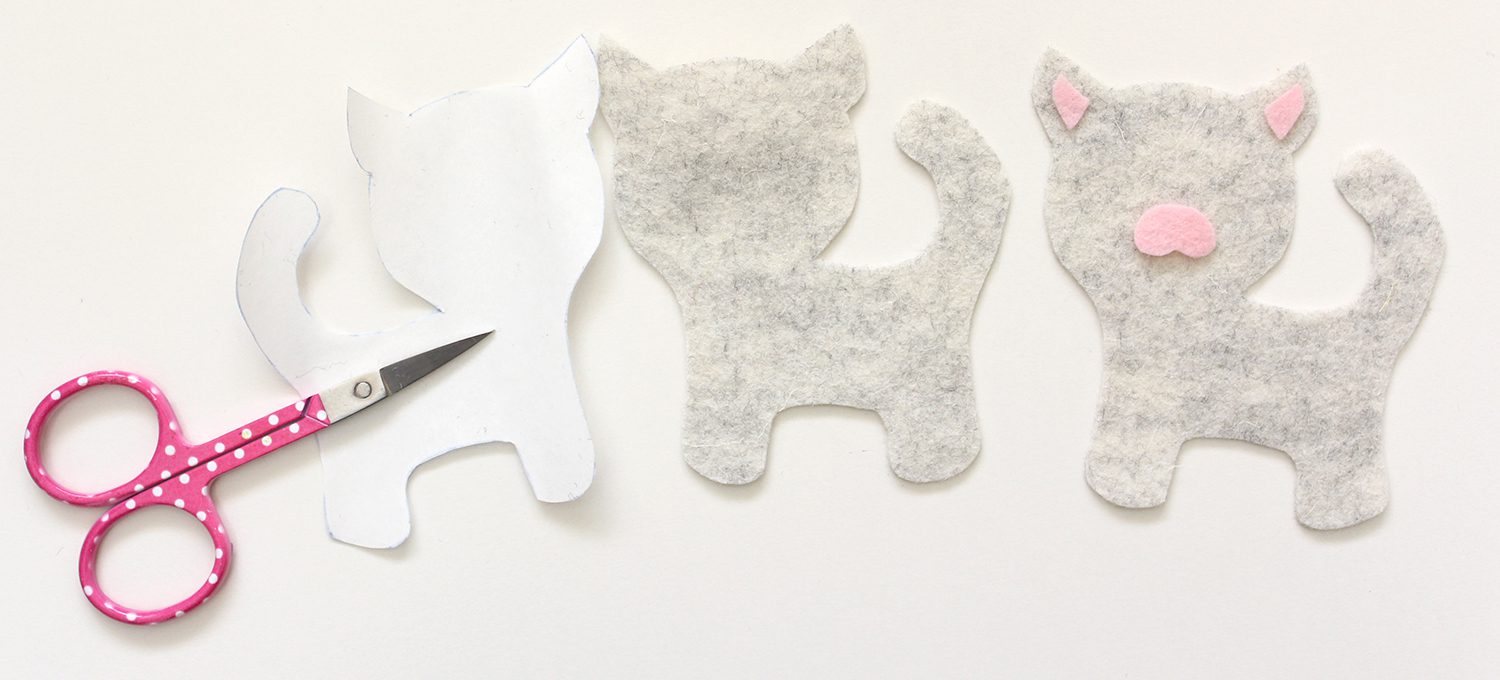
3. Thread your embroidery needle with a single strand of pale pink floss. Place the inner ear shapes over the ears of one kitty shape (set the other one aside) and use a tiny drop of appliqué glue to help secure them in place. Alternatively, hold the shapes down as you sew them in place, using a simple whip stitch or running stitch. Don’t forget to start and end your stitching on the wrong side (the back) of the felt. If you prefer, you can use craft glue to secure the inner ears and nose (without stitching), but be sure the glue is dry before proceeding with the net step.

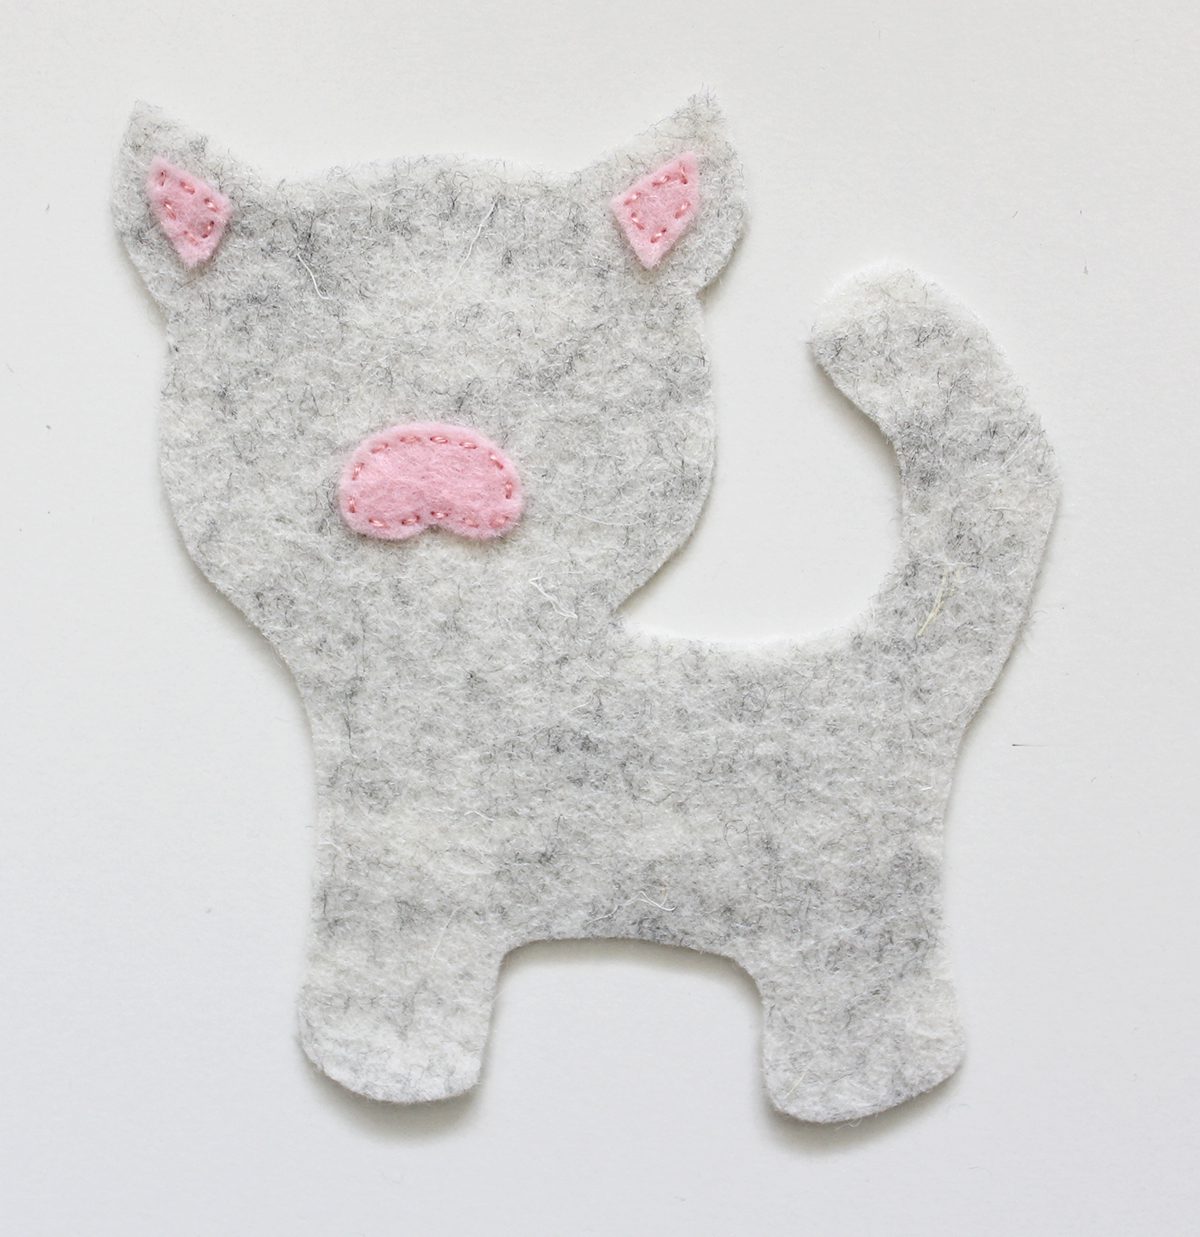
4. Use the same method as above to secure the pink nose shape in place. Use your template as a guide for where to position the felt.

5. Embroider the eyes, nose and whiskers with two strands of embroidery floss in black, brown or grey. Use the template as a guide for placement. Draw the features on using an erasable pen or use the handy trick described below. (As an alternative, you could also use glass beads for the eyes (if the kitty is for an older child), circles of dark felt, or even draw the facial details on with a permanent marker.)

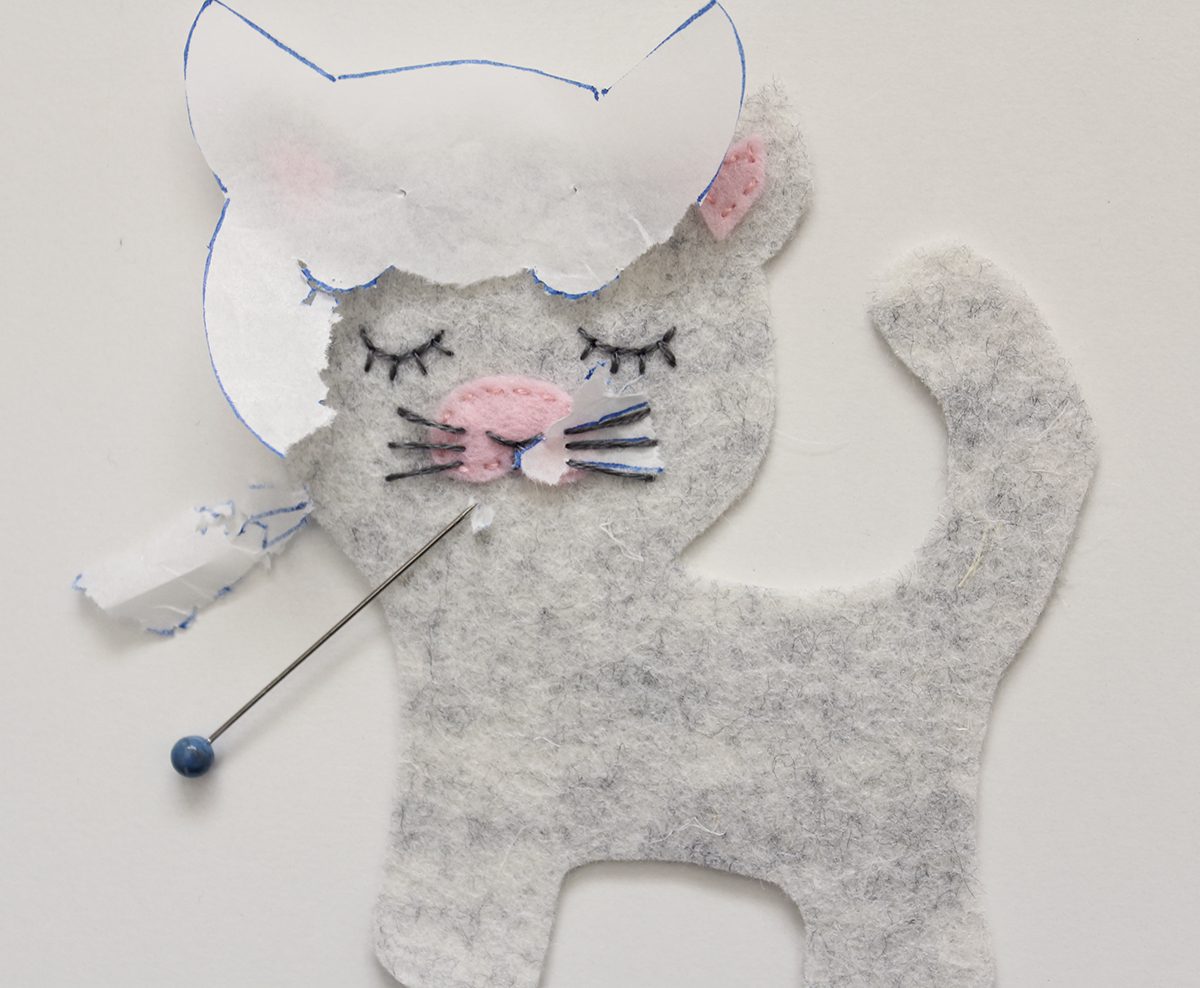
  • Trace the kitty face shape and facial details onto a small piece of thin paper lunch wrap or tissue paper. Tip: Don’t trace the details with lead pencil, as the lead will ‘muddy up’ your floss as you stitch!

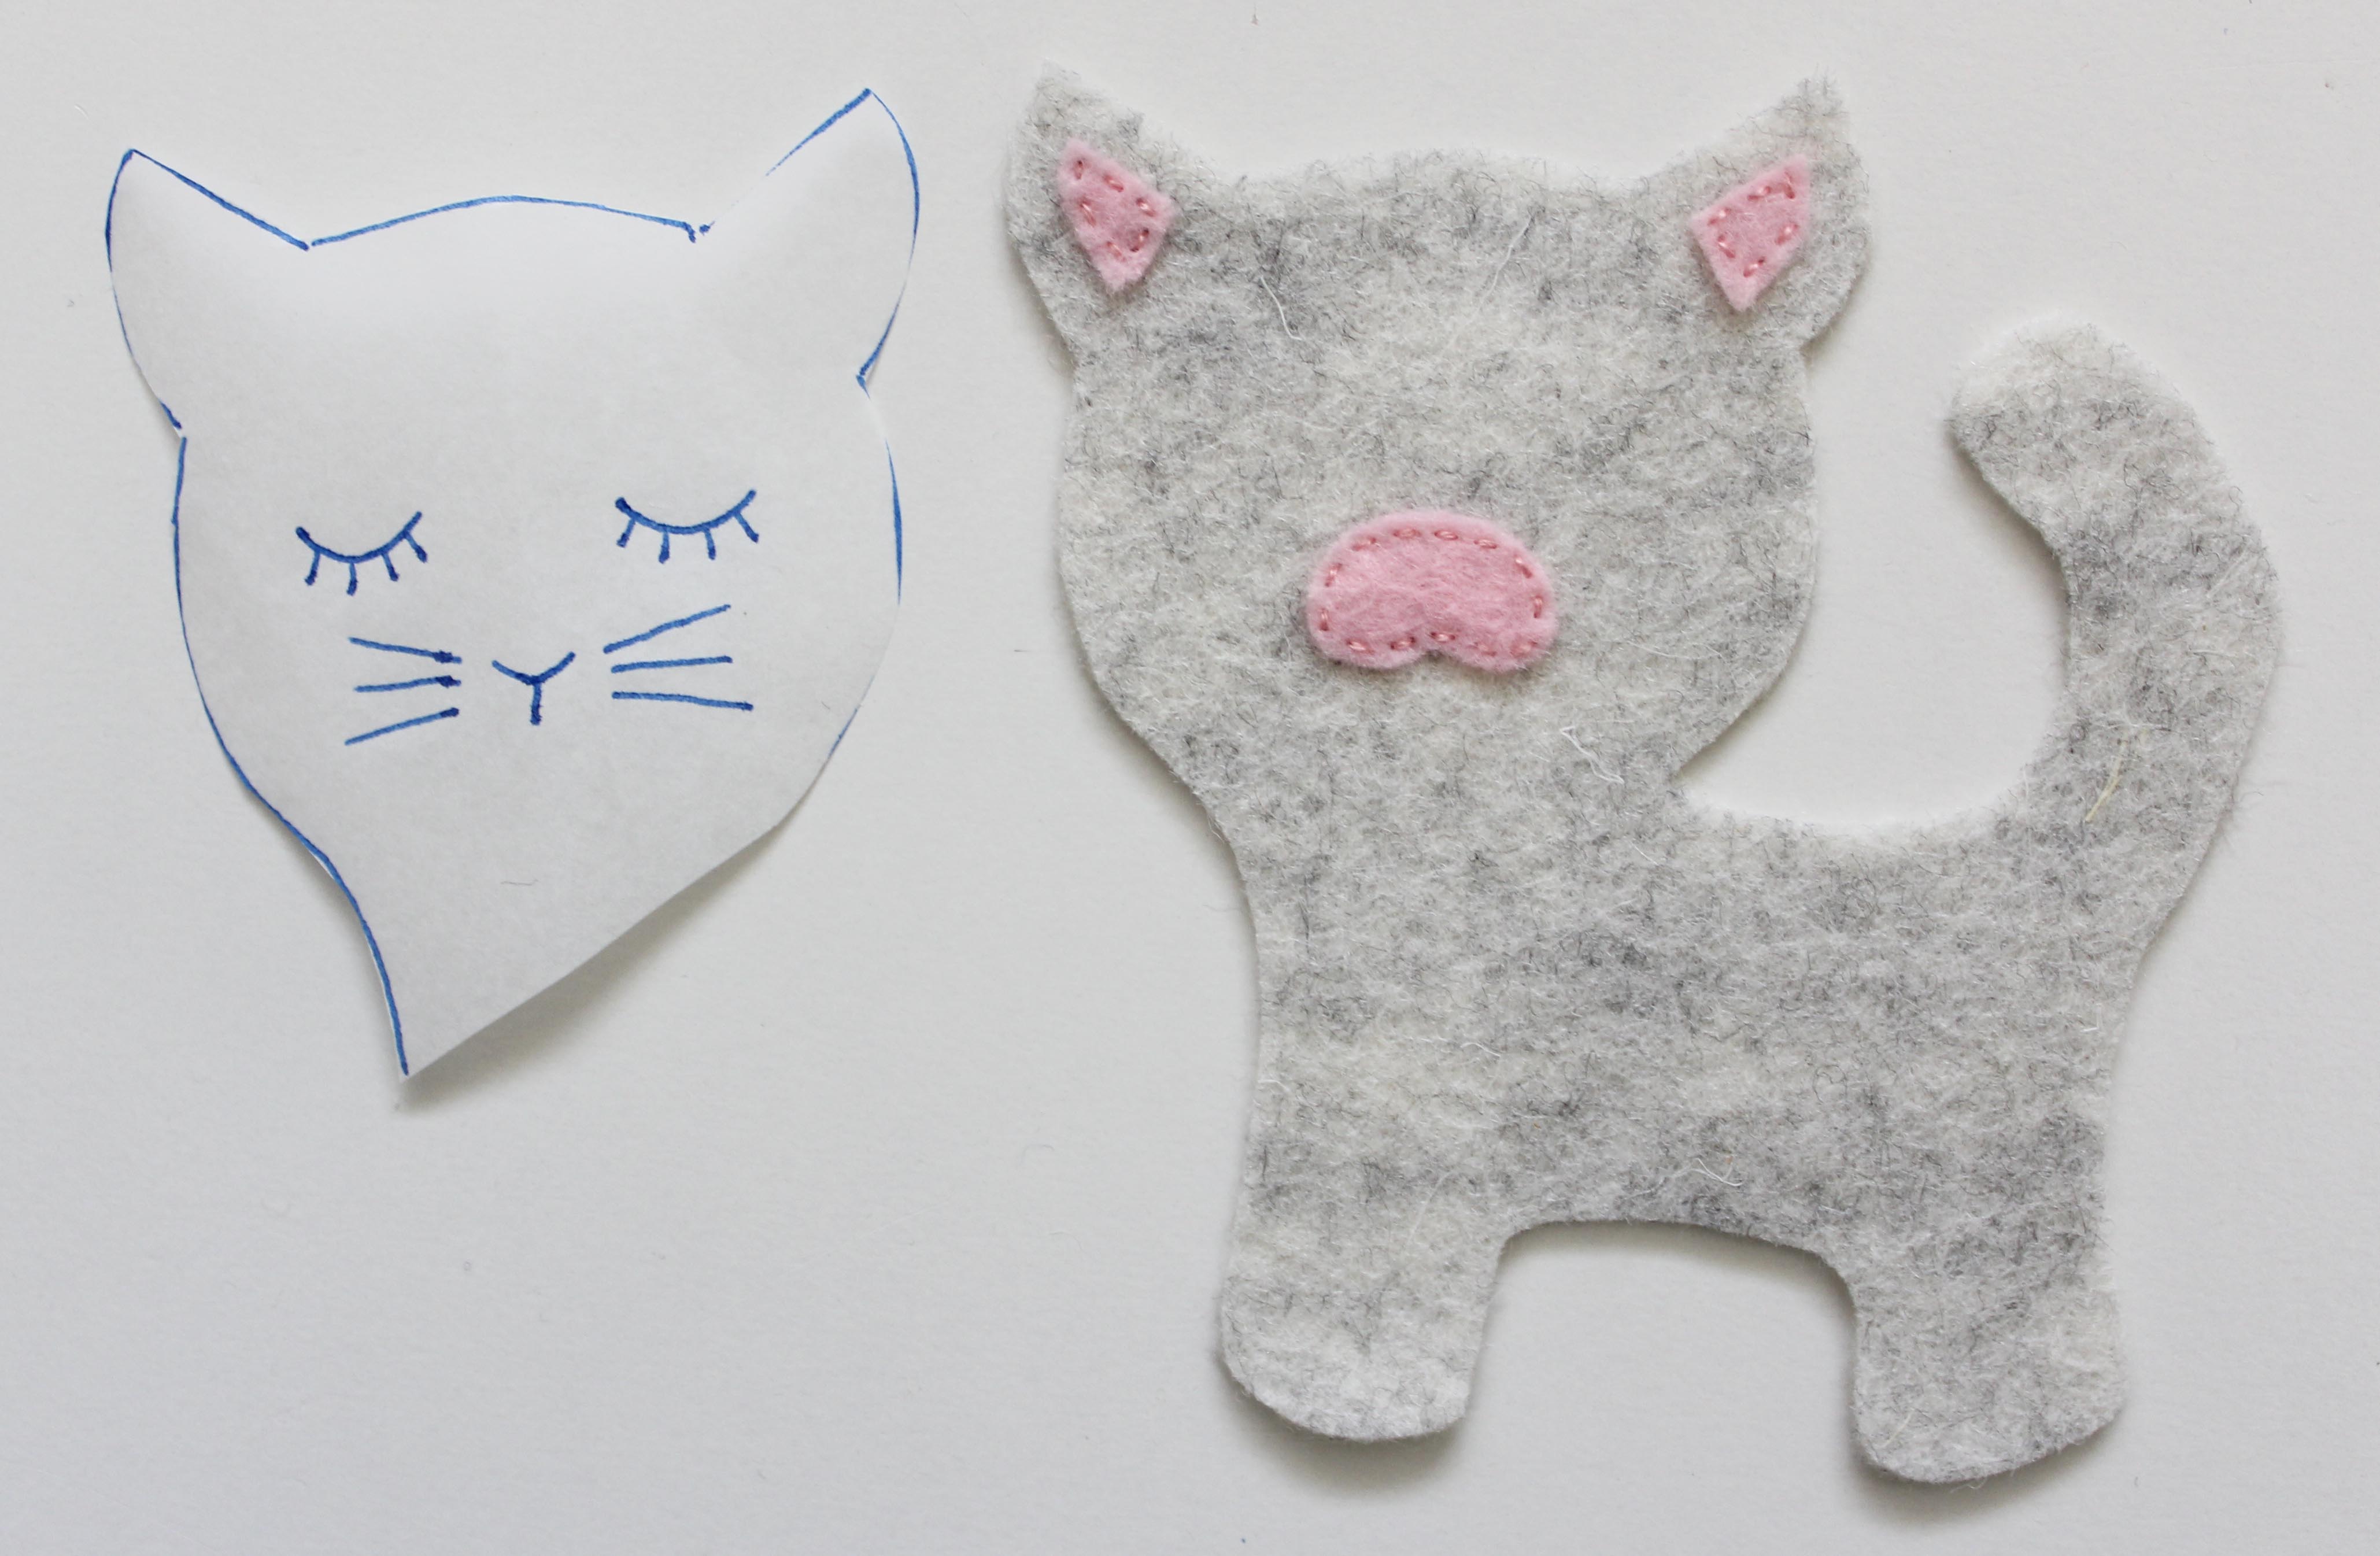
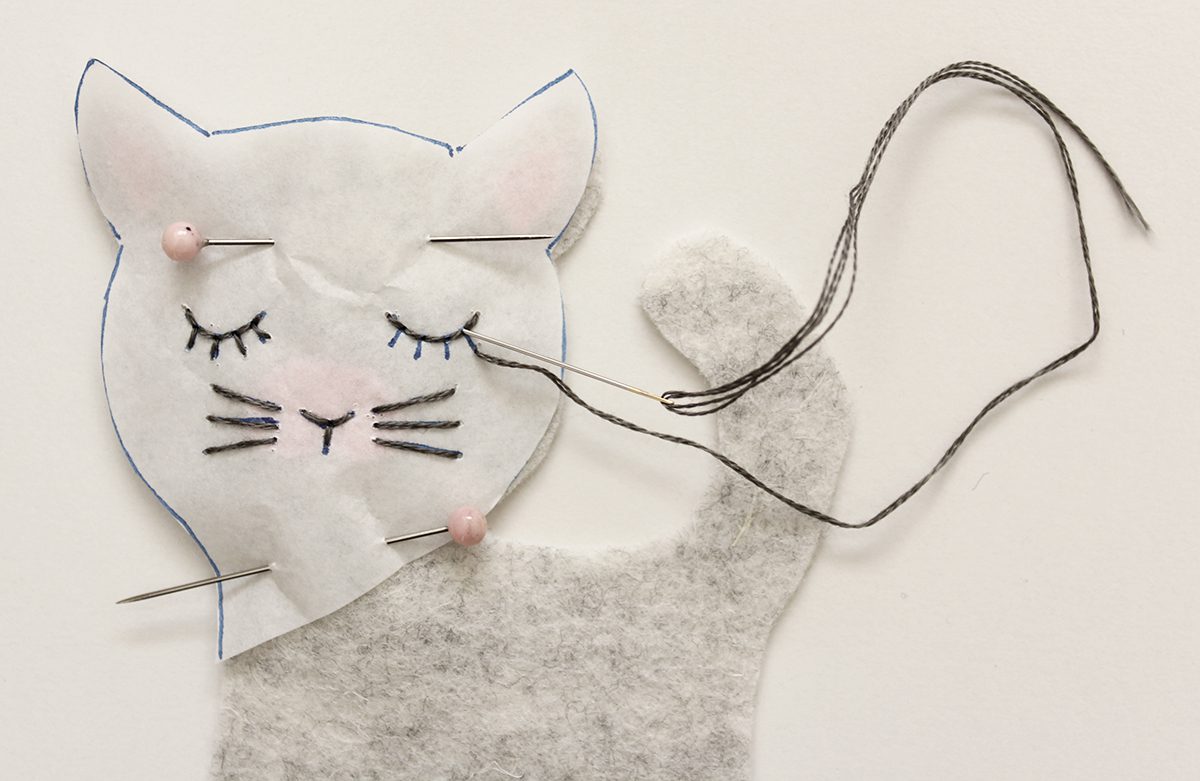
  • Cut around the outside edge of the paper. Pin the paper over the kitty’s head shape, making sure everything lines up.
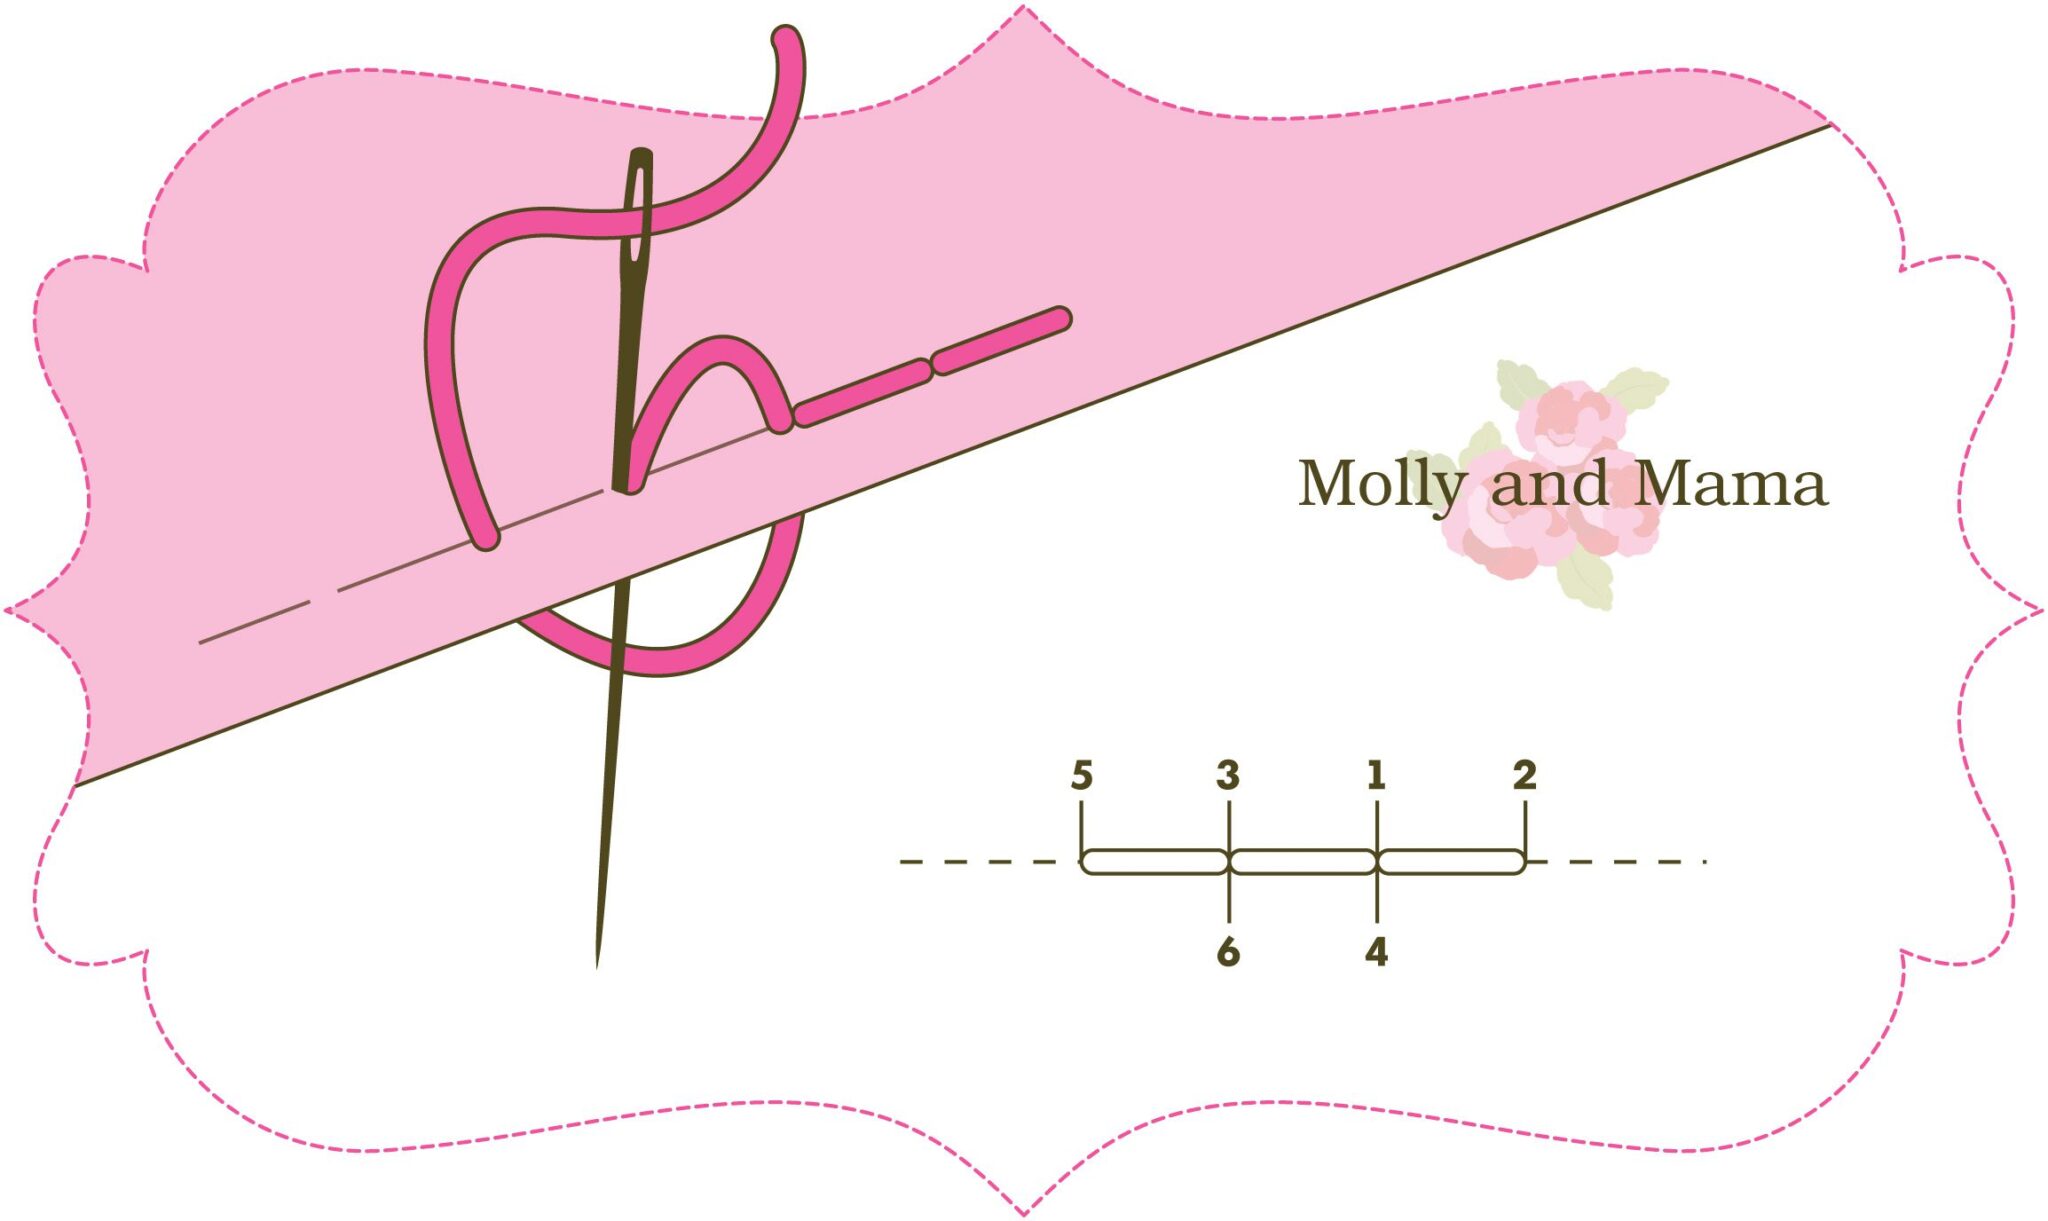
  • Using back stitch, sew the facial features by stitching directly through the paper. First, follow the lines to sew the mouth with small back stitches. Then stitch the whiskers with long, single stitches.  Next, stitch the length of one eye first, then the eyelashes. Then stitch the other eye and lashes.

Here’s a little refresher on how to back stitch. You might also like to read this tutorial.

  • When you’ve finished stitching, hold the stitches with one hand as you gently tear away the paper with the other. Use your needle to help tease any stray bits of paper out from under the stitches (if necessary).

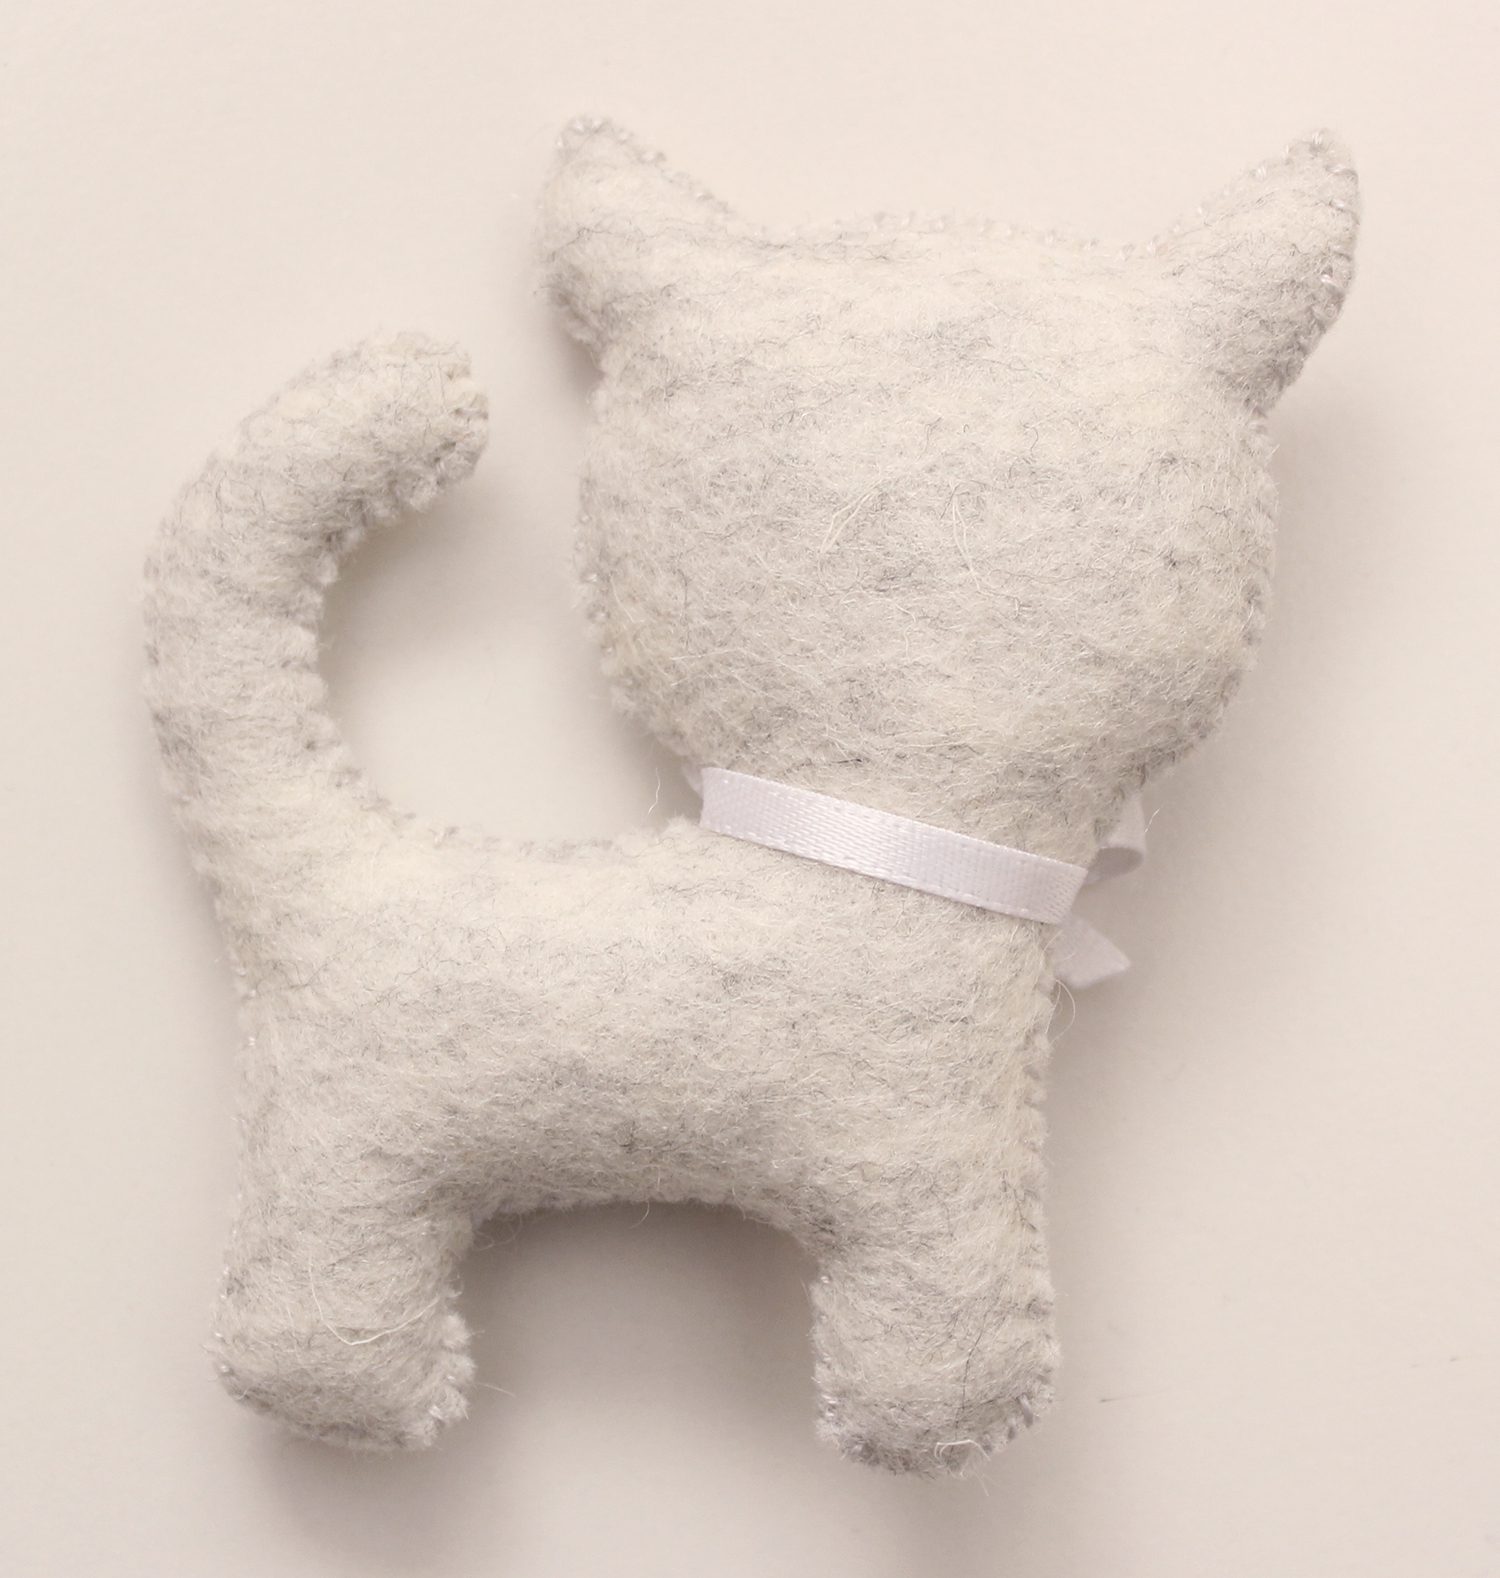
6. Pin the two kitty shapes together. Using two strands of matching embroidery floss, whip stitch the two shapes together. Hide the start of your stitching (your knot) inside the kitty shapes. Start sewing behind the head and sew along the back and up one side of the tail. Roll a small but long length of hobby fill and place it inside the kitty’s tail.

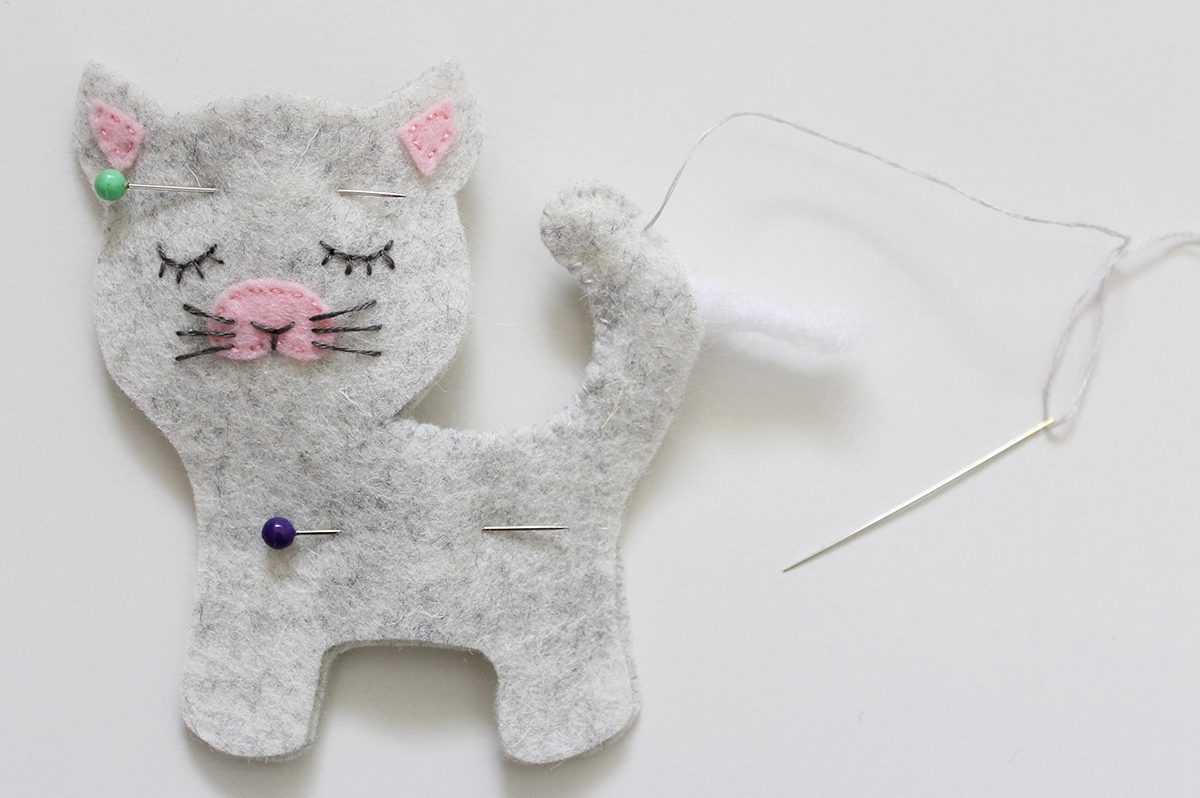
Continue to sew along the back of the tail, and then down around the back foot. Stuff the back foot and hind end of the kitty with stuffing, using only very small amounts. Continue to stuff firmly and sew until you come to your starting point. Finish off your stitching well, so that the end of your floss is hidden inside the kitty.

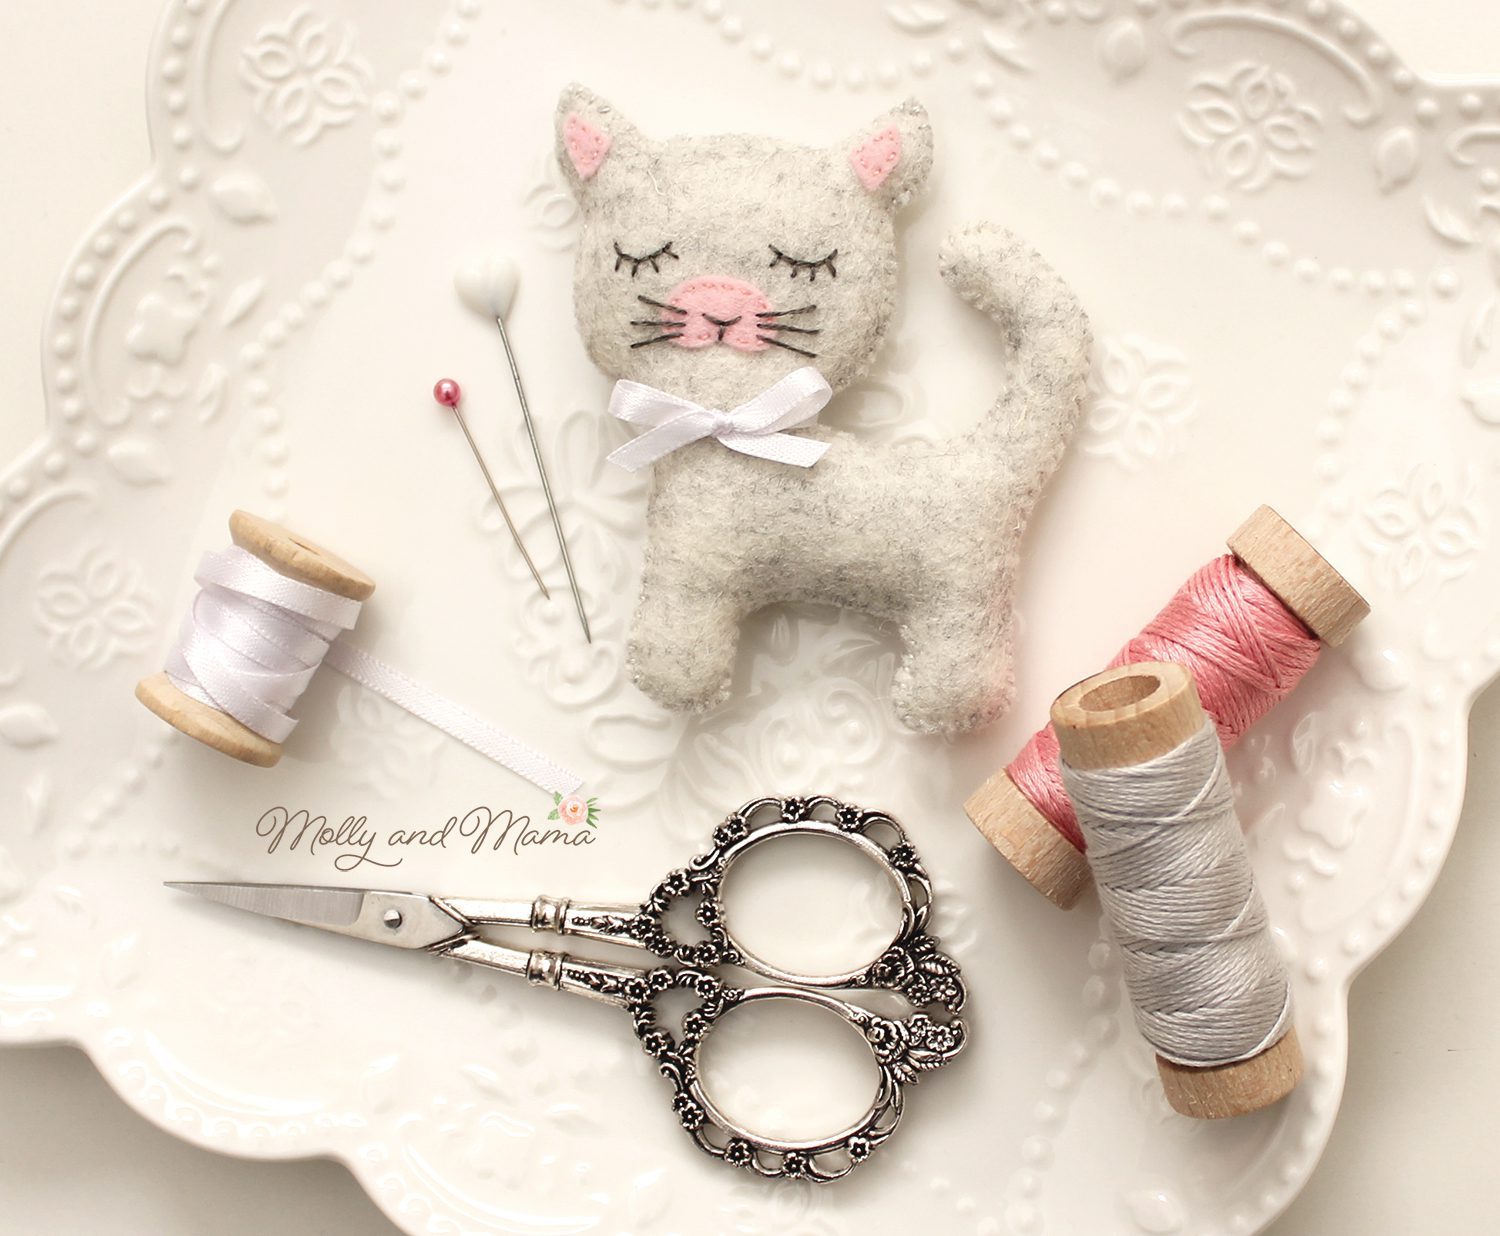
7. Add a bow, or other embellishments if you like. Then have fun playing together!

Thanks for joining the Sew A Softie initiative! If you’ve had a look around the blog and you like what you see, you might want to sign up to my newsletter, join me on Facebook or Instagram. I love making new friends so be sure to say hello and share your sewing with me!

Head to my Etsy Store to see my range of ‘beginner friendly’ instant download PDF sewing patterns too. I hope you find something you like.

Happy stitching, Lauren.

This post was written by Lauren Wright and appeared first on Molly and Mama www.MollyandMama.com.au 

SaveSave

SaveSave

SaveSave

SaveSave

SaveSave

Filed Under: Felt Fun, Tutorials Tagged With: cat doll, felt, felt cat, felt kitten, felt sewing, kitten, Molly and Mama, Sew A Softie, sewing tutorial, soft toy, tutorial, wool felt

Comments

  1. Julie says

    July 4, 2018 at 12:56 am

    Oh my, this is the cutest thing. I love your little felt cat. Pinning.

    Reply
    • Lauren at Molly and Mama says

      July 20, 2018 at 10:34 am

      Thanks so much Julie. It was so much fun to create this project for Sew A Softie. I’m glad you like it!

      Reply
  2. trixi says

    July 4, 2018 at 10:57 am

    What a great tutorial Lauren! Very clear and thorough and your photos are so beautiful. Thanks for joining into Sew a Softie and it’s so nice that we’re both blogging for the same reason…and both of us happen to be Aussies 🙂

    Reply
    • Lauren at Molly and Mama says

      July 20, 2018 at 10:32 am

      Hooray for Aussie Bloggers and sewing to share our skills! Thanks for having me on the Sew A Softie tour. Cinnamon Kitty is in some beautiful company!

      Reply
  3. Lisa // Cucicucicoo: Eco Sewing & Crafting says

    July 11, 2018 at 2:55 am

    What a sweet little kitten! Love it! 🙂 Lisa

    Reply
    • Lauren at Molly and Mama says

      July 20, 2018 at 10:27 am

      Thank you Lisa!

      Reply
  4. Linda Xuereb says

    May 10, 2019 at 3:28 am

    How divine

    Reply
    • Lauren at Molly and Mama says

      May 13, 2019 at 11:46 am

      Thank you Linda!

      Reply

Trackbacks

  1. 40+ Free Stuffed Toy Patterns: Sew a Softie 2018 | Coloured Buttons says:
    July 30, 2018 at 3:47 pm

    […] Cinnamon kitty […]

    Reply
  2. Cinnamon – Softie heaven says:
    September 7, 2018 at 2:46 am

    […] Denne lille kat er oprindeligt lavet i filt, jeg har syet den i stof og tegnet ansigtet. Cinnamon […]

    Reply
  3. Cinnamon – Softie heaven says:
    September 18, 2018 at 10:38 pm

    […] A cute little cat, originally in felt, but I made it in fabric and drew the face. Cinnamon […]

    Reply
  4. How To Embroider Details Onto Felt - Molly and Mama says:
    November 18, 2018 at 8:21 am

    […] outlined the technique below and borrowed some images from my Cinnamon Kitty Felt Cat tutorial. You can check out the entire project […]

    Reply
  5. How to Transfer Templates to Felt - Molly and Mama says:
    November 19, 2018 at 5:58 am

    […] freezer paper pictured above is for my Cinnamon Kitty tutorial. She’s a fun and sweet project to […]

    Reply
  6. Fabric, Patterns and Projects in July - Molly and Mama says:
    July 10, 2019 at 1:42 pm

    […] were slim. This posy will brighten my studio for a few days though. It’s pictured here with Cinnamon Kitty. I created a tutorial for her last year which you might like to […]

    Reply
  7. Sew A Felt Swan Hair Clip - Molly and Mama says:
    July 28, 2019 at 4:17 pm

    […] year I created a tutorial for Cinnamon Kitty. And this year I have made a cute felt swan hair accessory. She’s attached to an alligator […]

    Reply
  8. Sew a Simple Felt Swan Softie - Molly and Mama says:
    July 29, 2019 at 1:56 pm

    […] year I designed a felt cat tutorial. Be sure to check it out if you’d like to sew Cinnamon […]

    Reply
  9. Halloween Finger Puppet Patterns - Felt With Love Designs says:
    October 6, 2019 at 1:48 pm

    […] time I see them. They have been on my to-do list since they were published! Lauren also has an adorable kitty pattern that can be sewn up as a black cat for […]

    Reply
  10. Make a Heart Pocket Banner with Thermoweb - Molly and Mama says:
    February 5, 2020 at 11:14 am

    […] The banner construction is simple and straightforward. The heart shaped pocket has a felt back and a fabric-covered felt front (that forms the pocket part). It was nice to tuck some flowers into the pocket for the photos, but it’s hardly very practical. I would recommend using it to share cards, little love notes or small toys and treats instead. This little felt kitty I made a while back, fits inside the pocket perfectly. You can find the tutorial for the the cat toy HERE. […]

    Reply

Leave a Reply Cancel reply

Your email address will not be published. Required fields are marked *

Categories

  • Christmas (37)
  • Christmas Stocking Sew Along (6)
  • Easter (10)
  • Embroidery For Beginners (6)
  • English Paper Piecing (9)
  • Felt Fun (12)
  • Forest Family Quilt Along (10)
  • Holidays (11)
  • Molly and Mama Patterns (54)
  • Pattern and Book Reviews (38)
  • Projects (40)
  • Quilting Help (3)
  • This and That (49)
  • Tutorials (49)

Cart

mollyandmama

Studio For Pretty Stitches
🐝🌸 You’ve seen my pretty floral Serious Se 🐝🌸 You’ve seen my pretty floral Serious Sewist’s Set, but here’s a sweet Liberty Wiltshire version. I love @libertyfabrics tana lawn, especially when it’s paired with linen.

Find out more about this new pattern in the listing details. Tap the photo or head to the shop link in my profile. 

#mollyandmama #serioussewistsset #libertyfabric #libertytanalawn #iloveliberty #libertywiltshire #felt #woolfelt  #feltapplique #appliquebee #feltbee #scissorkeeper #scissorcharm #hexies #hexagons #englishpaperpiecing #epp #handstitched #slowsewing #aurifil #aurifloss #aurifilfloss #embroideryfloss #aurifilartisan
I’m loving @mabletandesigns new collection ‘B I’m loving @mabletandesigns  new collection ‘Birds & Blooms’ for @pbsfabrics. And hand quilting with @aurifilthread embroidery floss is a dream! Can you guess which of my patterns this will become? 

#mollyandmama #mabletandesigns #birdsandbloomsfabric #pbsfabrics #australianflorafabric #australianafabric #cockatoo #parakeet #parrot #stellacushions #fatquarterbundle #fabriccollection #fabricpull #aurifulthread #aurifloss #aurifilartisan #embroideryfloss #aurifilfloss
🐝🤍 It’s here! Thank you so much to those w 🐝🤍 It’s here! Thank you so much to those who have already purchased the Serious Sewist’s pin cushion and scissor charm pattern set. Tap the photo for a direct link, or head to my profile. 

#mollyandmama #serioussewistsset #felt #woolfelt  #feltapplique #appliquebee #feltbee #scissorkeeper #scissorcharm #hexies #hexagons #englishpaperpiecing #epp #handstitched #slowsewing #missrosesisterviolet #rileyblakedesigns #iloverileyblake #rileyblake #roseandvioletsgardenfabrics #aurifil #aurifloss #aurifilfloss #embroideryfloss #aurifilartisan #fatquarterbundle #roseandvioletsgardenfabric
🦜🌼 On the cutting table this week is this su 🦜🌼 On the cutting table this week is this summery fun Australiana collection called Birds & Blooms from @mabletandesigns for @pbsfabrics. It’s described as combining classical botanical illustration styles with a modern, trend-worthy colour palette. And it’s so true! Check with @pbsfabrics for stockists near you. 

I love all of Mable’s designs, this one especially! What should I make? 

#mollyandmama #mabletandesigns #birdsandbloomsfabric #pbsfabrics #australianflorafabric #australianafabric #cockatoo #parakeet #parrot #gumblossom #fatquarterbundle #fabriccollection #fabricpull #aurifulthread #aurifloss #aurifilartisan #embroideryfloss #aurifilfloss
How sweet does Miss Maisie Pin Cushion look sittin How sweet does Miss Maisie Pin Cushion look sitting here on this cute ‘I Spy’ style doll’s quilt?  It’s based on the Rising Sun mini quilt pattern from @blossomheartquilts’ book ‘Mini Masterpieces’. You can see more photos and find links to the book on my latest blog post (there’s a link in my profile). 

Miss Maisie is part of the Miss Molly And Friends Pin Cushion Pattern in my store. Tap the photo for a link. She’s quick to stitch, lots of fun to make and comes with two other friends; Miss Molly and Miss Kitty. 

#mollyandmama #missmollypincushion #missmollyandfriends #missmaisiepincushion #felt #woolfelt #feltpincushion #applique #appliqué #appliquequilt #ispyquilt #minimasterpiecesbook #blossomheartquilts #aurifilartisan #aurifilthread #aurifilfloss #aurifloss #blanketstitch #rawedgeapplique #quiltersofinstagram #makersgonnamake
🪡✂️💗 Thank you so much for your wonderfu 🪡✂️💗 Thank you so much for your wonderfully positive response to my Serious Sewist’s Set. The pattern is now live! Visit the link in my profile to head to the store 🐝💕.

#mollyandmama #serioussewistsset #serioussewistspincushion  #felt #woolfelt  #feltapplique #appliquebee #feltbee #scissorkeeper #scissorcharm #hexies hexagons #englishpaperpiecing #epp #handstitched #slowsewing #missrosesisterviolet #rileyblakedesigns #iloverileyblake #rileyblake #roseandvioletsgardenfabrics #aurifil #aurifloss #aurifilfloss #embroideryfloss #aurifilartisan #fatquarterbundle #roseandvioletsgardenfabric
💗 Have you started the year with some English p 💗 Have you started the year with some English paper piecing? The weekly #sipteaandepp party is continuing with the lovely Larisa from @stitchingnotes and this year I’m making way for the very talented Irina from @nordiccrafter to become the new co-host. Please go and visit the profiles of these clever creatives to learn all about what 2021 holds for #sipteaandepp. The girls have some exciting plans in place and I know you’re going to love it!

This week’s theme is all about Introductions, where you’re encouraged to share a few random facts about yourself. So here’s a little about me. 

🤍 Before starting this wonderful journey into sewing, I was a primary school teacher

🤍My first degree was a bachelor of Behavioural Science / Psychology

🤍 I’ve been crafty for as long as I remember but I also love art, illustration, gardening and baking

🤍 I’m not a traditional tea drinker (which was a little strange as the co-host of #sipteaandepp 😂 

🤍 I’m inspired mostly by colour and nature. I’m drawn to anything muted, delicate, pastel, pretty, dainty and floral. Yet nothing in my home or wardrobe would give you that impression! 

With so many new followers joining me in the new year, I’d love to know more about you. And if you have any questions for me, feel free to ask! Lauren 💗
🌸💚 I’ve had lots of requests for informati 🌸💚 I’ve had lots of requests for information about pattern releases and more. The best way to stay in the loop is to sign up for the fortnightly newsletter. That way you’ll also get the new release discount code. And you’ll even get this embroidery design as a FREE PATTERN! 

It’s just a friendly space where I share previews of my current projects, a tutorial or pattern, and some of your makes for added inspiration. I’d be thrilled to have you join me. I’m also working on the next free pattern, which gives you a taste for what my projects are all about - beginner techniques with beautiful finishes, so everyone can experience sewing success! 

Head to my profile for the sign up link. There’s a new felt freebie coming soon 💗

#mollyandmama #embroidery #freeembroiderypattern #freeembroiderydesign #handembroidery #handstitched #freepattern #freeproject #floralwreath #floralwreathembroidery #flowerwreath #flowerwreathembroidery #aurifil #aurifilthread #aurifilartisan #aurifilfloss #embroideryfloss #spoolofthread #embroiderersofinstagram #embroideryhoop #embroideryhoopart #stitchersofinstagram #makersgonnamake #makersgonnashare #craftersgonnacraft #happystitching #slowstitching
Honey bees are so amazing! I really wish I wasn’ Honey bees are so amazing! I really wish I wasn’t allergic. So while we gave my father in law a hive, we keep native Australian stingless bee hives instead. And they are the friendliest little creatures. I love finding sewing inspiration from our garden 🐝💐

This scissor fob is part of the Serious Sewist’s Pin Cushion Set. Find it in the store or tap the photo for a direct link 🥰

#mollyandmama #felt #woolfelt #feltapplique #appliquebee #feltbee #scissorkeeper #scissorfob #scissorcharm #hexies hexagons #englishpaperpiecing #epp #handstitched #slowsewing #missrosesisterviolet #rileyblakedesigns #iloverileyblake #rileyblake #roseandvioletsgardenfabrics #aurifil #aurifloss #aurifilfloss #embroideryfloss #aurifilartisan #fatquarterbundle #serioussewistsset #roseandvioletsgardenfabric
Follow on Instagram
This error message is only visible to WordPress admins
© Copyright 2020 - Molly and Mama