Molly and Mama

Studio for Pretty Stitches - Inspiring ideas for Felt, Stitchery and Patchwork

  • Home
  • Start Here!
  • PATTERNS
    • PDF Pattern Shop
    • Paper Pattern Stockists
    • Pattern Corrections
  • TUTORIALS
  • Classes
  • BOOK
  • Contact

How to Back Stitch – practical tips for Hand Embroidery

January 18, 2015 By Lauren at Molly and Mama 7 Comments

How to Back Stitch by Molly and Mama

A lot of my sewing projects include hand embroidery. And the most common stitch I use is back stitch. It’s such a simple stitch to do, and it’s a great one to start with. Especially if you’re just beginning your hand stitching journey.

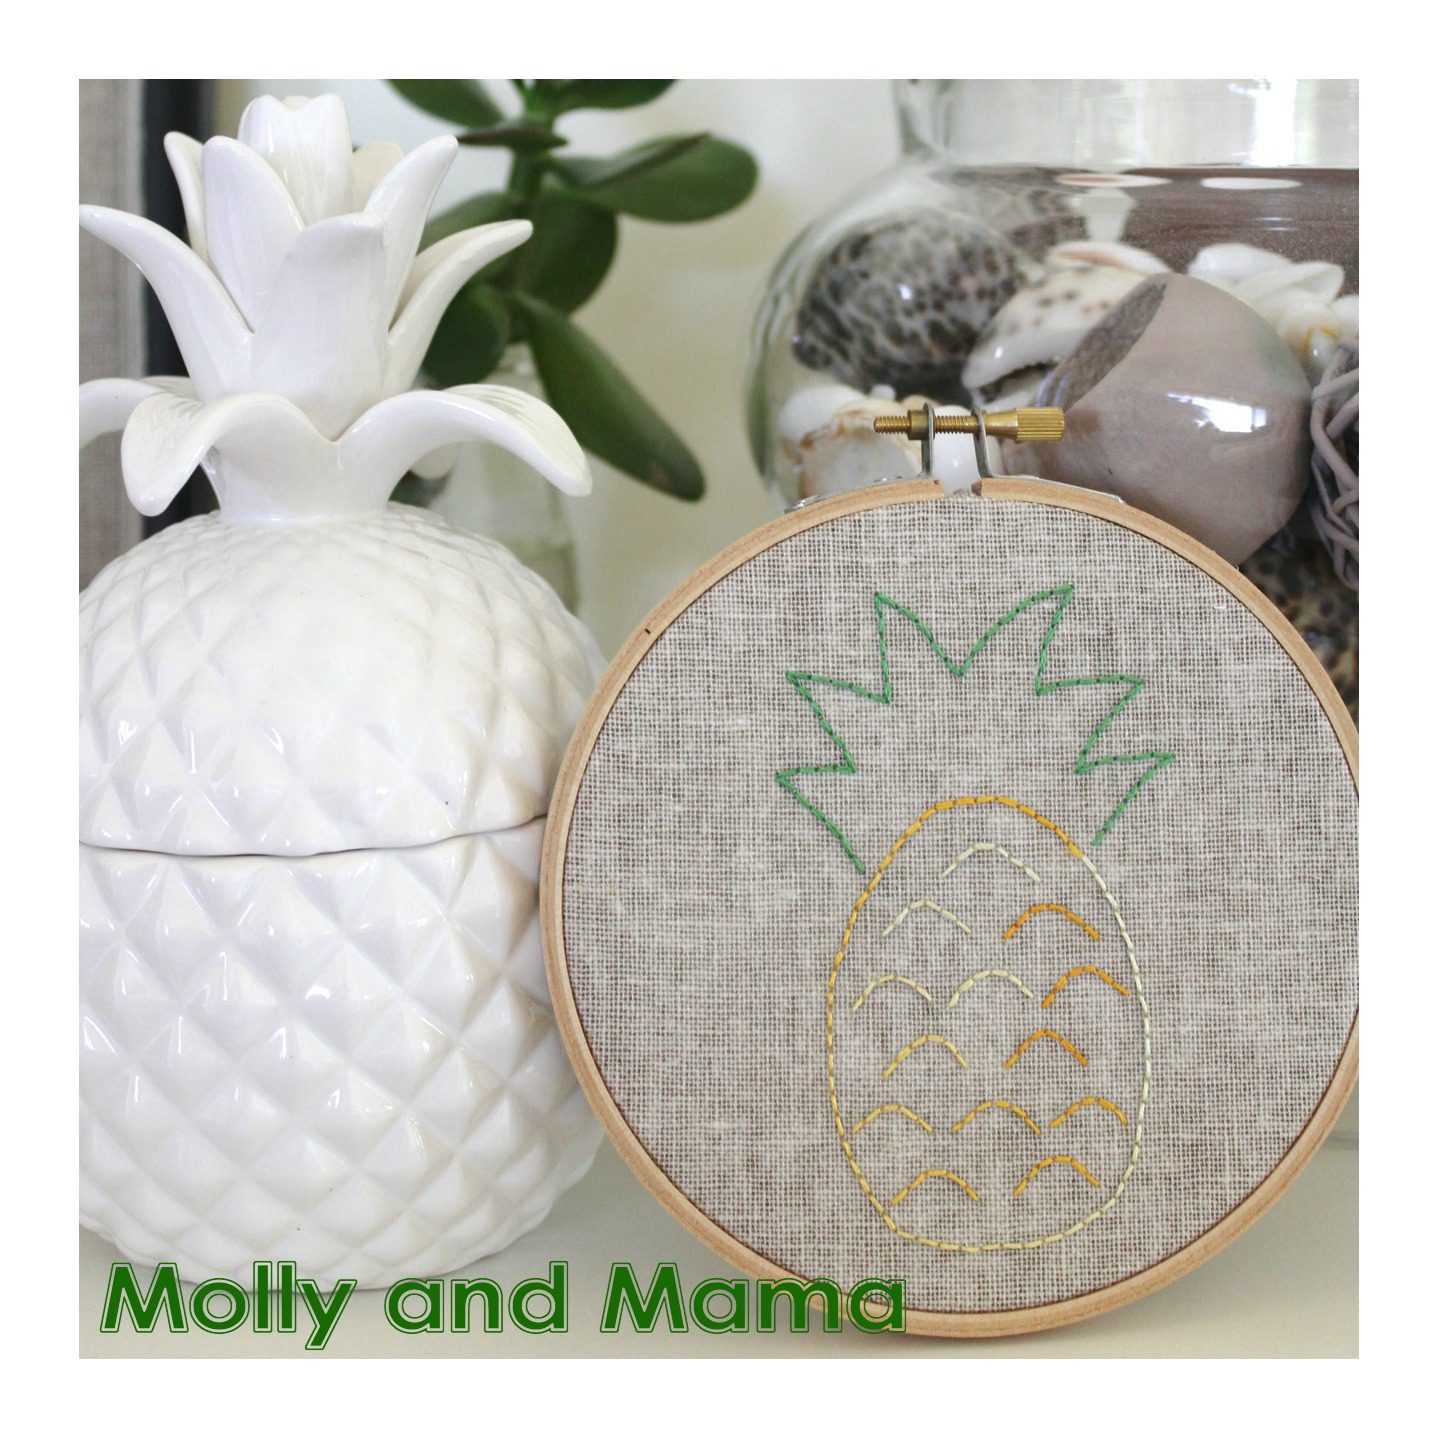
I recently stitched this lovely tropical inspired wall art. It’s created using nothing more than back stitch.

Pineapple Embroidery hoop art project by Molly and Mama

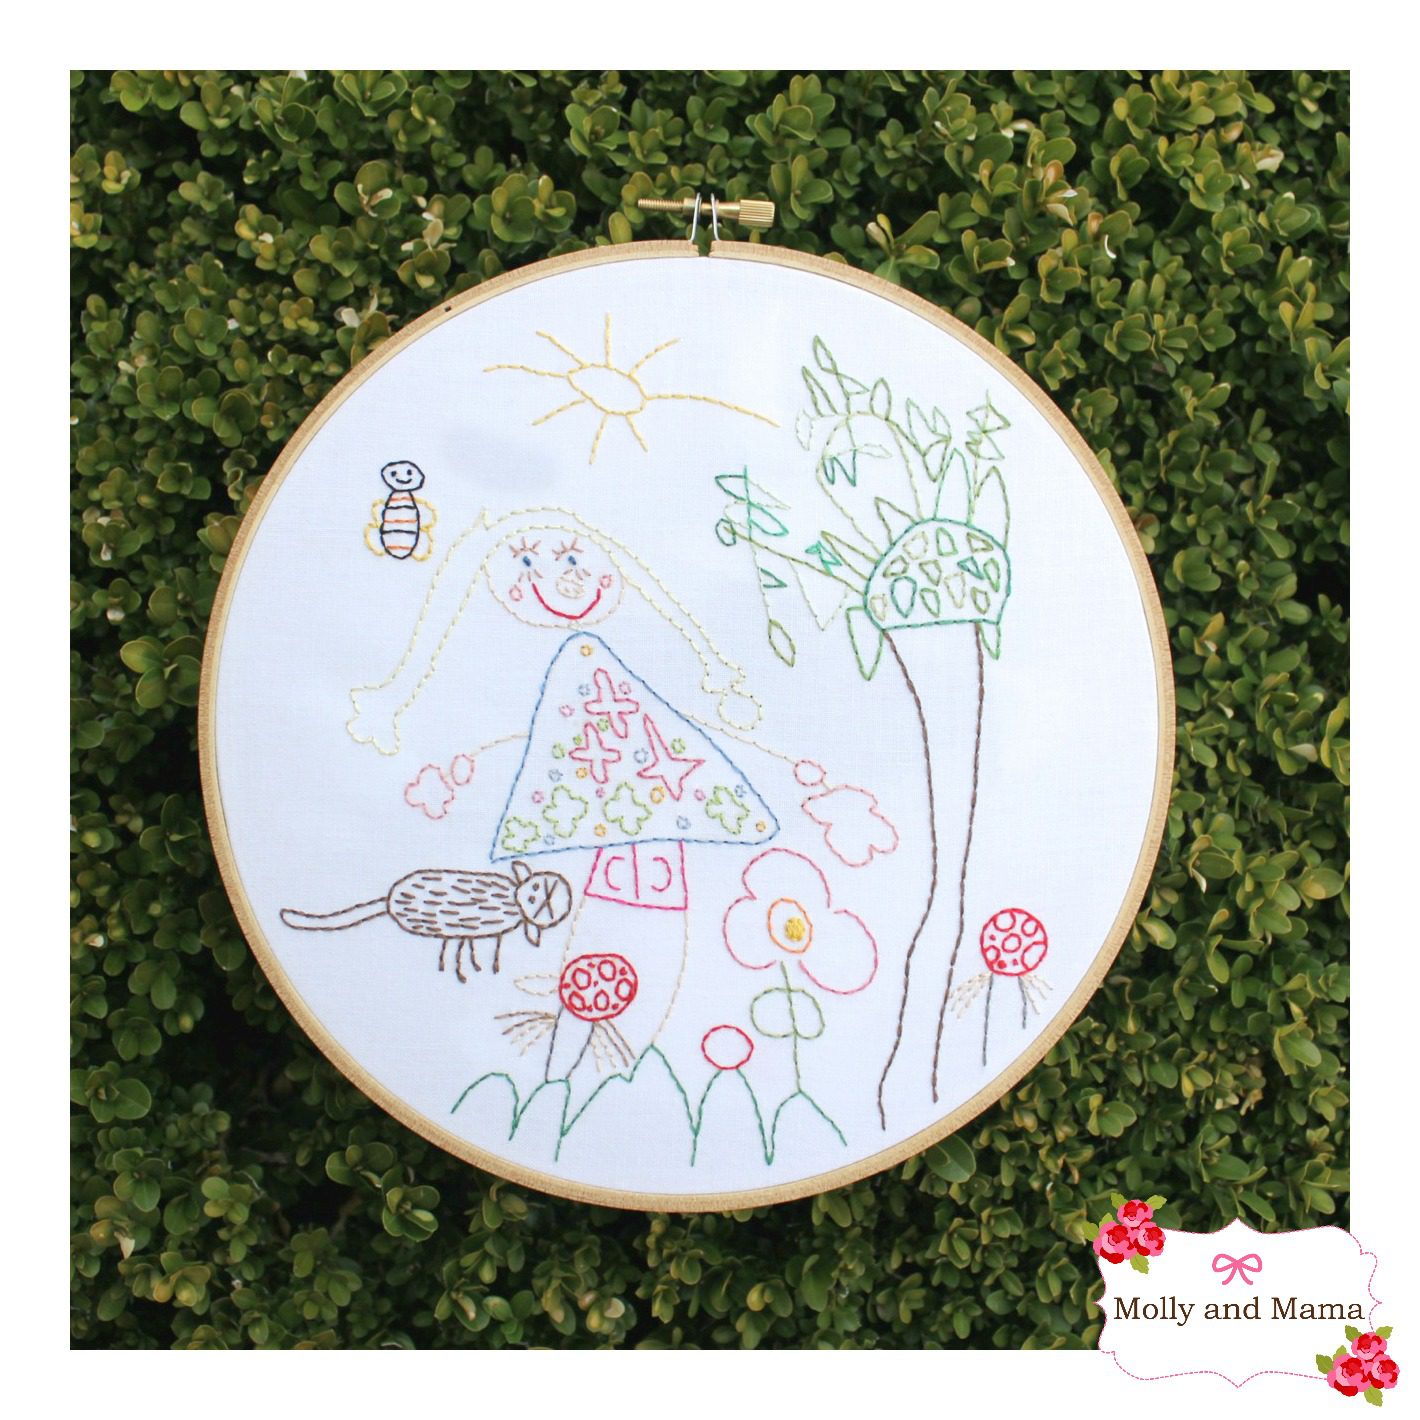
I also transformed one of my five year old daughter’s sketches into a beautiful embroidery using back stitch too! I love it!

Embroidered Children's Art by Molly and Mama

Back stitch is so easy and you can achieve such a neat and straight finish. It’s also a great alternative to machine sewing (if you ever need another option). Read on to find out how to back stitch;
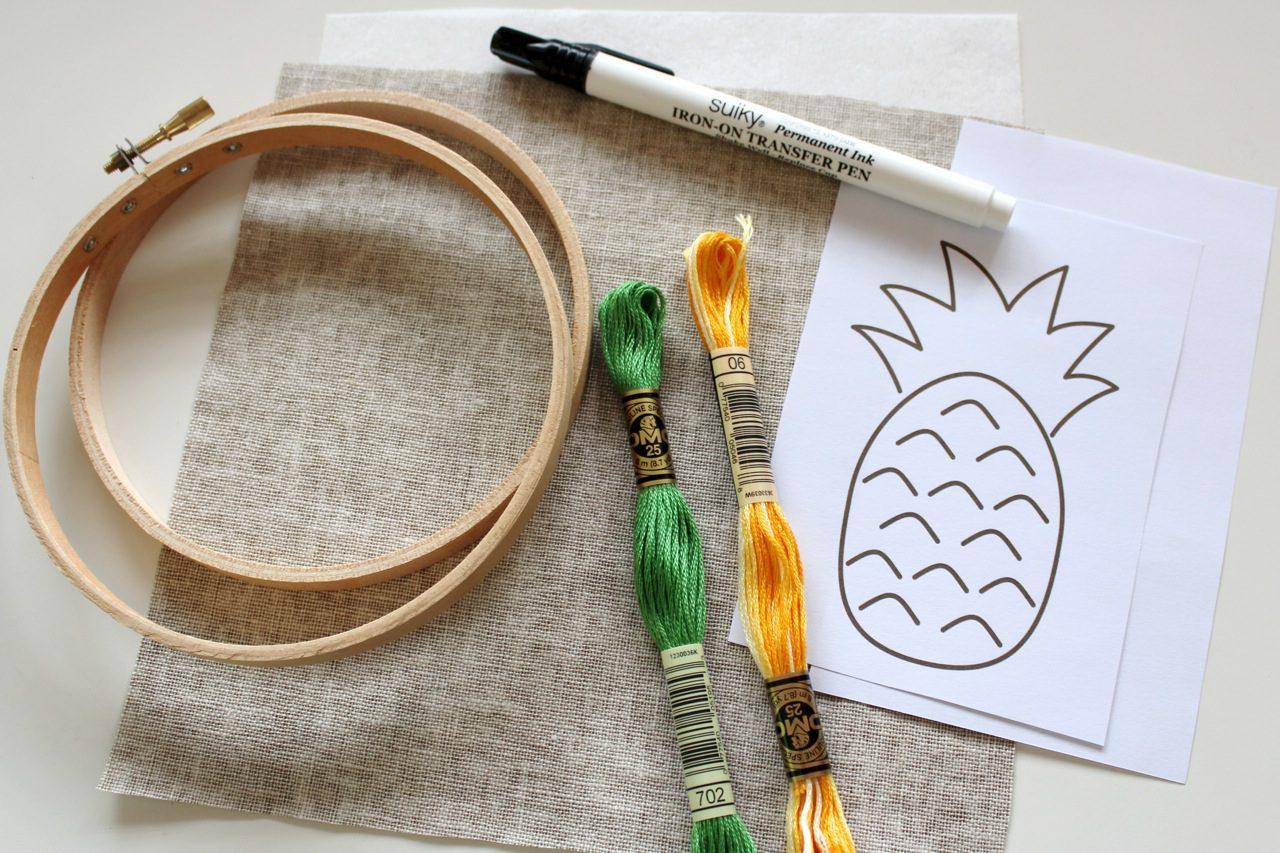
YOU WILL NEED

  • fabric to embroider
  • embroidery floss like DMC thread
  • an embroidery needle with a sharp point
  • a design to stitch and a method to transfer it to your fabric
  • an optional hoop
  • an optional fabric stiffener like iron-on interfacing

I use six stranded skeins of embroidery floss (like DMC) for hand embroidery like back stitch. Depending on your project and how thick you would like your stitching to be, you can use all six threads or you can split them up. It’s not uncommon to stitch with three strands or two strands of floss also. In this project, I split my floss skein in half so I used three threads together.

Some people like to pre-prepare their floss but I usually just cut a length of embroidery floss and then divide it as I need it.

Don’t forget to store your embroidery floss well too. It’s best to wind your floss onto individual cards that you can label with the floss type and the colour number. That way, you always know what colour you’re using and how much you have left. (But if I’m perfectly honest, I must confess to also having a little container bursting at the seams with tiny offcuts and remnants of floss. It’s just a big old jumble of thread! But it’s great when you just need a tiny bit of pink for a smile, or a scrap of brown for an eye.)

WILL YOU USE A HOOP?

Before starting your stitching, consider using an embroidery hoop. They’re inexpensive and they help keep your project flat. This means you’ll have a similar thread tension throughout your project. You’ll avoid puckering and have a neater finish. I like the adjustable wooden hoops like the one shown below. You don’t need a hoop large enough to fit your whole project. You can just keep moving them around and readjusting their position on your fabric.

Back stitching with a hoop, by Molly and Mama

PREPARE YOUR FABRIC

Prepare your fabric by ensuring it is clean, ironed flat and has the edges prepared. As the fabric edges can fray during the hand stitching process, prepare the edges by overlocking (or serging) them, taping them with masking tape or cutting them with pinking shears (my preferred method). The method you choose will also depend on what you’re using your embroidered design for.

If you’re creating a hoop art project, consider adding some weight to your fabric by adding some iron-on interfacing to the back. I did this for my pineapple embroidery project. It makes the fabric stiffer and easier to work with.

TRANSFER YOUR DESIGN

To prepare a project for stitching, transfer your design onto your fabric. Your design may be a pattern, or a print out. You may also have a pre-made iron-on transfer. You can use a light box to help you trace your design with a lead pacer pen or erasable ink pen. You can also hold it up against a window to trace. You can draw the design on thin paper, and stitch through it. You can also draw your design on paper with a fabric transfer pen and then iron your design onto your fabric. Remember if you iron your design on, it will be a mirror image of the original though.

PREPARE YOUR FLOSS

So to start, cut a length of floss and split it in half. Your length should be long enough to easily work with. If it’s too short, you’ll be rethreading your needle constantly. If it’s too long, your project will be more susceptible to knotting and tangles. 15 to 20 inches is a good starting length (38 – 50cm).

Thread the three strands onto your embroidery needle. Be sure to create a simple knot at the end and trim the excess thread past the knot (to 1/4 inch or less than 1cm).

BEFORE STITCHING

Consider where you’ll start your stitching and where you’ll finish. Try and work it so that your stitching will travel from line to line without too much overlapping and without travelling too great a distance on the back of the fabric. Will you stitch section by section or colour by colour? Take some time to consider this before you begin.

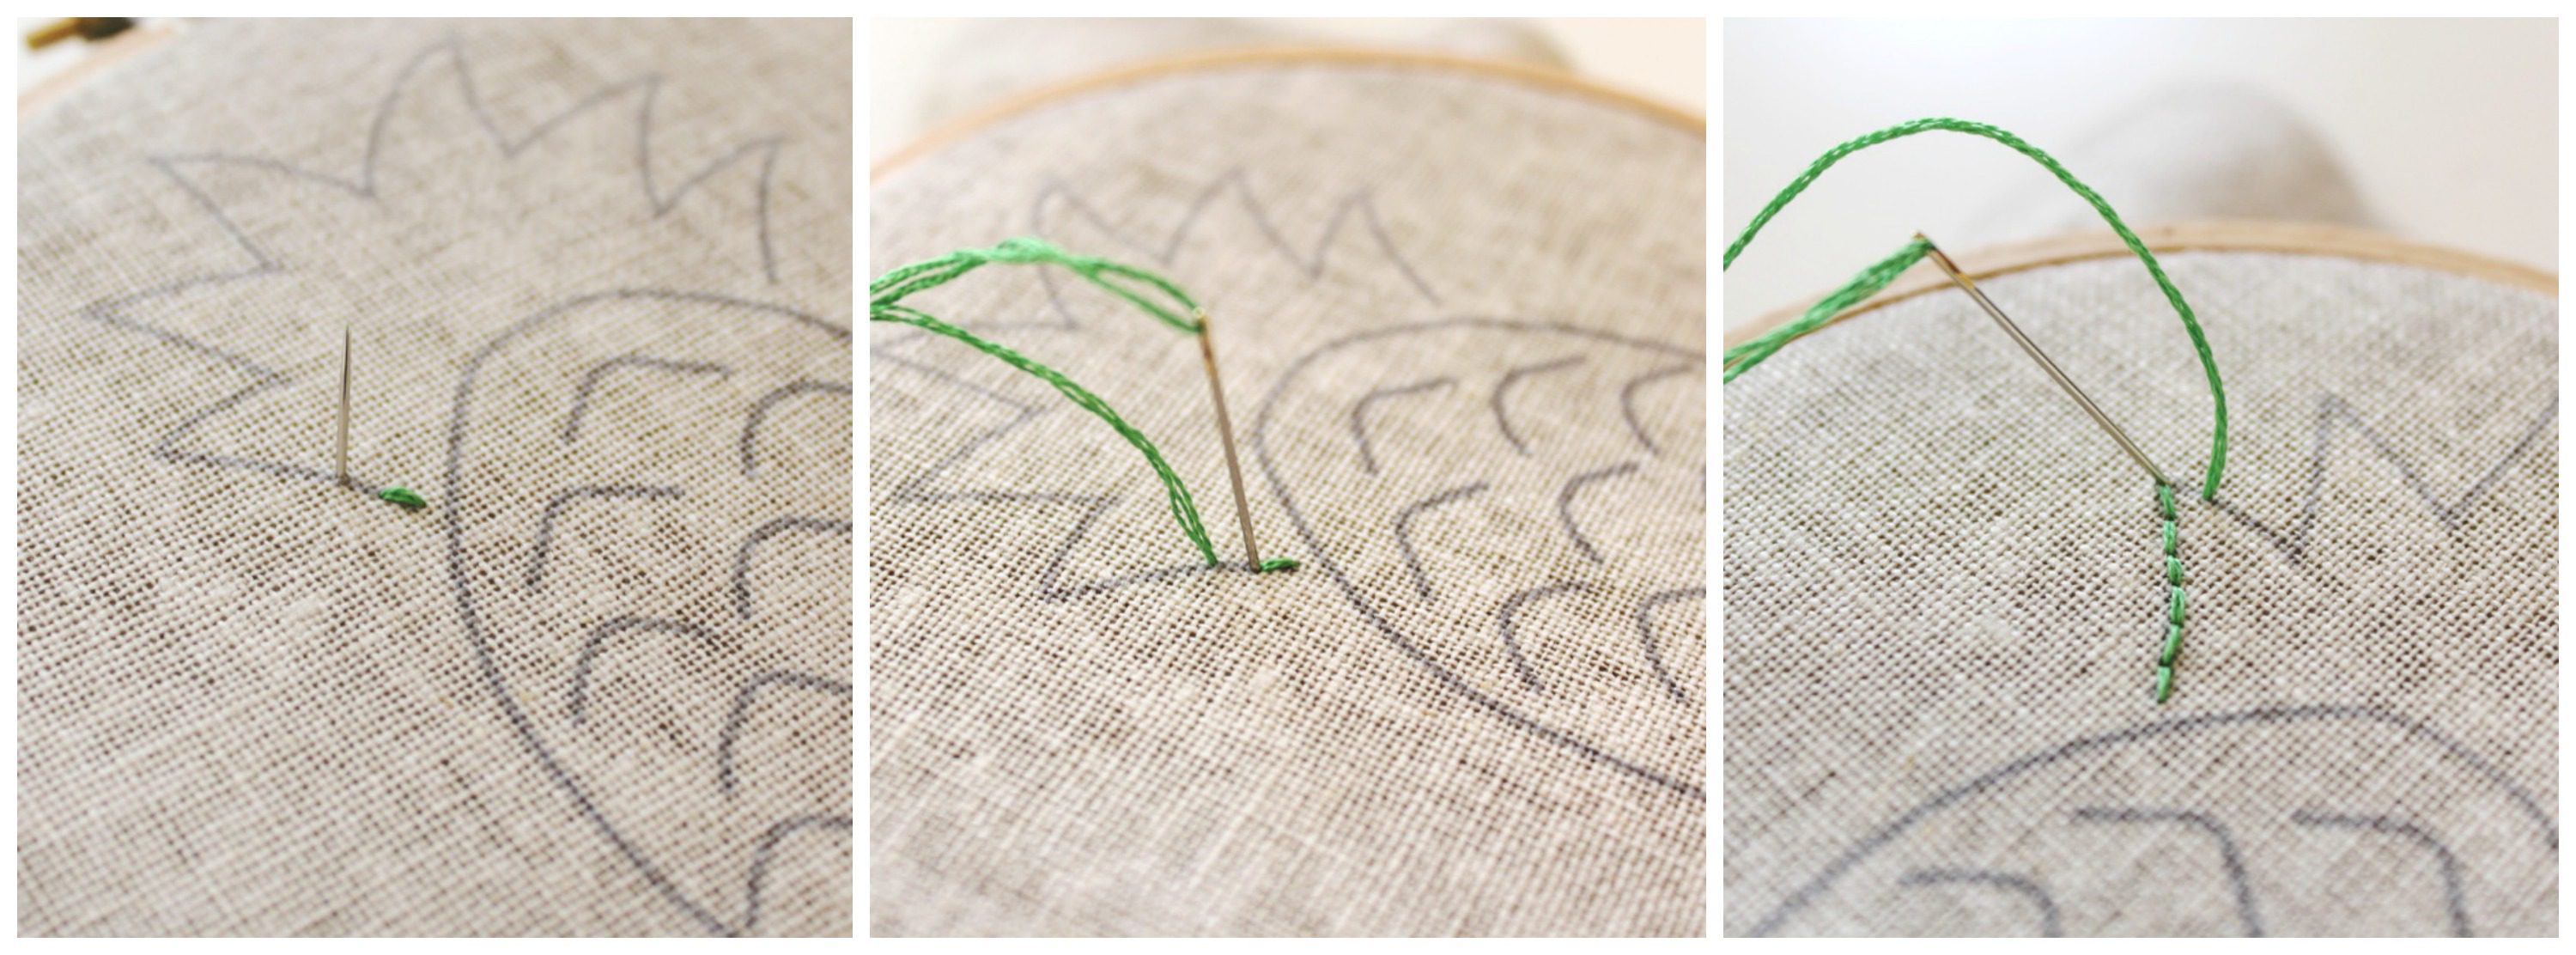
START BACK STITCHING

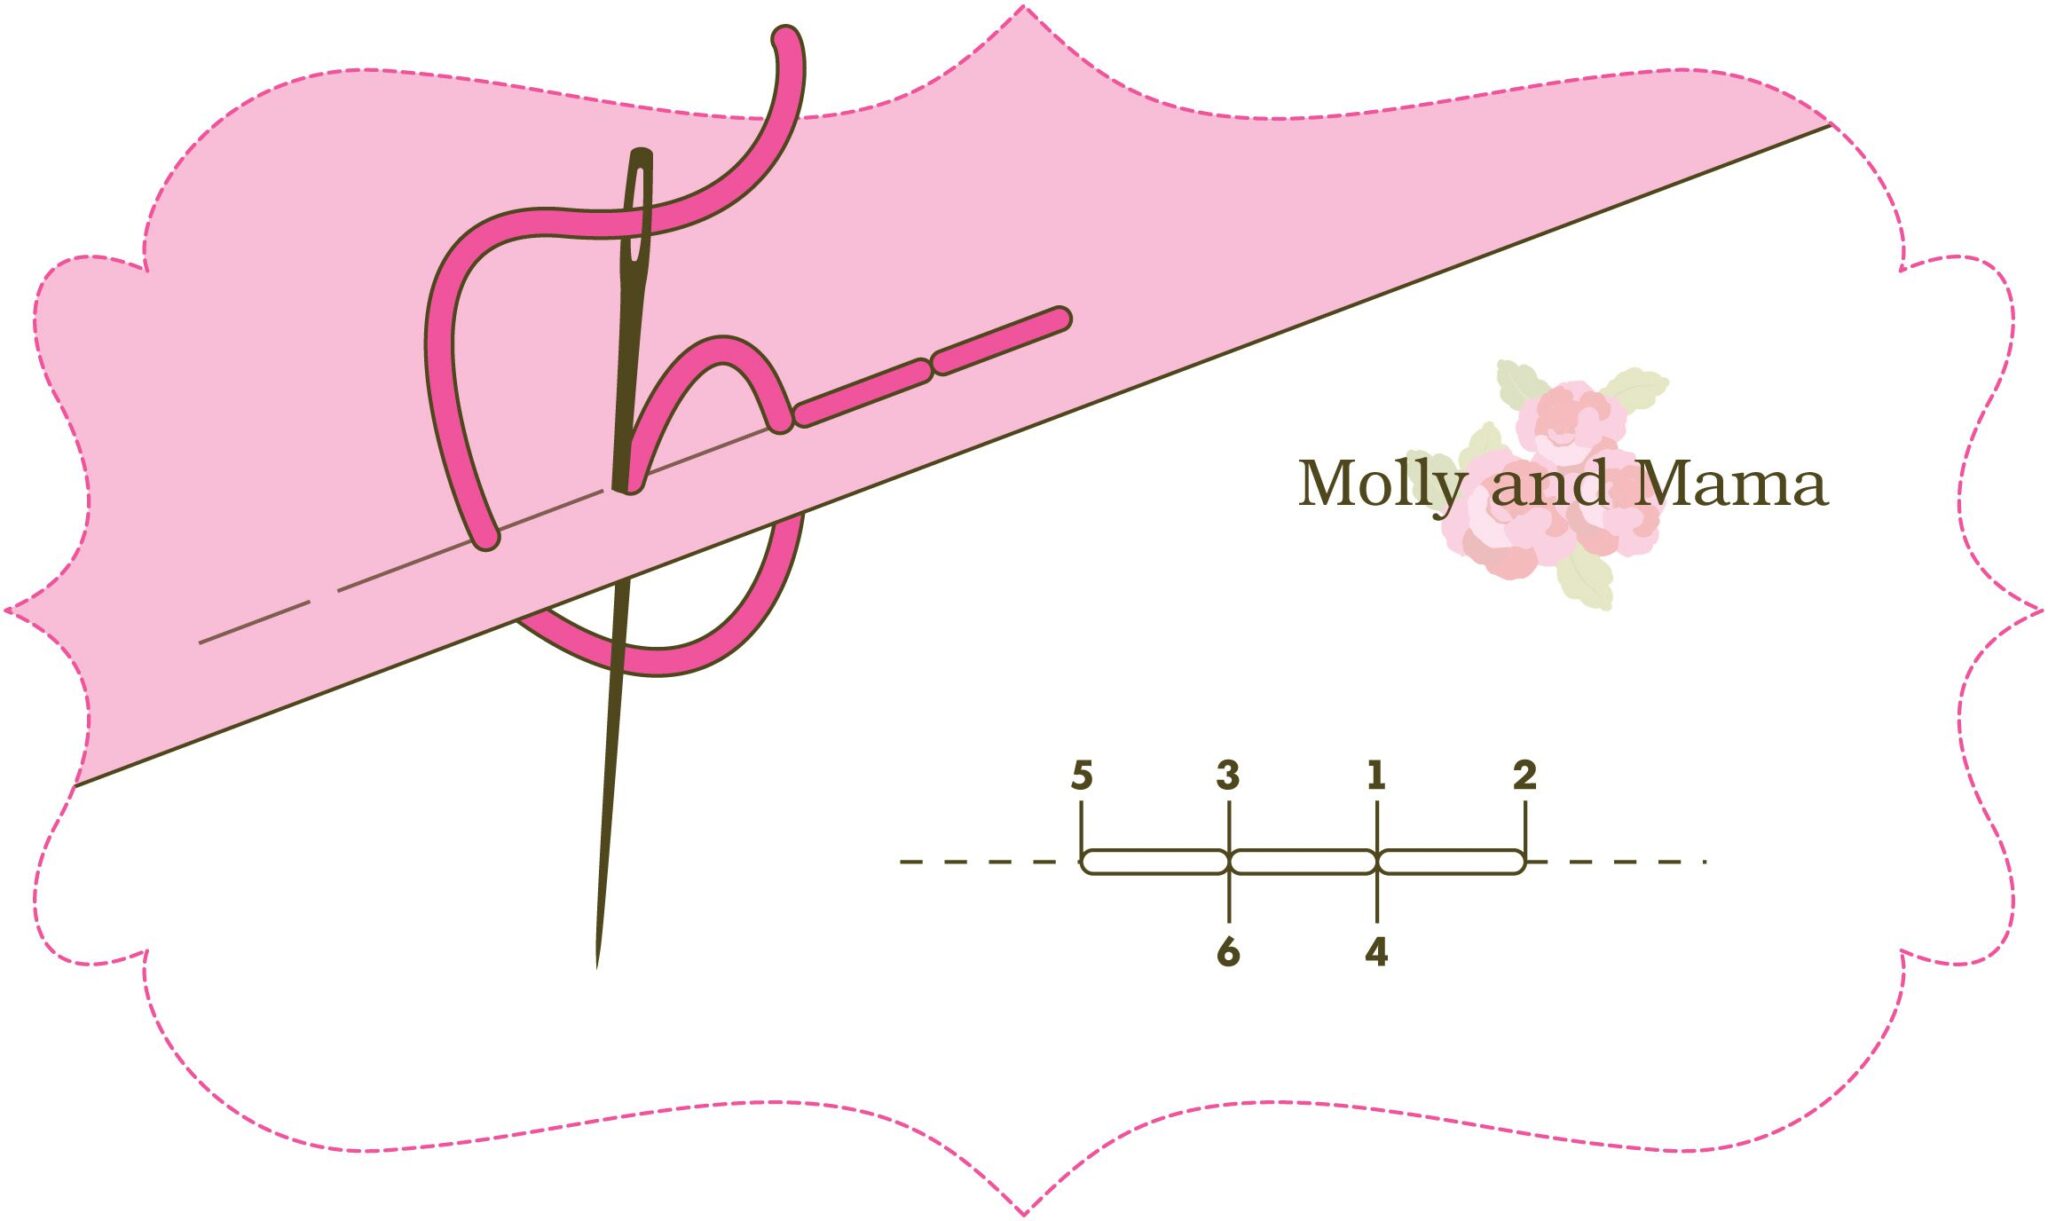
You’re ready to start. When backstitching, you’re just making a series of normal straight stitches. But you stitch them in a backward motion.

Bring the needle and thread up through the back (the wrong side) of your fabric so that the needle pops up a stitch ahead of your starting point or the beginning of your template. Stitch back to the starting point of your template. Make your stitch a 1/4 – 1/8 inch long (or a few millimetres long). This will be your first stitch.

Then bring your needle and thread up a ‘stitch space’ ahead of your last stitch. Lastly, bring the needle down through the same hole as the end of the last stitch you made. This diagram may make things a little more clear.

How to do back stitch by Molly and Mama

As you back stitch, be careful to cover the lines of your transfer as you go. Try and keep your stitches the same length. However, make adjustments as you stitch so that you don’t end up with one unusually short or long stitch at the beginning or end of a section or line.

Starting backstitch

Consider the direction of stitching before you begin each new section, so you know exactly where you’re heading and where you’re ending.

When complete, your stitching will look something like this from the front and the back;

The front and back of Back Stitch

As you finish your thread, feed the needle down into the back and be careful to catch a number of your stitches to help secure the thread (you can see this in the image above, where the yellow thread is being drawn through a number of the stitches on the back to secure the thread). Trim the excess thread away.

To start a new length of thread or to change colour, follow the previous instructions and continue stitching.

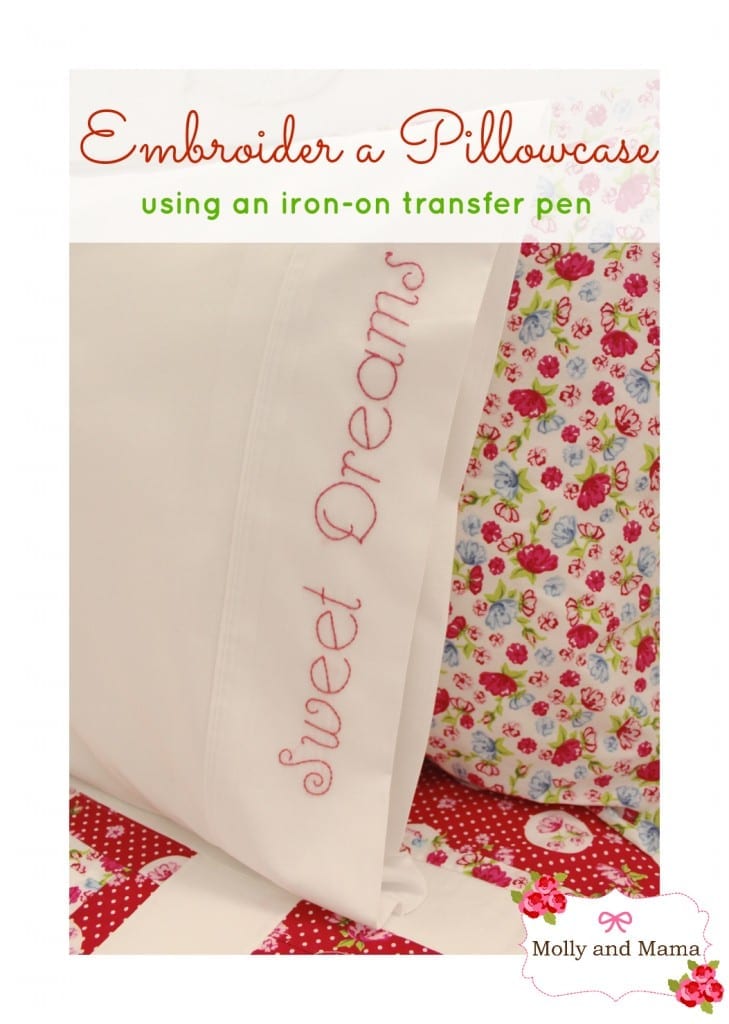
This FREE tutorial features back stitch and explains how to transfer text onto a pillowcase using an iron-on transfer pen. It also goes though the process of back stitching.
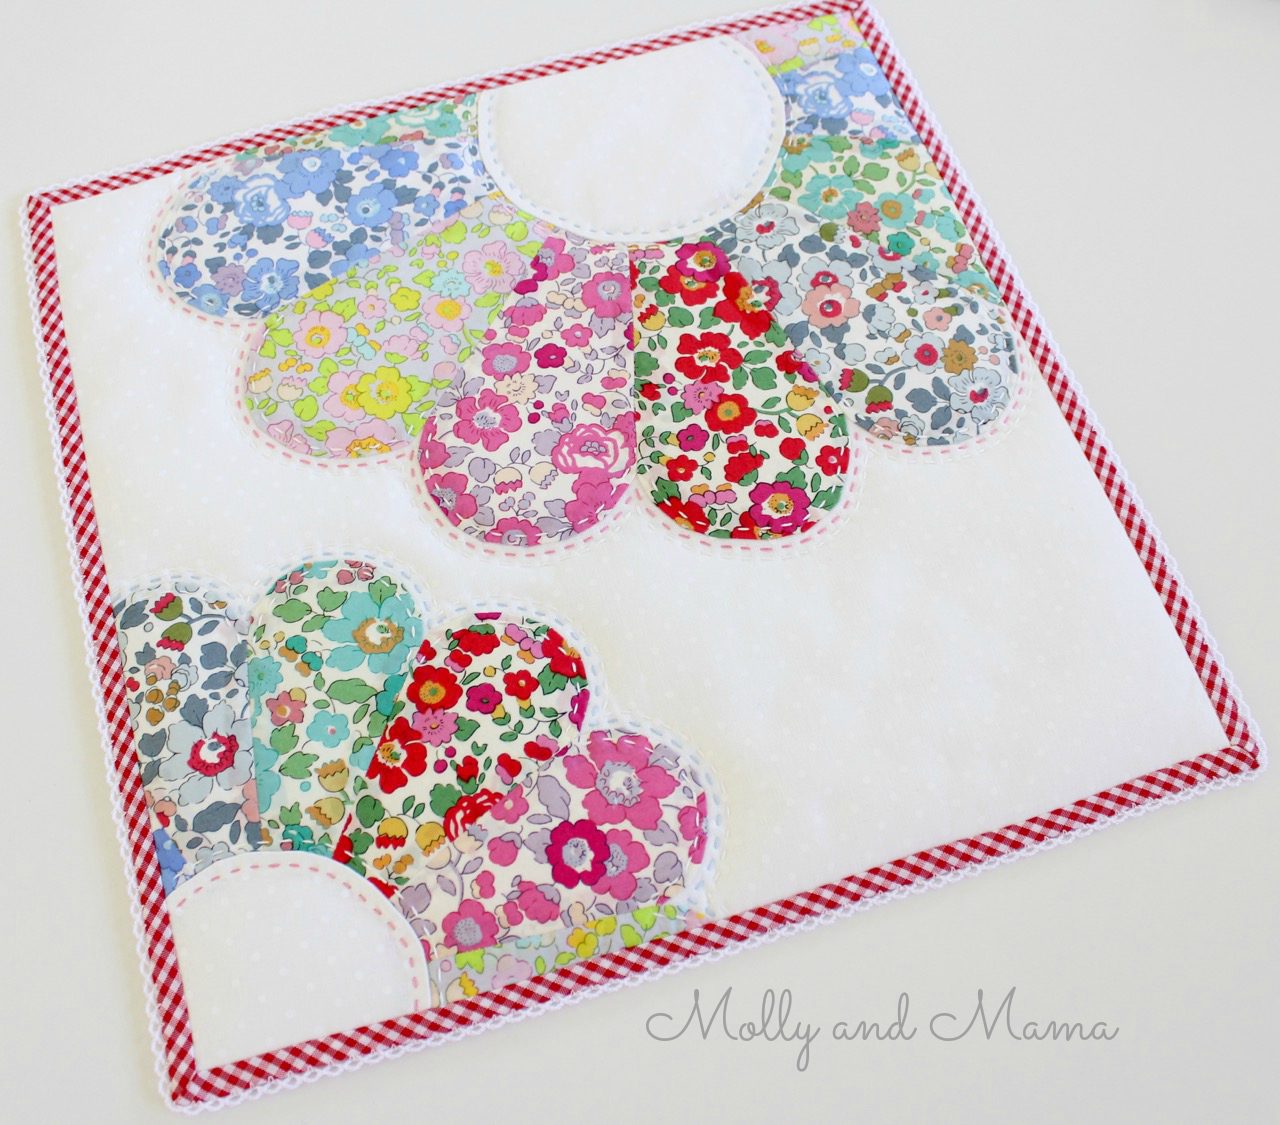
Embroider a Pillowcase with Molly and Mama


Back stitch is featured in most of my Applique Patterns too. You can browse the instant download range HERE. You can see how I’ve used it to stitch all the facial features below.

Molly and Mama Patterns .jpg

If you’re keen to create a backstitch project, you might like to use this FREE pattern I created for my Laundry Day post. You can download it HERE or Pin It for later.

'Washing Day' - a free embroidery pattern from Molly and Mama

Thanks for being here for another Molly and Mama tutorial. You may have some terrific tips and ideas so please leave a comment. Or feel free to share your thoughts, and projects over on Facebook.

Happy stitching, Lauren x

This post was written by Lauren Wright and appeared first on Molly and Mama http://www.MollyandMama.com.au

Filed Under: Projects Tagged With: back stitch, backstitch, hand embroidery, sewing, stitching

Trackbacks

  1. Swoodson Says – Making Time to Sew & Craft with Young Kids at Home says:
    April 29, 2015 at 10:33 pm

    […] my son sat in a pack and play, eating apple slices and ripping paper/fabric scraps while laughing. Check out how Lauren of Molly and Mama embroidered one of her daughter’s sketches! I also love this shot of Bethany’s daughter […]

    Reply
  2. Make a Koala Hair Clip - Molly and Mama says:
    June 5, 2015 at 2:12 pm

    […] the facial features using back stitch. For more tips on Back Stitch head over to this tutorial HERE. This image is a great refresher […]

    Reply
  3. Make a Headband Holder - Molly and Mama says:
    June 5, 2015 at 6:21 pm

    […]  This post was written by Lauren Wright of Molly and Mama http://www.MollyandMama.com.au  […]

    Reply
  4. Hand Embroider a Simple Hoop Art Project - Molly and Mama says:
    June 5, 2015 at 10:41 pm

    […] If you’re unsure how to back stitch, I have written a detailed tutorial with extra tips HERE. However, this image is a great […]

    Reply
  5. Stitch a Felt Angel Christmas Ornament - Molly and Mama says:
    November 19, 2015 at 12:45 pm

    […] Back stitch is used for the eyes and mouth. You can read more about it HERE.  […]

    Reply
  6. Sew a Felt Koala Bookmark - Molly and Mama says:
    January 23, 2016 at 12:23 pm

    […] the facial features using back stitch. For more tips on Back Stitch head over to this tutorial HERE. This image is also a great […]

    Reply
  7. Tips for working with Wool Felt - Molly and Mama says:
    May 10, 2016 at 9:46 pm

    […] You’ll need to master a few embroidery stitches if you want to give your work some personality too. But these can also be very simple. Straight stitch, back stitch and French knots are some wonderful stitch types to start with. They’re quick to master and very effective. Here’s a link to my Back Stitch tutorial. […]

    Reply

Leave a Reply Cancel reply

Your email address will not be published. Required fields are marked *

Categories

  • Christmas (37)
  • Christmas Stocking Sew Along (6)
  • Easter (10)
  • Embroidery For Beginners (6)
  • English Paper Piecing (9)
  • Felt Fun (12)
  • Forest Family Quilt Along (10)
  • Holidays (11)
  • Molly and Mama Patterns (54)
  • Pattern and Book Reviews (38)
  • Projects (40)
  • Quilting Help (3)
  • This and That (52)
  • Tutorials (49)

Cart

mollyandmama

Studio For Pretty Stitches
🧵🪡 Our fourth week of the #seworderly challe 🧵🪡 Our fourth week of the #seworderly challenge that I am cohosting with Ali from  @arabesquescissors has already begun! For our final week we’re discussing how you organise your projects for SEWING ON THE GO! This might look a little different for you at the moment (depending on where you live) but how and what do you pack to maximise sewing whilst travelling or out-and-about? 

Travel sewing kits are especially applicable for hand sewing projects like English paper piecing and embroidery (even if you’re moving from the sewing room to the couch🤣). But you may also have tips for traveling with your machine and quilt WIPs too, particularly if you have enjoyed sewing on holidays or attending retreats. 

To join the challenge, simply share a public photo showing us how you plan for sewing on the go. Tag us and use the #seworderly hashtag so others can find you. We’re thrilled to see the generosity with which you’re sharing ideas, tips and more! 

Your post will put you in the running to win this gorgeous bundle of three PDF ‘Cathedral Window’ patterns from @arabesquescissors. So cute, right? Please see Ali’s prize post for more information. And don’t forget that we’ll also be selecting a Grand Prize Winner at the end of the month. Good luck everyone! 💗
🧵🪡 Week 3 of the #SewOrderly challenge with 🧵🪡 Week 3 of the #SewOrderly challenge with me and Ali from @arabesquescissors has come to an end. For the past week you’ve been sharing your tips and tricks for storing and organising your Work In Progress (WIP) projects and we’ve been loving reading all the suggestions and seeing all of your photos. 

We’ve selected @kirsty_sews and @mtnlaurel96 as our winners of the Molly and Mama Pattern pack including the #SimpleSewingFolder, #SummerRosePouch and #MissMollyandFriends. Congratulations ladies! 

I’m looking forward to putting together a blog post with some of the fantastic ideas that have been shared this week. Here’s a couple of my favourites. 

-	Small square pastry or cake containers work well for storing WIPs, as do scrapbooking shelves and containers. 
-	If a WIP is something you’d like to work on more, put it somewhere that you’re likely to see, so you’re more likely to pick it up and get some stitching done! 
-	Label each box or tub with the name of the project, the date it was started, the fabrics used, and any other relevant information you want to keep at hand. 
-	@amandalovestocreate shared a terrific tip of adding an adhesive photo of the project to the label! I love that idea!
-	Make a note in your diary or set an alarm on your phone to remind you to check in with your WIPs and their progress. This might give you a much needed push to get stuck into a project you may have otherwise forgotten about.
-	Find a likeminded maker and ask them to become your Accountability Partner so you can periodically check in with each other and give yourselves a gentle nudge to make some progress on your WIPS! 

If you have more ideas, we’d still love to hear them. Ali has put together a great round up of ideas on her blog too. 

Stay tuned as we now share more information about our fourth and final week, with Sewing on the go! 

#mollyandmama #arabesquescissors #seworderly #sewsorted #seworganised #seworganized #sewingroom #craftroom  #craftroomorganization #quiltstorage #quilting #sewingwips
Did you see my posts over at @aurifilthread this w Did you see my posts over at @aurifilthread this weekend? I did an Instagram takeover which was heaps of fun! Pop over to see what I shared. One of the posts included my Top 5 Tips for Embroidery Success, and I thought it was silly of me not to share those tips here too! But really, these tips apply to all sewing. They’re simple but true! 

1.	Choose the right tool for the job. You don’t need to spend a lot of money, but using a needle you can easily thread with the right type of thread for the job, can make all the difference to your experience. 

2.	Start simple. As a beginner, starting a large and intricate design might become overwhelming if only because of the amount of time it will take to complete. Start with a smaller design and move on to more detailed projects as your skills progress. 

3.	Get help from the experts. Watch You Tube videos, read blog posts, enrol in online courses. Over time you’ll develop a whole new skill set that you’ll be able to pass on to someone one day too. 

4.	Don’t rush. It’s not a race, and embroidery is all about slow stitching. 

5.	Leave out your embroidery so you’re more likely to pick it up and continue stitching when you have a spare moment. The more you stitch, the better you’ll become. And it’s a wonderful mindfulness activity! 

#mollyandmama #mollyandmamastitchlibrary #prettystitchesclub #aurifil #aurifilfloss #aurifilthread #embroideryfloss #embroidery #embroiderythread #embroiderytips #embroiderersofinstagram #sewingtips #stitching #handstitching #handsewing #stitchingtips #slowsewing #slowstitching
One of the sewing patterns up for grabs in this we One of the sewing patterns up for grabs in this week’s prize pack for the #SewOrderly challenge is my Simple Sewing Folder. So I just wanted to show you a little more about this pattern in my store. 

Featuring a hand embroidered front panel, little hexie details, and simple patchwork, the cover is all about showcasing the ‘pretty’. 

Open it up (swipe to see) and it’s all about the practical! There’s a lace zipper pocket, tabs for tools, a wool felt needle and pin minder, a thread holder and spaces for hoop storage. 

This folder is perfect for storing ‘work in progress’ projects - the focus of this week’s theme for our sewing room organisation challenge, hosted by me and @arabesquescissors. 

If you’d like to know more, there are links in my profile to my store and my blog. I’d love you to get involved! 

#mollyandmama #seworderly #simplesewingfolder #embroidery #embroiderydesign #sewingfolder #projectfolder #sewingroomstorage #sewingspace #notionstorage #sewingonthego #hexies #hexagons #quilting #quiltedpouch #sewingpouch #tildateatowel
I don’t show my face on here anywhere near as of I don’t show my face on here anywhere near as often as I should. And it’s funny because you’ll have a picture of someone in your head and they often don’t look anything like what you imagine. So for what it is worth, this is me, Lauren. I wanted to say hi and share a bit more about me, as there’s so many new faces here lately. Thank you so much for joining us! 

Here’s 5 facts about me;

1️⃣ My first degree was in Behavioural Science, but I used my second degree in Education to become a primary school teacher. 

2️⃣ After having our two kids, we decided I’d work from home and I’ve been sewing, blogging and designing ever since! 

3️⃣ My maternal grandmother’s name was Molly and my kids call my mum ‘Mama’. I named my business after Molly and Mama in honour of the skills, lessons and traits they passed down to me. I’m so blessed to be able to  share that love of creative expression with all of you! 

4️⃣ My favourite colour is pink. Big surprise there 😂! And I have a love for all things pretty and sweet. 

5️⃣ I love drawing and illustrating and hope to bring more of that to my work in the future! 

I’d love to meet more of you and hear where you are from. Feel free to leave me a reply.  Thanks for your support and encouragement of my little biz. It means the world to me! Lauren 💗
🌼🌸🪡There’s something new and very excit 🌼🌸🪡There’s something new and very exciting coming to Molly and Mama soon! Are you subscribed to the newsletter? Find a link to join in my profile, so you can stay tuned for the release of the ‘Pretty Stitches Club’. It’s all about sharing my love of embroidery, slow sewing and beautiful stitchery🪡🌸🌼

#mollyandmama #prettystitchesclub #studioforprettystitches #embroidery #embroideryclub #stitcheryclub #sewingclub #sewingsubscription #embroiderypatterns #monthlyembroideryclub #handstitching #slowsewing #aurifilthread #aurifilfloss #aurifilartisan #aurifloss #tinystitches #floralembroidery #embroiderywreath
Our Week Three prize pack for the #seworderly chal Our Week Three prize pack for the #seworderly challenge with @arabesquescissors includes three of my @mollyandmama  PDF sewing patterns; the #SimpleSewingFolder, the #SummerRosePouch and the #MissMollyAndFriends pin cushion pattern. 

 Ali and I will each select a winner on Monday, 22nd February, 2021.

To enter, post a photo or video on your public profile showcasing how you store your projects and quilts as you’re working on them or even when they are completed. Tag @mollyandmama and @arabesquescissors and use the #seworderly hashtag so others can find you. 

T&Cs
- the giveaway is open worldwide to participants 18 years and over, with a public Instagram profile, and who post in alignment with the guidelines outlined above. 
- Entries will close at 11.59pm AEST on Sunday, 21th Feb 2021. 
- The two winners will be announced here on Monday, 22nd Feb, 2021 and will need to provide an email address to receive their prize. 
- This giveaway is in no way associated with, sponsored by or endorsed by Instagram. 

Thanks so much for sharing the #seworderly love! And you can find out more about these patterns in the store - there’s a link in my profile. The Simple Sewing Folder is a fantastic project folder for embroidery or EPP storage, perfect for WIPs. How do you store your ‘work in progress’ projects and quilts?
Have you been participating in the #seworderly cha Have you been participating in the #seworderly challenge with me and Ali from @arabesquescissors? We’re sorting our sewing rooms for the month of February and have already tackled NOTIONS and FABRIC. 

This week we’re exploring how to store and organise our completed QUILTS AND PROJECTS and those we’re still working on (WIPs). Would you like to join us? There’ll be a sweet @mollyandmama prize pack up for grabs, but more importantly, you’ll be having fun sorting your sewing space knowing that there are likeminded friends joining you! 

Share a photo of your quilt and project storage, tag @mollyandmama and @arabesquescissors, use the hashtag #seworderly, ask questions or share tips and advice. We’d love you to join us! 

#mollyandmama #arabesquescissors #sewsorted #seworganised #seworganized #fabricbundle #sewingroom #craftroom #quilts #craftroomorganization #quiltstorage #quilting #quiltfolding #serioussewistsset #beeapplique #libertyfabric #libertytanalawn #epp #englishpaperpiecing #libertywiltshire
Ali from @arabesquescissors and I are wrapping up Ali from @arabesquescissors and I are wrapping up week 2 of our #seworderly challenge. This week has been a HUGE one, where we’ve focussed on FABRIC STORAGE. We’ve been overwhelmed by the number of you who have wholeheartedly jumped onboard and unreservedly shared your sewing spaces and craft rooms. So thank you and congratulations on the success you have achieved this week; from tidying just a small stash, a basket or a drawer, to refolding and sorting all the fabrics in your entire room! 

So many of you have tackled your yardage, pre-cuts, scraps, fusibles, interfacings, batting and more! And you’ve been so generous with your tips and ideas. So thank you! I’m sure those of you who are yet to tackle your stash will get a lot of inspiration from heading to the #seworderly hashtag! 

We can’t always keep our fabrics in pretty little arrangements like my first photo of Liberty here. So swipe to see my second photo – a more realistic view, taken from the inside of one of my newly organised Billy bookshelves from Ikea. I like to keep my fabrics folded, in plastic tubs, behind solid cupboard doors, so I can avoid sun damage and reduce the effects of dust, pests and moisture. They’re organised by type and size (so yardage, fat quarters, smaller pre-cuts and scraps are generally all separated), then by colour or their use. How do you organise yours? 

I’ll be compiling all the tips and tricks I learned from my own experiences and from reading all of your posts, into a blog post really soon. So stay tuned for that. 

And Ali and I have both chosen a winner for the @arabesquescissors pattern prize pack for this week. Please see Ali’s post to see if it’s you! Thank you so much to all who participated. We’re looking forward to kicking off Week 3 shortly. Let’s explore PROJECTS & QUILTS. Please join us (find out more about the #seworderly challenge on the blog, using the link in my profile). 

Happy sorting, Lauren x 

#mollyandmama #arabesquescissors #sewsorted #seworganised #seworganized #stashbusting #stashstorage #fabricstorage #fabricsorting #fabricstash #libertytanalawn #libertyfabrics #libertybundle #fabricbundle #fabriccontainers #sewingroom #craftroom
Load More… Follow on Instagram
© Copyright 2020 - Molly and Mama