Molly and Mama

Studio for Pretty Stitches - Inspiring ideas for Felt, Stitchery and Patchwork

  • Home
  • Start Here!
  • PATTERNS
    • PDF Pattern Shop
    • Paper Pattern Stockists
    • Pattern Corrections
  • TUTORIALS
  • Classes
  • BOOK
  • Contact

Week 2 – Forest Family Quilt Along

October 8, 2020 By Lauren at Molly and Mama Leave a Comment

It’s the second week of the Forest Family Quilt Along and I’m excited to get stuck into fabric fusing and cutting! In case you missed it, visit this link for the overview of the Quilt Along.

Last week was all about gathering supplies and getting ready to begin. We discussed fabric selection and inspiration. We traced our shapes onto fusible appliqué web and cut them out, ready to iron onto fabric.

This week we’re starting with the instructions shown in the pattern. I don’t like wasting a lot of fabric (or buying unnecessary amounts) and I’m sure you feel the same way. So following the instructions listed in the pattern is crucial for getting the best out of your supplies.

You might like to use the Cutting Guide to prepare your white fabric for the blocks, corners and binding. You can also prepare your print fabric for the scalloped borders and patchwork borders too. Then it’s time to start the appliqué process!

Appliqué Tips

I find raw edge appliqué fun and easy. But there’s some tips you can follow that can definitely help with the process. If you haven’t tried it before, you might like to check out my Beginner’s Guide to Appliqué which takes you through the basics from the very beginning.

But as a refresher, here’s some tips that are particularly relevant to this project that will help you achieve the best results;

  • Carefully follow the manufacturer’s instructions that come with your fusible webbing, including the temperature and steam settings to use on your iron.
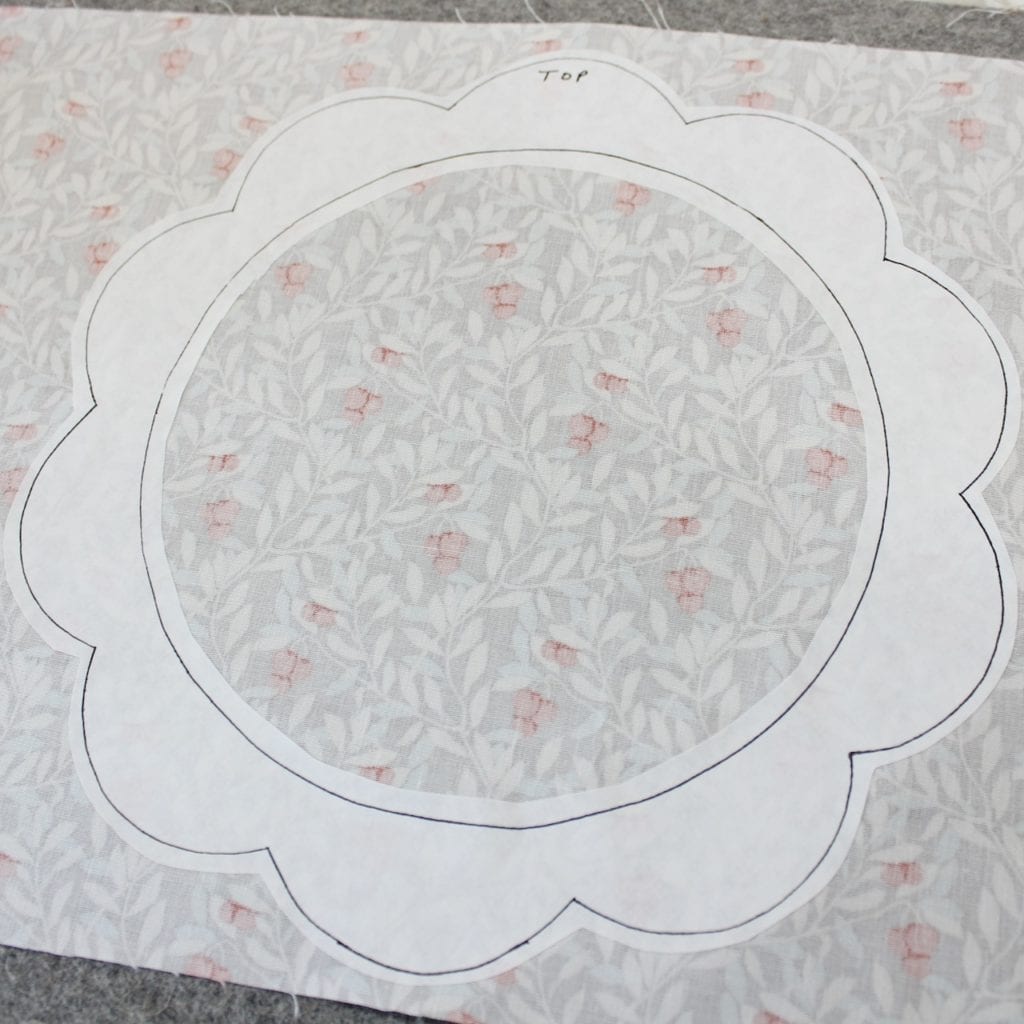
  • When fusing shapes to fabric, think about the fabric direction. Ensure that if floral prints are directional, the scalloped borders are fused so that the TOP you labelled on the template is at the top of the fabric (so the print pattern or details won’t appear upside down). This also applies to the torso or body shapes.
  • Always try and work with the fabric grain, fusing shapes so that the grain runs horizontally and vertically (with the warp and weft of the fabric) and not on the bias or diagonal. This ensures that your appliqué animal blocks will look uniform as the shapes are less likely to warp when stitched.
  • Consider the fabric colours you are using and if light coloured fabrics will be fused over darker fabrics. Colours can show through, so use shades that are not too starkly contrasted.
  • Use paper scissors to roughly cut out your shapes before fusing.
  • Use sewing scissors (but maybe not your best ones!) to cut out the fabric shapes on the line, after fusing. This will give a clean crisp cut to the fabric edge. I find it easier to use smaller scissors for cutting all my shapes. This helps with manoeuvrability and accuracy.
  • Press straight down with the iron to secure the fusible webbing to the fabric, instead of sliding the iron along the fabric. This ensures the webbing doesn’t move out of place.

I started the appliqué process by fusing all the scalloped border templates to the wrong side of my chosen print fabrics.

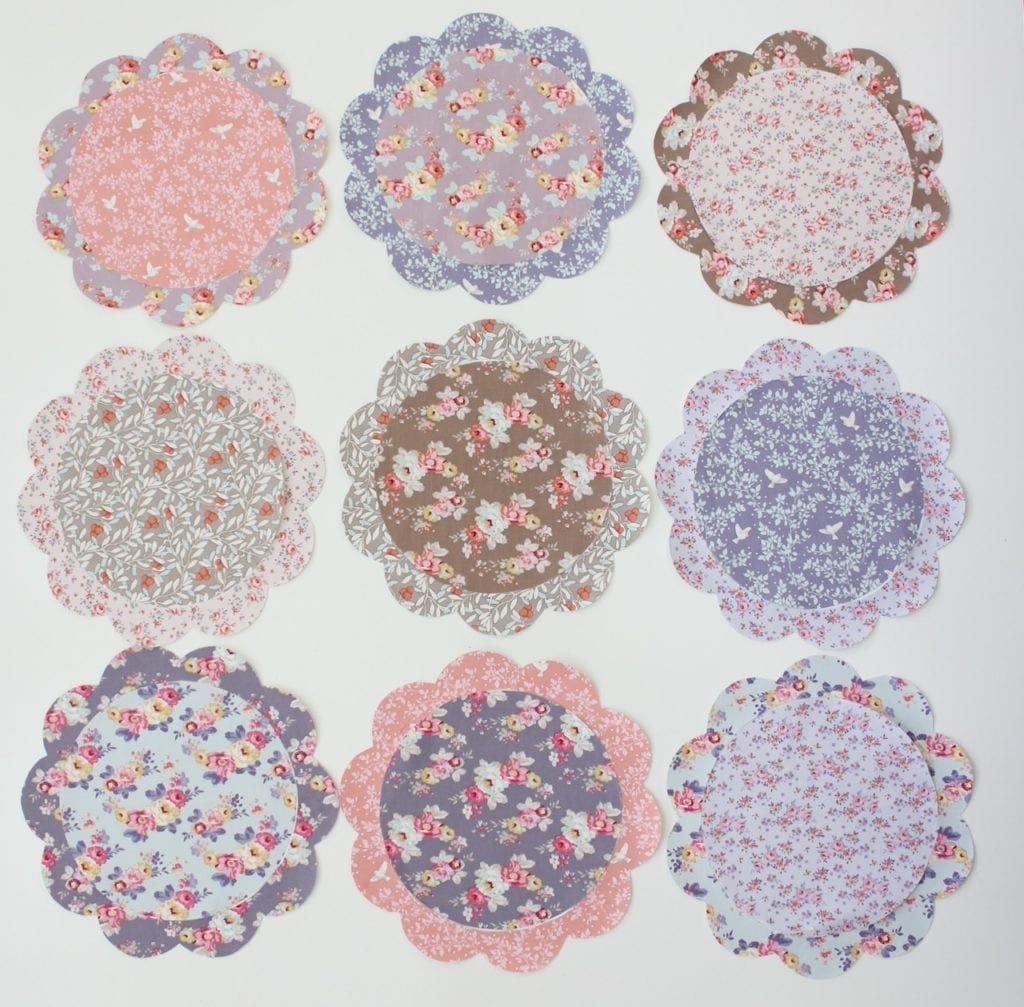
Here’s the nine different fabric borders that have been fused and cut out on the line.

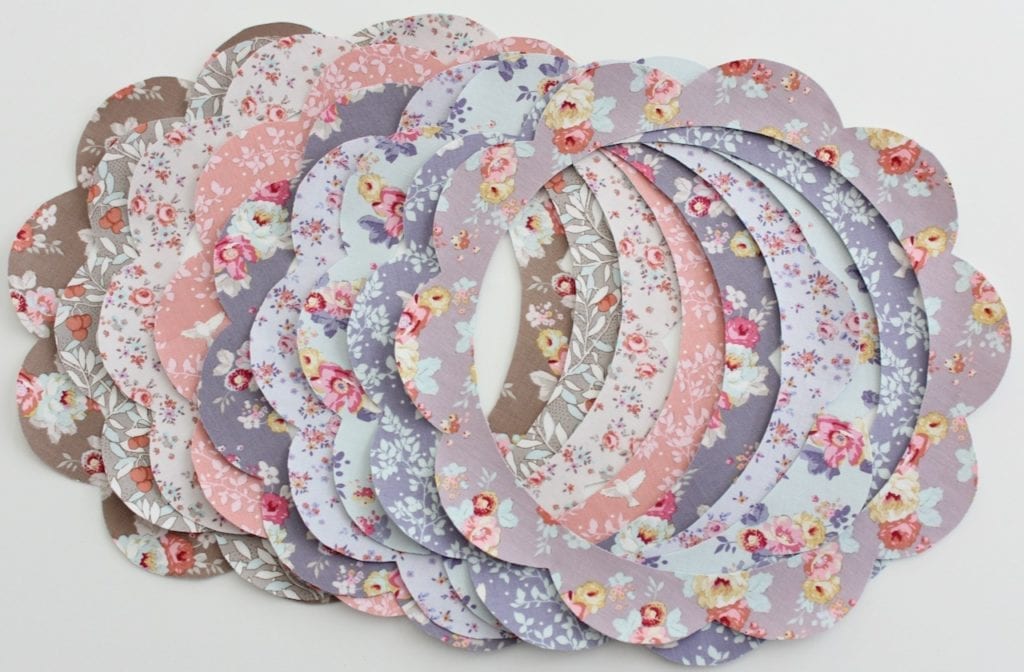
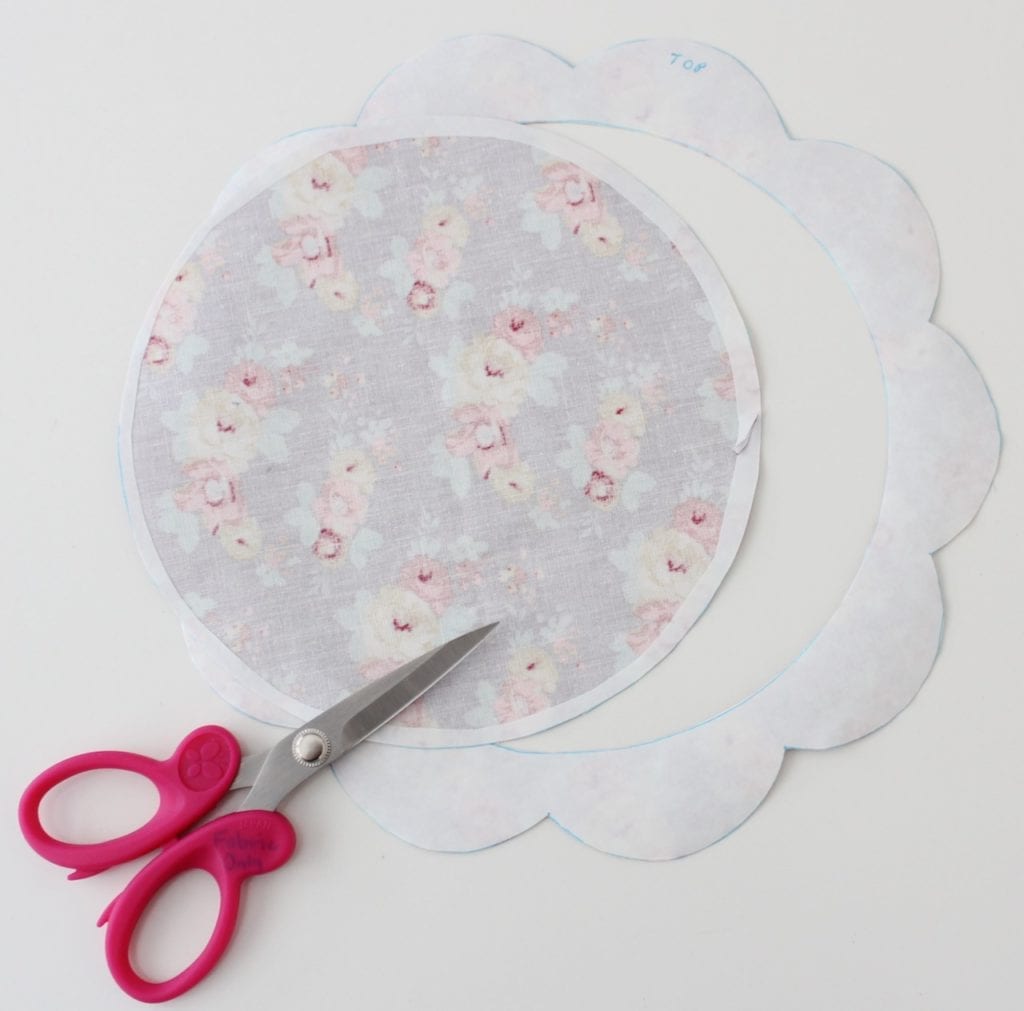
I’ll keep the paper backing intact until I’m ready for fusing to the background fabric. And I’ll keep the centre circles for the torso shapes.

Note my smaller scissors for fabric cutting. These are from Sewline.

Next I worked on the face shapes. Using the instructions in the pattern, I fused all the cream fabric shapes first, and then worked my way down the list of fabric colours and corresponding shapes. I removed the shapes needed from each ‘Animal’ bag and then replaced them after they were fused. Once all the face fabrics were fused, I took each bag, removed the contents and cut out all the shapes on the line (again keeping the backing paper intact).

The back of the fused Fox shapes, cut out on the line.
The front of the fused Fox shapes, cut out on the line (with the torso still to be decided).

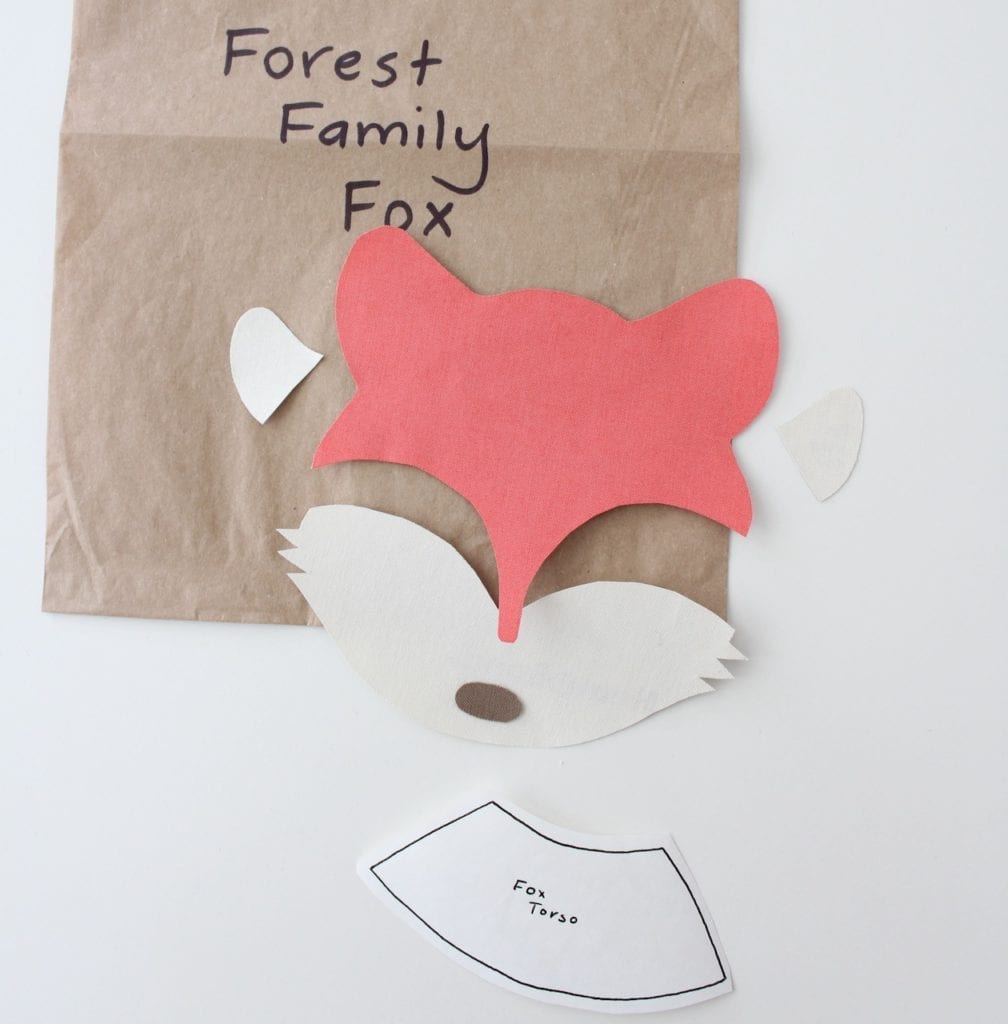
The last step was to fuse all the torso or body shapes for each of the animals, but I wanted to finalise the scalloped border fabrics for each animal first. So I took all the scalloped borders and assembled them in a 3 x 3 format. I have a large white board that I can place on the ground, just for this purpose. But you could also use a white sheet instead. I played around with the layout until I was happy with the arrangement of patterns and colours.

I then ‘auditioned’ the different centre circles (to form the torso or body shapes) to see which prints worked the best with each border and also gave a balanced and appealing look to the entire layout. It meant that I had to rearrange things a little, as some of the prints did not work as well together. (You can use this technique to decide on the layout for your own shapes, or you can follow the instructions provided with the pattern more explicitly.)

Once I was happy with the layout, I took a photo so I could refer to it as I went. A photo is also a great way of seeing all the prints and colours closely together. It can give you a great idea of how the colours work together as a whole.

I was then able to fuse fuse each of the torso colours to the corresponding fabrics, and cut those out too.

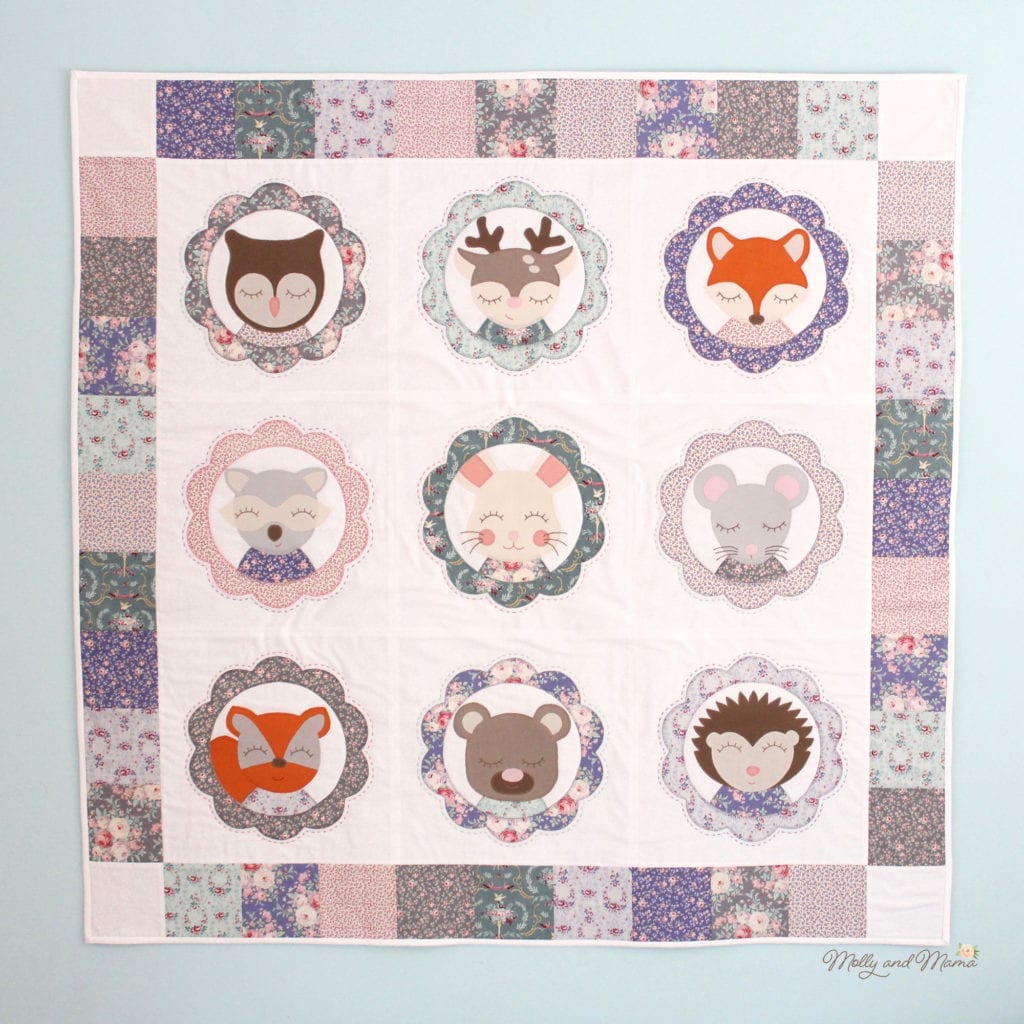
With all my shapes fused and cut, and my other fabrics also cut and prepared, I am ready to begin the process of appliqué for each block, but we’ll save that for next week. To keep it simple, we’ll work on three blocks from start to finish for each of the next three weeks. I’m itching to get started!

Thanks for sewing along this week. Remember to share your progress over on Instagram, using the #ForestFamilyQAL hashtag so we can all see each other’s work and encourage each other too!

Until next week, happy stitching, Lauren x

Filed Under: Forest Family Quilt Along, Molly and Mama Patterns Tagged With: forest family quilt, forest family quilt along, quilt along

Leave a Reply Cancel reply

Your email address will not be published. Required fields are marked *

Categories

  • Christmas (37)
  • Christmas Stocking Sew Along (6)
  • Easter (10)
  • Embroidery For Beginners (6)
  • English Paper Piecing (9)
  • Felt Fun (12)
  • Forest Family Quilt Along (10)
  • Holidays (11)
  • Molly and Mama Patterns (54)
  • Pattern and Book Reviews (38)
  • Projects (40)
  • Quilting Help (3)
  • This and That (49)
  • Tutorials (49)

Cart

mollyandmama

Studio For Pretty Stitches
🐝🌸 You’ve seen my pretty floral Serious Se 🐝🌸 You’ve seen my pretty floral Serious Sewist’s Set, but here’s a sweet Liberty Wiltshire version. I love @libertyfabrics tana lawn, especially when it’s paired with linen.

Find out more about this new pattern in the listing details. Tap the photo or head to the shop link in my profile. 

#mollyandmama #serioussewistsset #libertyfabric #libertytanalawn #iloveliberty #libertywiltshire #felt #woolfelt  #feltapplique #appliquebee #feltbee #scissorkeeper #scissorcharm #hexies #hexagons #englishpaperpiecing #epp #handstitched #slowsewing #aurifil #aurifloss #aurifilfloss #embroideryfloss #aurifilartisan
I’m loving @mabletandesigns new collection ‘B I’m loving @mabletandesigns  new collection ‘Birds & Blooms’ for @pbsfabrics. And hand quilting with @aurifilthread embroidery floss is a dream! Can you guess which of my patterns this will become? 

#mollyandmama #mabletandesigns #birdsandbloomsfabric #pbsfabrics #australianflorafabric #australianafabric #cockatoo #parakeet #parrot #stellacushions #fatquarterbundle #fabriccollection #fabricpull #aurifulthread #aurifloss #aurifilartisan #embroideryfloss #aurifilfloss
🐝🤍 It’s here! Thank you so much to those w 🐝🤍 It’s here! Thank you so much to those who have already purchased the Serious Sewist’s pin cushion and scissor charm pattern set. Tap the photo for a direct link, or head to my profile. 

#mollyandmama #serioussewistsset #felt #woolfelt  #feltapplique #appliquebee #feltbee #scissorkeeper #scissorcharm #hexies #hexagons #englishpaperpiecing #epp #handstitched #slowsewing #missrosesisterviolet #rileyblakedesigns #iloverileyblake #rileyblake #roseandvioletsgardenfabrics #aurifil #aurifloss #aurifilfloss #embroideryfloss #aurifilartisan #fatquarterbundle #roseandvioletsgardenfabric
🦜🌼 On the cutting table this week is this su 🦜🌼 On the cutting table this week is this summery fun Australiana collection called Birds & Blooms from @mabletandesigns for @pbsfabrics. It’s described as combining classical botanical illustration styles with a modern, trend-worthy colour palette. And it’s so true! Check with @pbsfabrics for stockists near you. 

I love all of Mable’s designs, this one especially! What should I make? 

#mollyandmama #mabletandesigns #birdsandbloomsfabric #pbsfabrics #australianflorafabric #australianafabric #cockatoo #parakeet #parrot #gumblossom #fatquarterbundle #fabriccollection #fabricpull #aurifulthread #aurifloss #aurifilartisan #embroideryfloss #aurifilfloss
How sweet does Miss Maisie Pin Cushion look sittin How sweet does Miss Maisie Pin Cushion look sitting here on this cute ‘I Spy’ style doll’s quilt?  It’s based on the Rising Sun mini quilt pattern from @blossomheartquilts’ book ‘Mini Masterpieces’. You can see more photos and find links to the book on my latest blog post (there’s a link in my profile). 

Miss Maisie is part of the Miss Molly And Friends Pin Cushion Pattern in my store. Tap the photo for a link. She’s quick to stitch, lots of fun to make and comes with two other friends; Miss Molly and Miss Kitty. 

#mollyandmama #missmollypincushion #missmollyandfriends #missmaisiepincushion #felt #woolfelt #feltpincushion #applique #appliqué #appliquequilt #ispyquilt #minimasterpiecesbook #blossomheartquilts #aurifilartisan #aurifilthread #aurifilfloss #aurifloss #blanketstitch #rawedgeapplique #quiltersofinstagram #makersgonnamake
🪡✂️💗 Thank you so much for your wonderfu 🪡✂️💗 Thank you so much for your wonderfully positive response to my Serious Sewist’s Set. The pattern is now live! Visit the link in my profile to head to the store 🐝💕.

#mollyandmama #serioussewistsset #serioussewistspincushion  #felt #woolfelt  #feltapplique #appliquebee #feltbee #scissorkeeper #scissorcharm #hexies hexagons #englishpaperpiecing #epp #handstitched #slowsewing #missrosesisterviolet #rileyblakedesigns #iloverileyblake #rileyblake #roseandvioletsgardenfabrics #aurifil #aurifloss #aurifilfloss #embroideryfloss #aurifilartisan #fatquarterbundle #roseandvioletsgardenfabric
💗 Have you started the year with some English p 💗 Have you started the year with some English paper piecing? The weekly #sipteaandepp party is continuing with the lovely Larisa from @stitchingnotes and this year I’m making way for the very talented Irina from @nordiccrafter to become the new co-host. Please go and visit the profiles of these clever creatives to learn all about what 2021 holds for #sipteaandepp. The girls have some exciting plans in place and I know you’re going to love it!

This week’s theme is all about Introductions, where you’re encouraged to share a few random facts about yourself. So here’s a little about me. 

🤍 Before starting this wonderful journey into sewing, I was a primary school teacher

🤍My first degree was a bachelor of Behavioural Science / Psychology

🤍 I’ve been crafty for as long as I remember but I also love art, illustration, gardening and baking

🤍 I’m not a traditional tea drinker (which was a little strange as the co-host of #sipteaandepp 😂 

🤍 I’m inspired mostly by colour and nature. I’m drawn to anything muted, delicate, pastel, pretty, dainty and floral. Yet nothing in my home or wardrobe would give you that impression! 

With so many new followers joining me in the new year, I’d love to know more about you. And if you have any questions for me, feel free to ask! Lauren 💗
🌸💚 I’ve had lots of requests for informati 🌸💚 I’ve had lots of requests for information about pattern releases and more. The best way to stay in the loop is to sign up for the fortnightly newsletter. That way you’ll also get the new release discount code. And you’ll even get this embroidery design as a FREE PATTERN! 

It’s just a friendly space where I share previews of my current projects, a tutorial or pattern, and some of your makes for added inspiration. I’d be thrilled to have you join me. I’m also working on the next free pattern, which gives you a taste for what my projects are all about - beginner techniques with beautiful finishes, so everyone can experience sewing success! 

Head to my profile for the sign up link. There’s a new felt freebie coming soon 💗

#mollyandmama #embroidery #freeembroiderypattern #freeembroiderydesign #handembroidery #handstitched #freepattern #freeproject #floralwreath #floralwreathembroidery #flowerwreath #flowerwreathembroidery #aurifil #aurifilthread #aurifilartisan #aurifilfloss #embroideryfloss #spoolofthread #embroiderersofinstagram #embroideryhoop #embroideryhoopart #stitchersofinstagram #makersgonnamake #makersgonnashare #craftersgonnacraft #happystitching #slowstitching
Honey bees are so amazing! I really wish I wasn’ Honey bees are so amazing! I really wish I wasn’t allergic. So while we gave my father in law a hive, we keep native Australian stingless bee hives instead. And they are the friendliest little creatures. I love finding sewing inspiration from our garden 🐝💐

This scissor fob is part of the Serious Sewist’s Pin Cushion Set. Find it in the store or tap the photo for a direct link 🥰

#mollyandmama #felt #woolfelt #feltapplique #appliquebee #feltbee #scissorkeeper #scissorfob #scissorcharm #hexies hexagons #englishpaperpiecing #epp #handstitched #slowsewing #missrosesisterviolet #rileyblakedesigns #iloverileyblake #rileyblake #roseandvioletsgardenfabrics #aurifil #aurifloss #aurifilfloss #embroideryfloss #aurifilartisan #fatquarterbundle #serioussewistsset #roseandvioletsgardenfabric
Follow on Instagram
This error message is only visible to WordPress admins
© Copyright 2020 - Molly and Mama