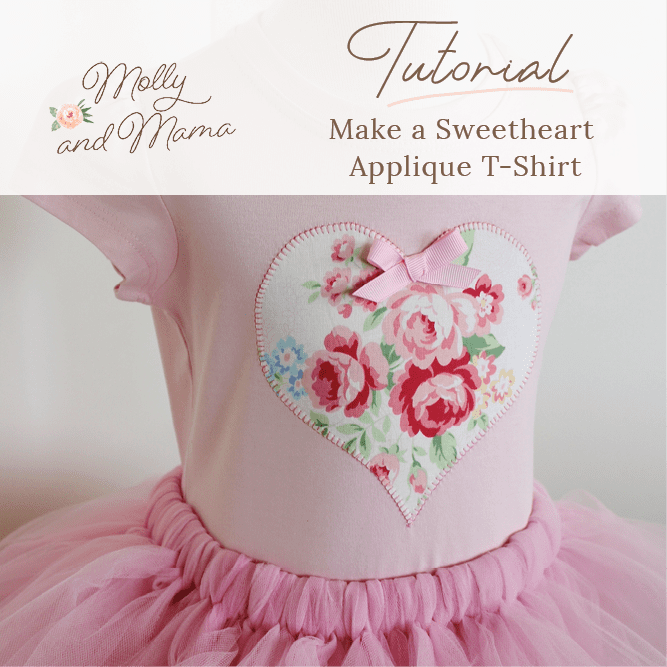
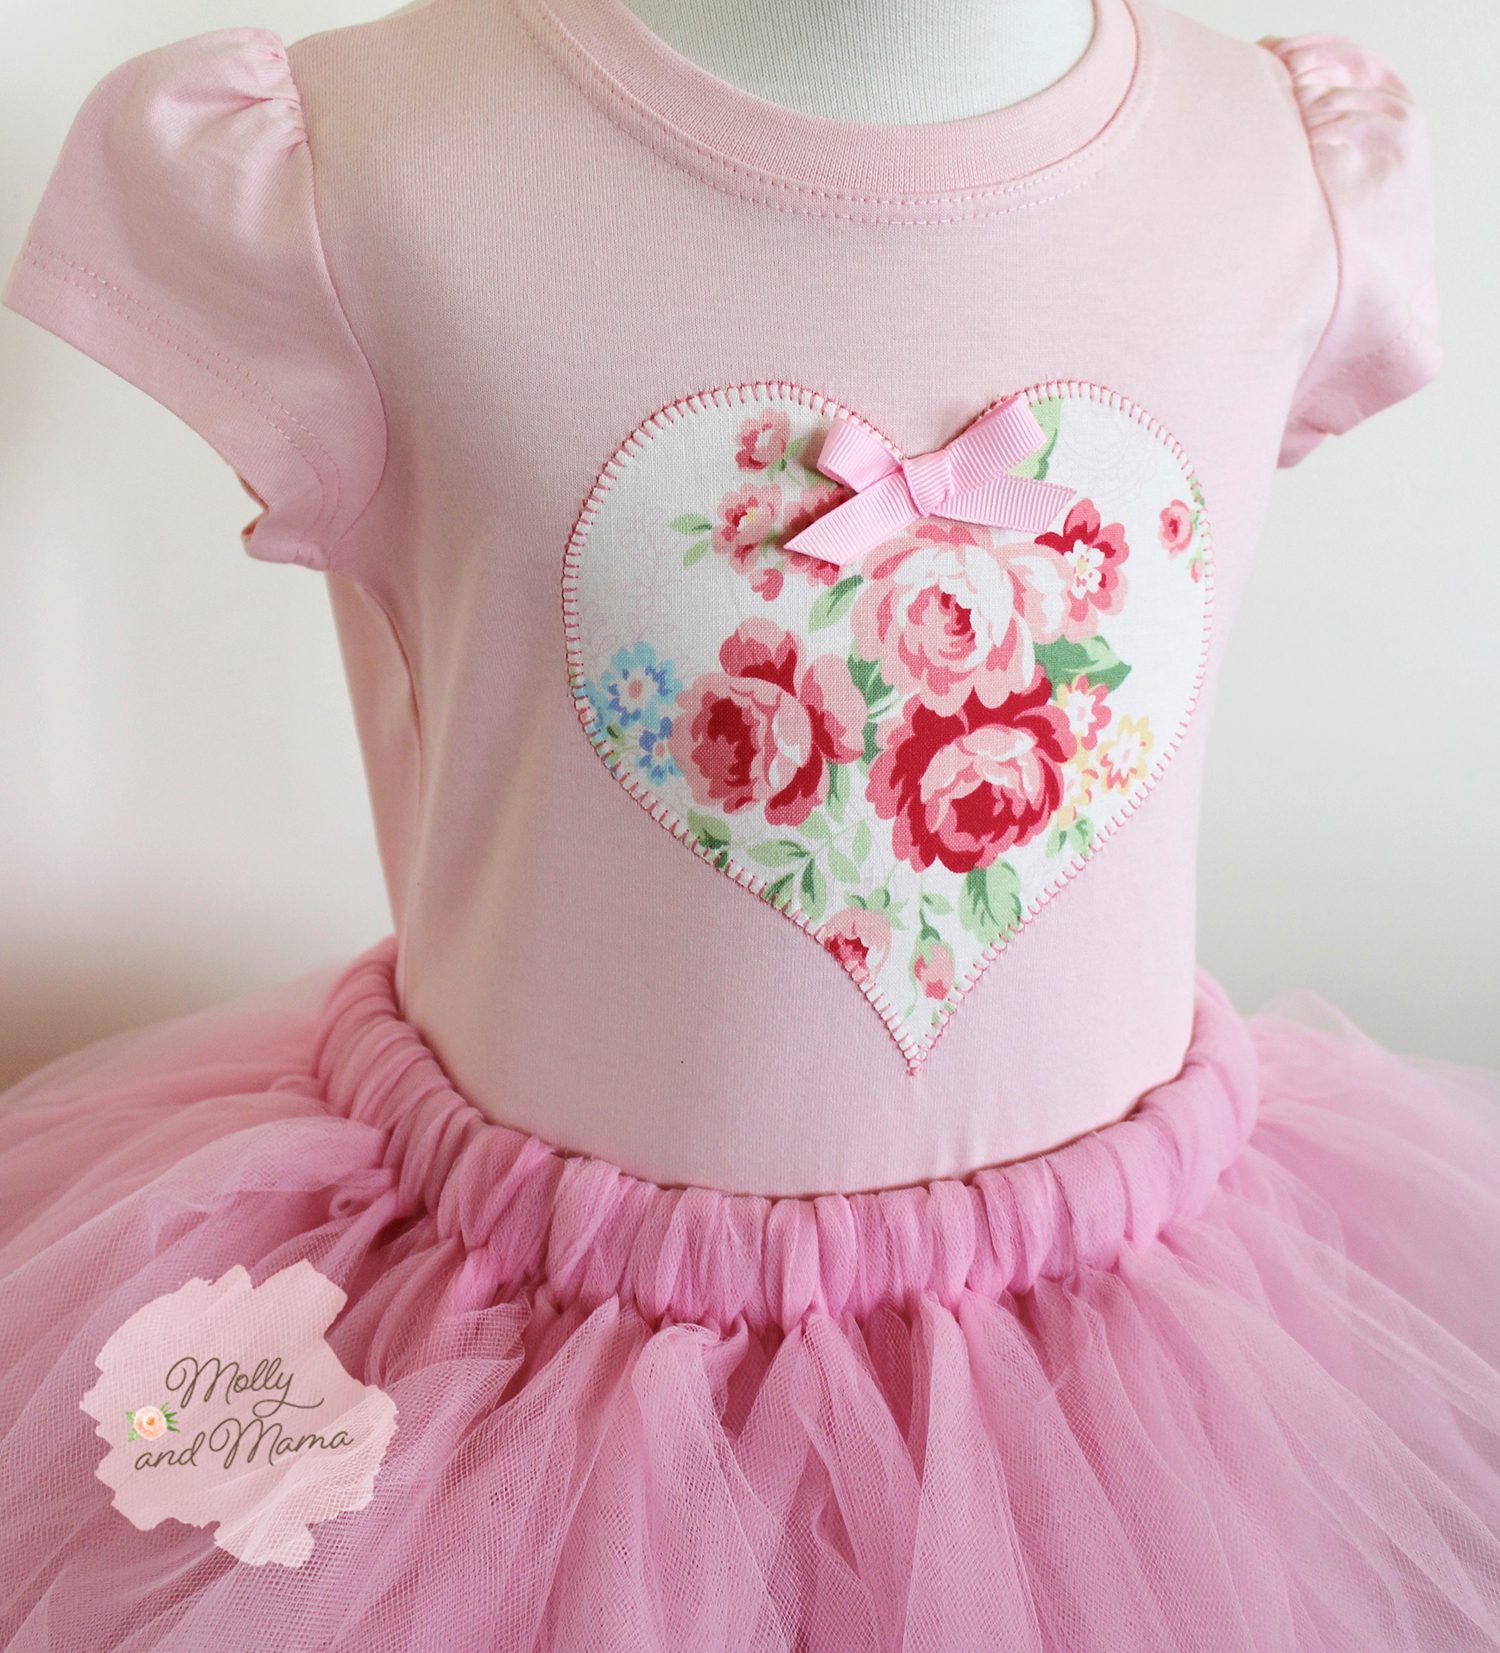
Make a Sweet Heart Appliqué T-Shirt
Gorgeous appliquéd t-shirts are so easy to make and look adorable. They make terrific gifts and are a great scrap-busting project too! Here’s a step-by-step guide to sewing this sweet heart appliqué project at home. You can use the heart pattern to appliqué clothing, homewares or anything you would like!
UPDATED: January 2024
FINISHED SIZE: 5 1/4” (13.5cm) across by 5 1/8″ (13cm) tall
YOU WILL NEED
- 7″ (18cm) square of decorative quilter’s cotton for your appliqué heart – 100% cotton is recommended.
- A t-shirt or project for the appliqué – 100% cotton is best.
- HEART TEMPLATE – Save it to your computer and print it as is, or resize to suit your project
- 7″ (18cm) square of paper backed fusible heat bonding web like HeatnBond.
- General sewing supplies.
- Embroidery needle and thread or sewing machine with complimentary thread colours.
- Ribbon for a bow if you wish. 3/8″ or 10mm wide ribbon is easy to work with and grosgrain ribbon washes really well.
- Ballpoint needle (optional – useful to stop the needle piercing the knit fabric of a t-shirt).
BEFORE YOU BEGIN
Be sure to read the tutorial from beginning to end, before commencing your project. If you haven’t tried appliqué before, read my beginner’s tutorial. Make sure you practice using some fabric scraps first. Take your time. And enjoy it!
Which Stitch?
All of my appliqué projects use a ‘blanket stitch’. I find that this stitch gives a great finish, and longevity for the appliqué. Many sewing machines will have a blanket stitch or button hole stitch setting (which is what I use). Alternatively, you can hand stitch and embroider your appliqué. If you are new to hand stitching, you can read more about the different stitch types in the Stitch Library. Apart from blanket stitch, you can also use a straight stitch, or tight zig zag (satin) stitch.
LETS GET SEWING!
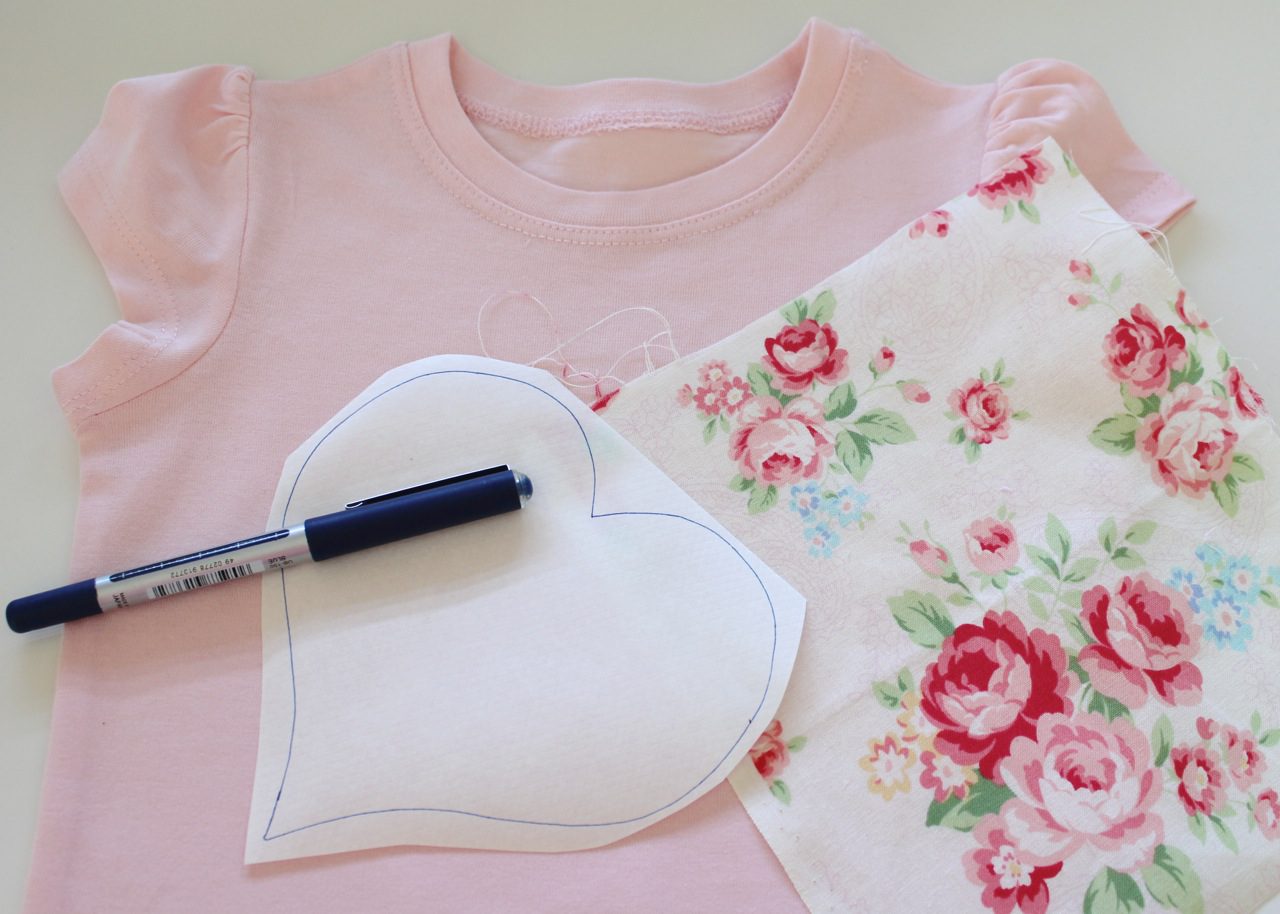
1 Trace Your Heart Template
Save and then print a copy of the Heart Template. Make sure it prints at full size (100%, with no scaling or cropping).
Trace your heart template onto the paper side of your fusible web using a pen.
2 Cutting Out
Roughly cut around your traced piece of fusible web ensuring you leave a small border. Do not cut on your drawn outline (shown below).
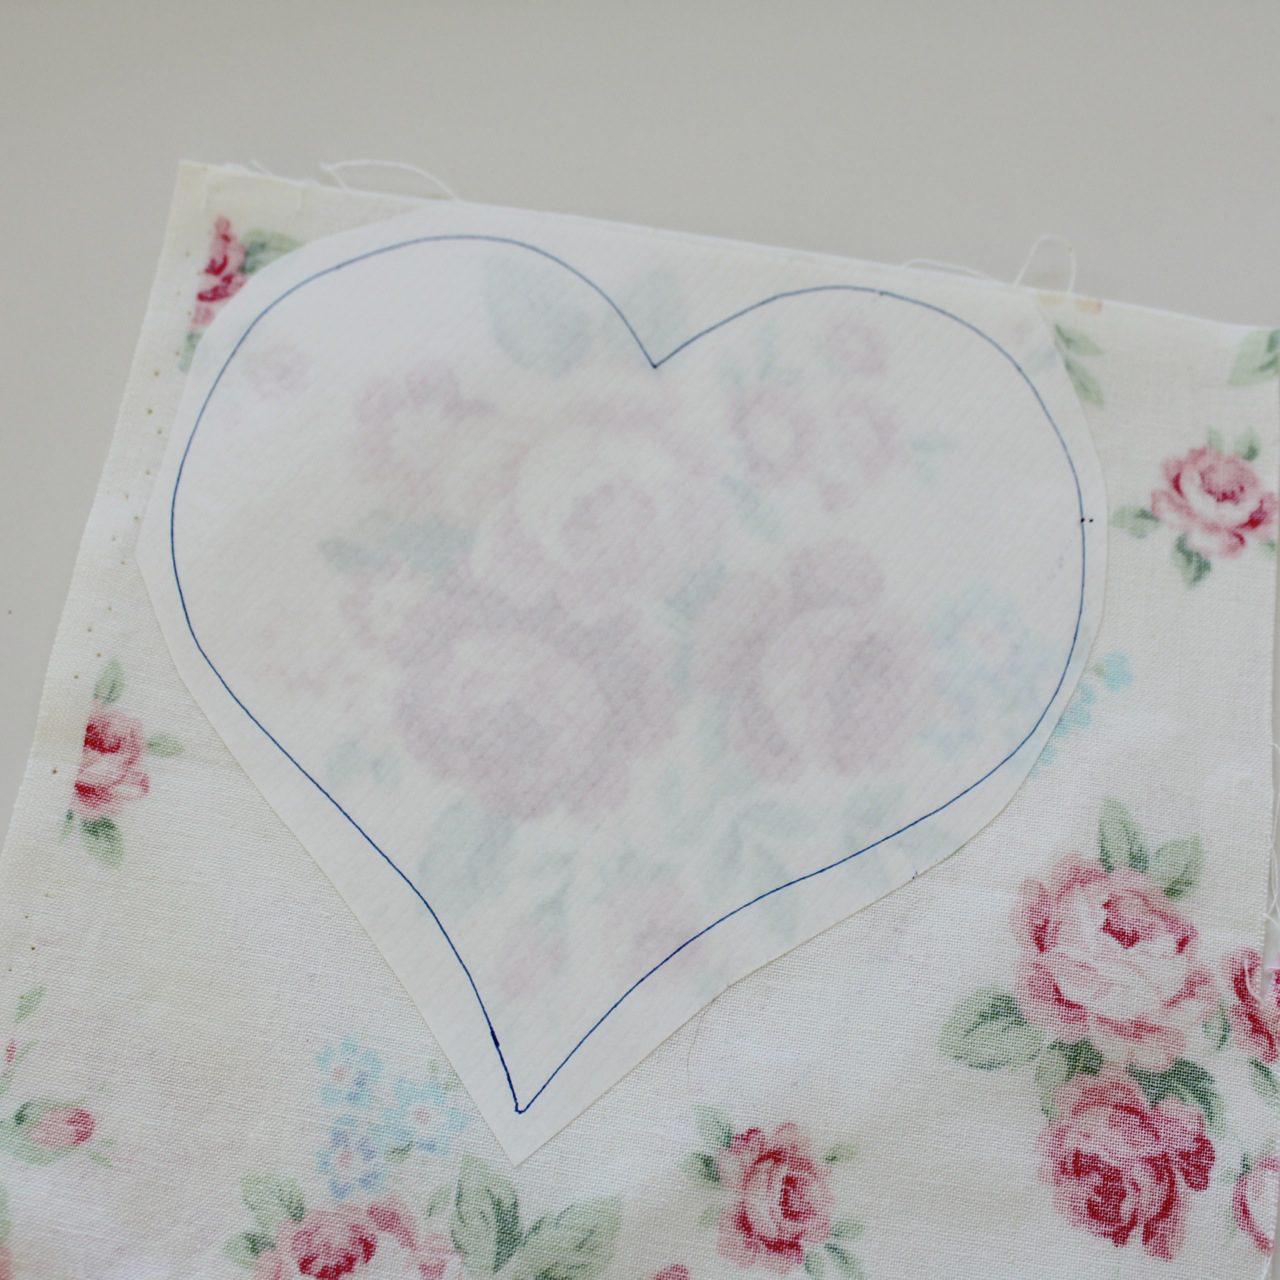
3 Secure The Fusible Web To Your Fabric
Take some time to decide on the fabric you will use, and where you will position your fusible web. You might want to showcase a particular part of the fabric print by fussy cutting it (like I have done).
Take note of fabric that has a directional print or pattern. You don’t want the pattern to be upside down on your project. Try and always work with the grain so that the threads in the fabric run horizontal and vertical across the template (and not diagonally). And if the fabric has a light background, be sure your t-shirt colour won’t show through.
Once you are happy with your fabric selection and placement, heat your iron to a hot non-steam setting. Place the fusible web onto the wrong side (the back) of your chosen fabric so that your template (the paper side) is facing you and webbing is between the paper and the fabric. Fuse the paper to the fabric by running the hot iron over it for a few seconds.
4 Cut Out Your Template Piece
Follow your traced lines to neatly cut out your appliqué piece.
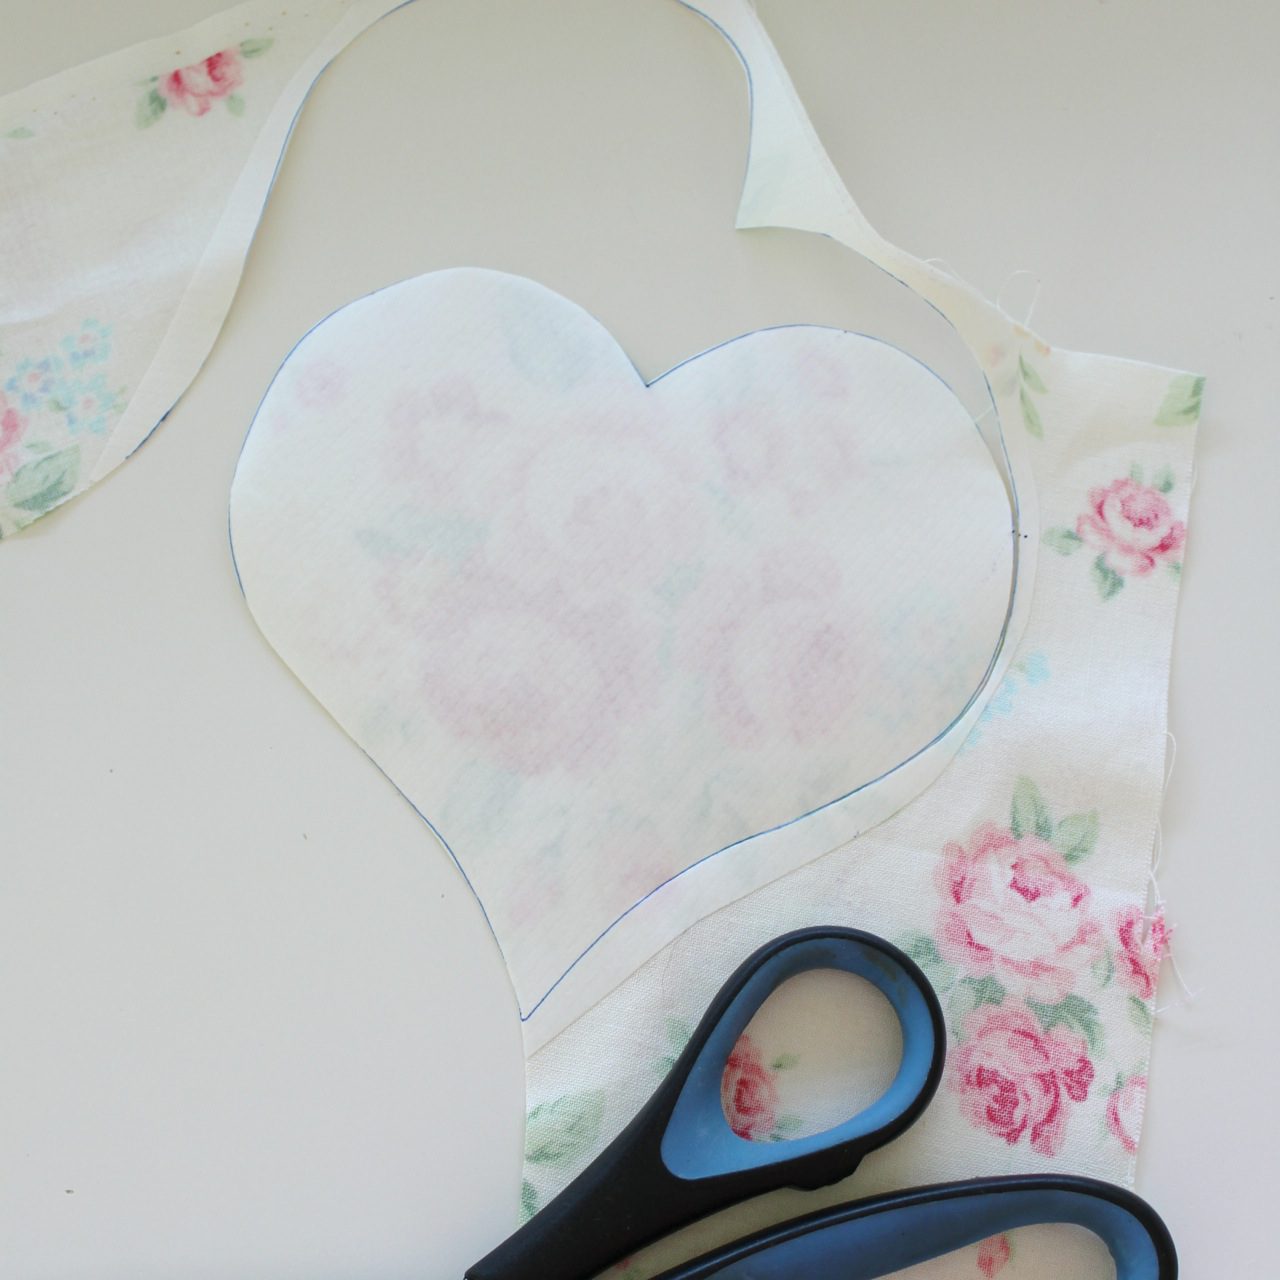
Peel the backing paper off.

5 Secure Your Appliqué
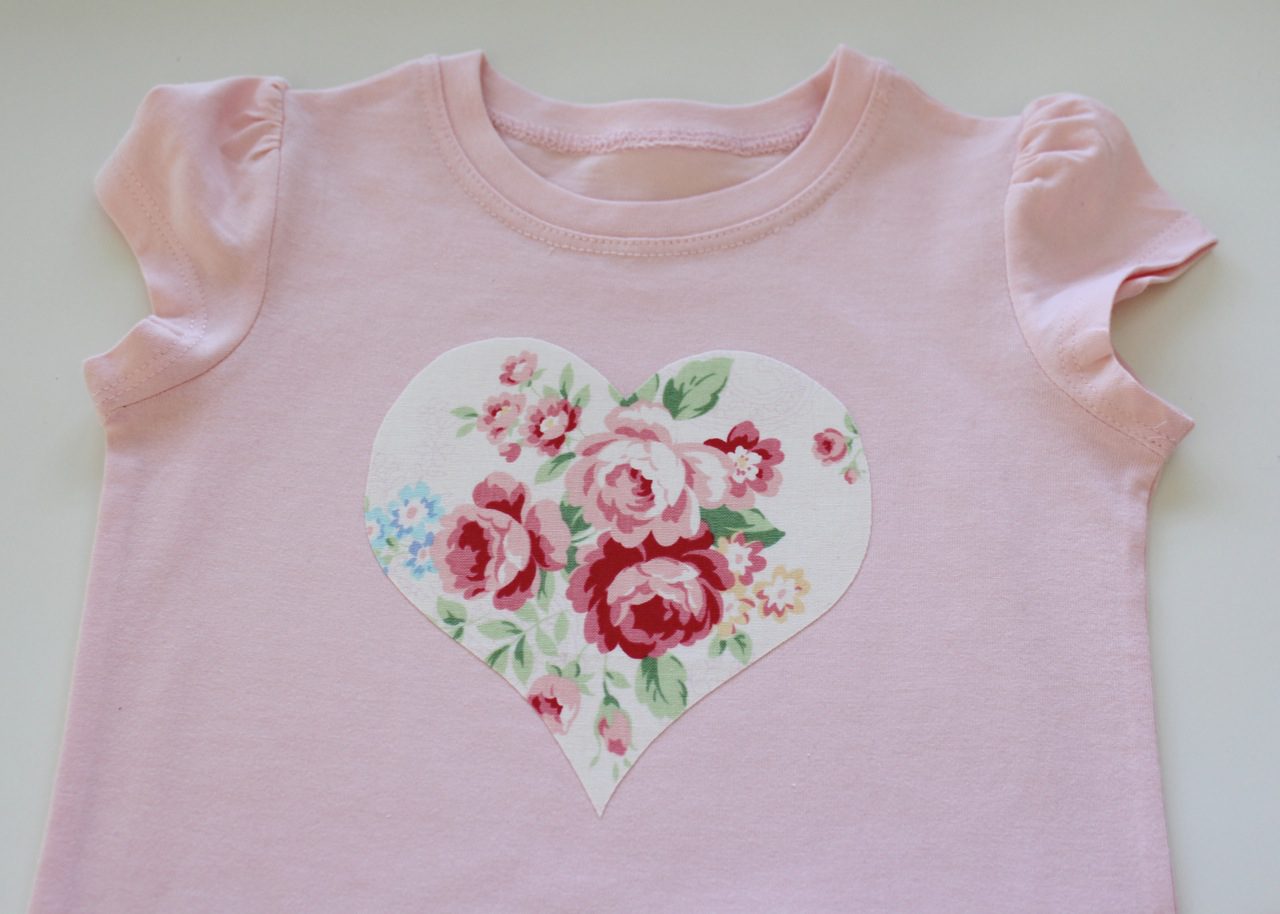
Your heart is now ready to attach to your t-shirt. I like to make sure my appliqués are positioned in the centre front of the t-shirt and only an inch or two from the neckline. That way the design isn’t hidden if the t-shirt is tucked into a skirt or pants.
When you are happy with your positioning, secure the appliqué fabric by going over it with a hot iron. The heat will ‘melt’ the bonding agent to secure your fabric to the garment or project fabric.
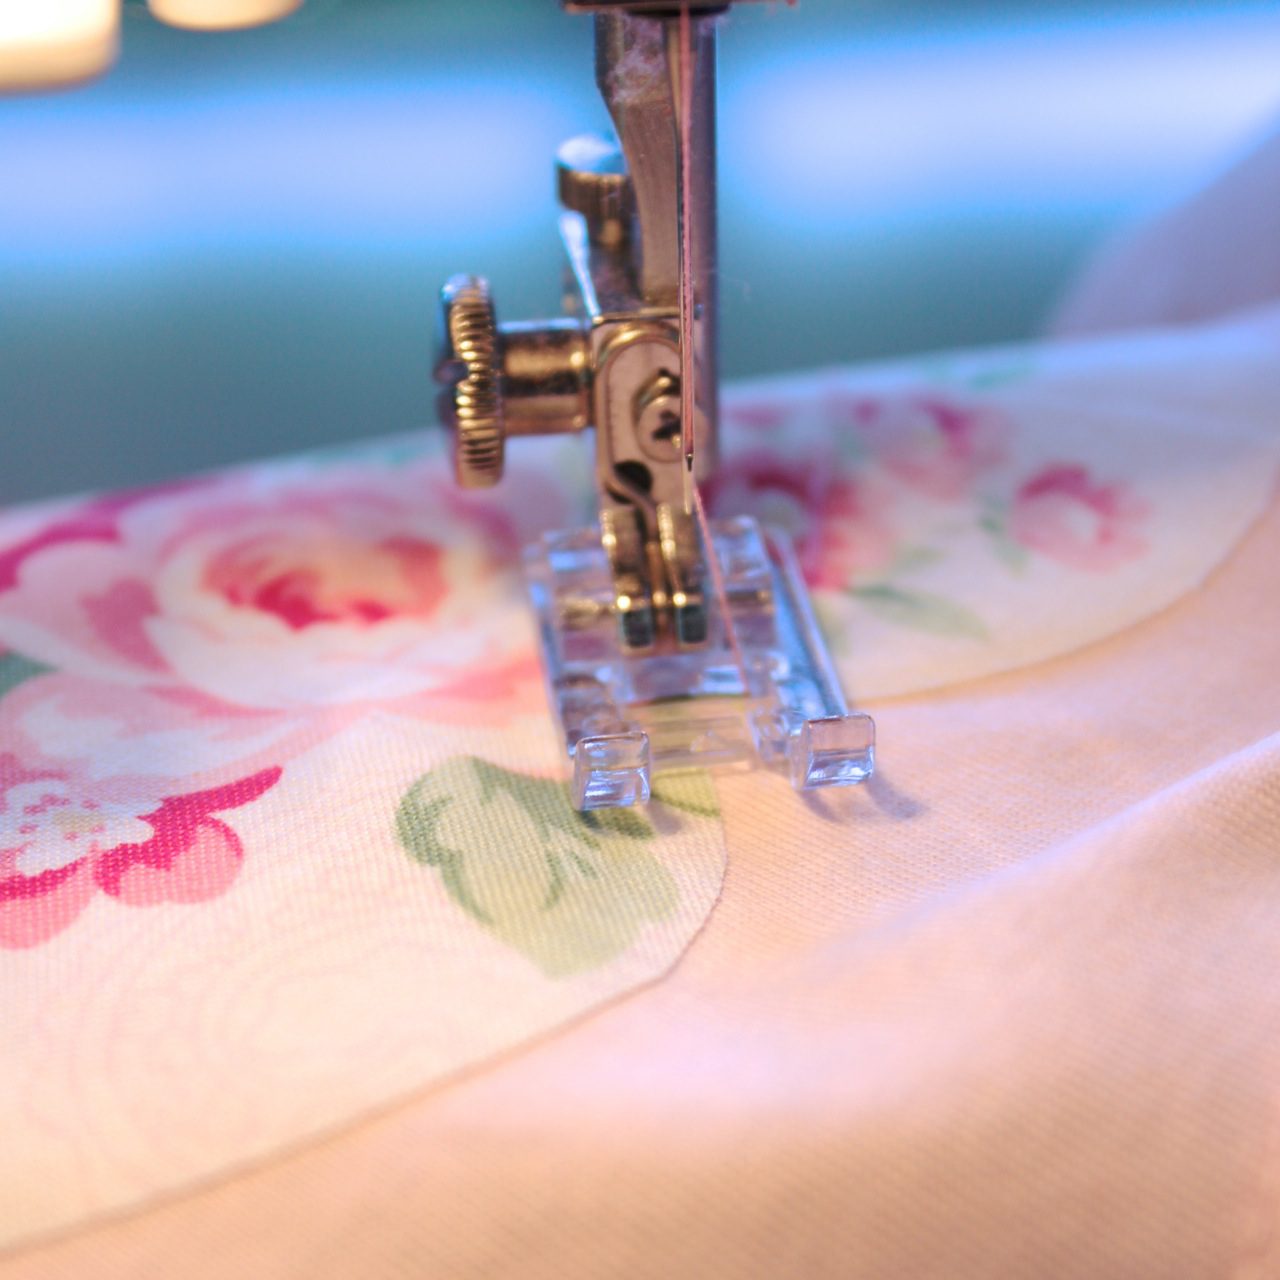
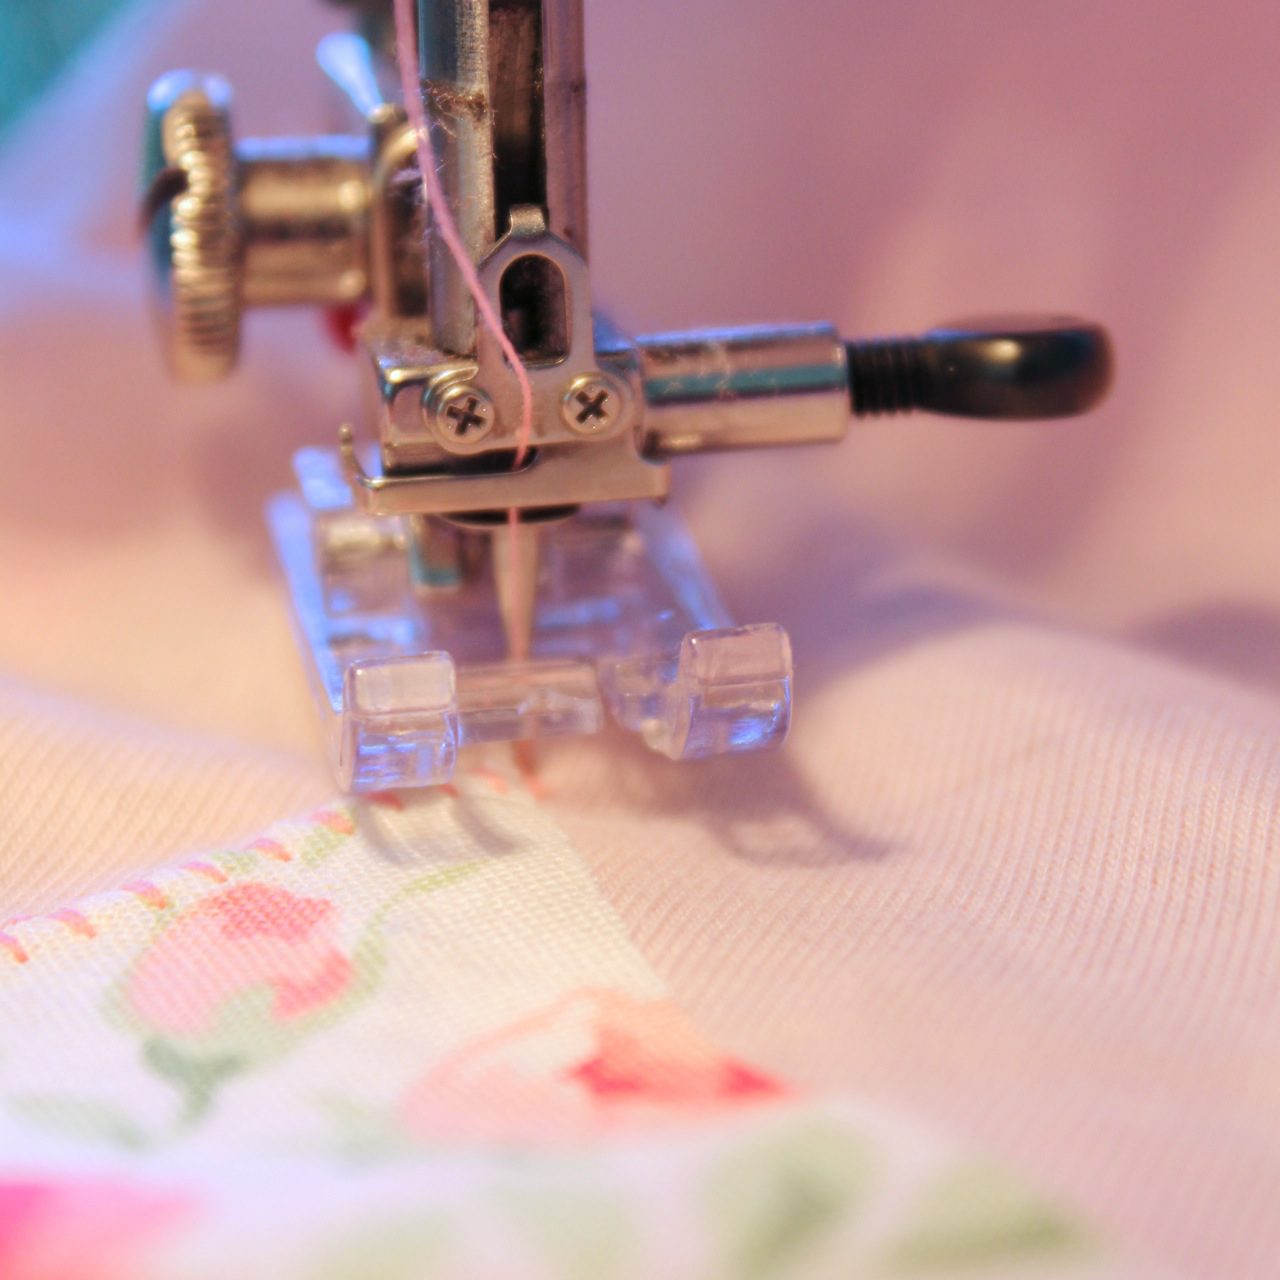
6 Time to Stitch
It’s time to blanket stitch around the raw edges of your appliqué design. You can also use a satin stitch (which is a tight zig-zag stitch), or a straight stitch on the sewing machine. Choose a stitch you are comfortable with. However, I find that a blanket stitch protects the raw edges of the fabric and gives the neatest finish.
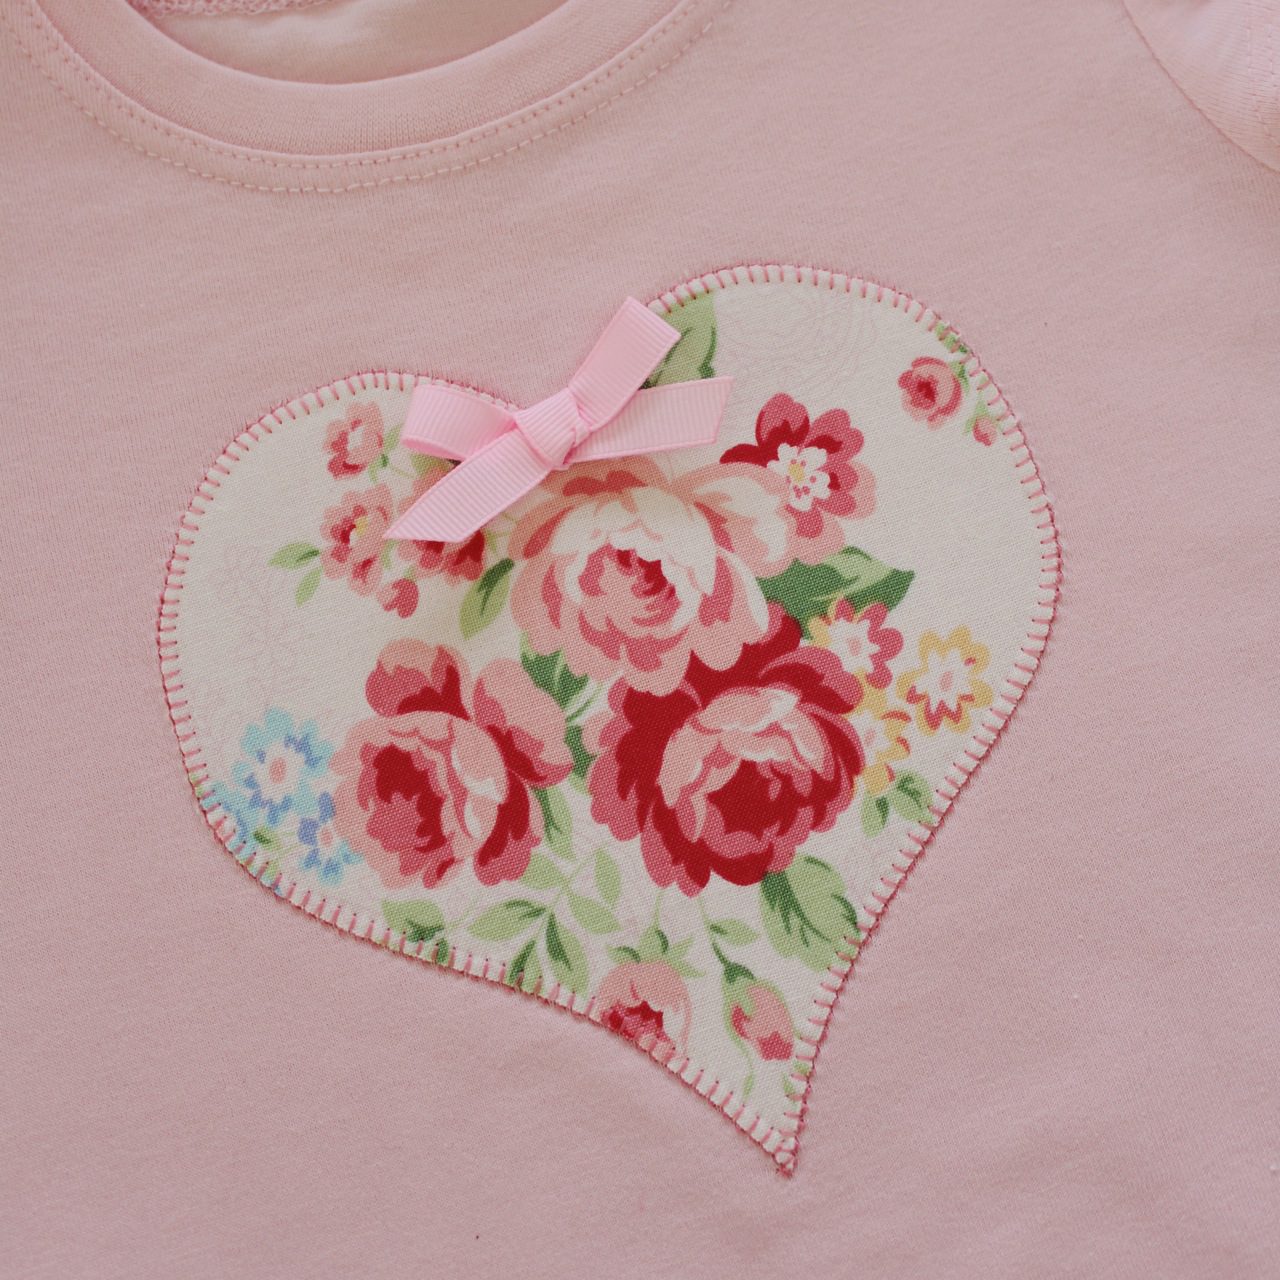
I start stitching my hearts in the ‘bend’ at the top. That way, if there are any stitches that look untidy, they can be covered by the bow I add to finish the garment at the end.
Try and use 100% cotton thread in your machine, so that the completed t-shirt is all cotton (and easier to iron). If you are stitching by hand, use two strands of embroidery thread.
Take your time blanket stitching. Pivot your needle or gently guide the fabric around as you stitch, so that your blanket stitch stays as close to the edge of your fabric as possible. When you reach the base of the heart (when machine stitching), ensure your needle is down in the fabric, raise your foot, and pivot the fabric around so that you can easily navigate the corner. Lower your foot and continue to blanket stitch.
Remember to secure your stitching well at the beginning and end (by back-stitching on the machine).
NOTE: Some people like to use stabilisers at the back of their appliqué to help ensure the t-shirt doesn’t stretch out of shape. However I have found that it’s not necessary, and can sometimes get in the way. Practice first and see what works best for you.
7 Add Any Embellishments
This heart doesn’t require embellishing, but you can add a button or a bow or both. Be sure to attach all embellishments securely.
To add a bow, tie a small bow with some ribbon and trim the ends. Heat seal the ends with a heat sealing tool, or by quickly running a lighter flame along the cut edge of the ribbon to melt the fibres together. This ensures the bow doesn’t fray.
Position the bow and secure it to the appliqué by hand stitching it firmly in place. Use sewing cotton in a similar colour to the bow. I prefer to disguise my stitches under the bow ends and loops so they can’t be seen.
Here’s the finished t-shirt. It’s all ready for a cute little miss to wear! And I have to say that I LOVE these when they’re teamed with a tutu!
TIPS FOR APPLIQUE
- Be sure to check your printer settings. When using templates that are not symmetrical, remember that your finished appliqué will be a mirror image of your template.
- Reduce or enlarge your template on your printer to create a suitably sized appliqué for your project.
- 100% cotton fabrics work best for appliqué.
- Use a bobbin thread that matches the colour of your t-shirt or base fabric.
- Use top threads in colours that coordinate with your appliqué pieces.
- Use the best quality sewing cotton you can. I feel they give a better finish, a neater stitch and the cotton is less likely to break during stitching.
- Use an appliqué foot on your sewing machine if you can. It has a clear plastic base and and sometimes an open toe. So it’s much easier to see what you are doing (see above images).
- When sewing on t-shirts and knit fabric, use a ball point needle in your machine. This type of needle won’t break or damage knitted fibres, like a normal needle can.
- There are a number of online tutorials for tips and tricks when stitching appliqué with your machine. Get to know what your machine is capable of.
- Take your time when you are stitching. Practice makes perfect!
- Hand embroider and stitch using the best quality embroidery thread you can. I love DMC threads for their quality and range of colours too.
Most of all, have fun, enjoy it and practice, practice, practice! If you have any extra tips or tricks to add, I’d love to hear them.
To see more heart inspired projects, pop by my Valentine’s Pinterest Board. Or you can see more appliqué ideas on Pinterest too!
Happy stitching, Lauren x
This post was written by Lauren Wright and appeared first on Molly and Mama http://www.MollyandMama.com.au

Adorable! I love the fabric and the colours, very beautiful.
Thanks so much for your lovely feedback Eva! I’m glad you liked the project.
This is such a pretty project! Thanks for sharing!
Thanks Bethany. I’m glad you like it! Lauren x
It makes me very happy to see that this fashion still is fashionable.