Molly and Mama

Studio for Pretty Stitches - Inspiring ideas for Felt, Stitchery and Patchwork

  • Home
  • Start Here!
  • PATTERNS
    • PDF Pattern Shop
    • Paper Pattern Stockists
    • Pattern Corrections
  • TUTORIALS
  • Classes
  • BOOK
  • Contact

Embroider a Pillowcase with an Iron-On Transfer

June 21, 2014 By Lauren at Molly and Mama 13 Comments

Hand embroidery is a gorgeous way to brighten up a store-bought pillowcase. I’ll show you how easy it is to use an iron-on transfer pen to transfer your design to fabric. Then it’s just a matter of embroidering your design. So simple and so pretty! It makes a terrific thrifty gift too!

YOU WILL NEED

  • a plain pillowcase
  • a SULKY iron-on transfer pen (or similar product)
  • a computer, printer and paper
  • iron and ironing board
  • embroidery floss or thread (I used DMC 335 for this project)
  • needle and scissors

LETS GET STARTED

TRANSFER YOUR DESIGN

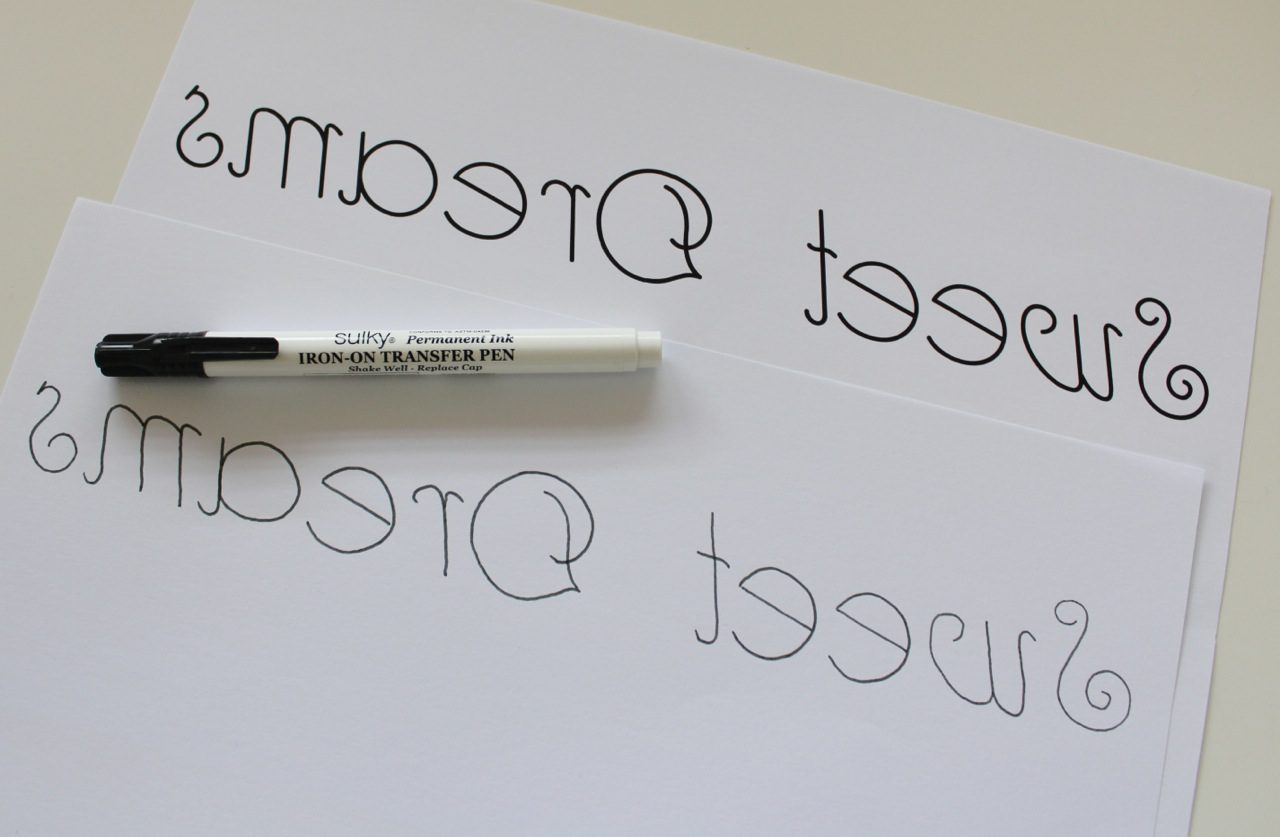
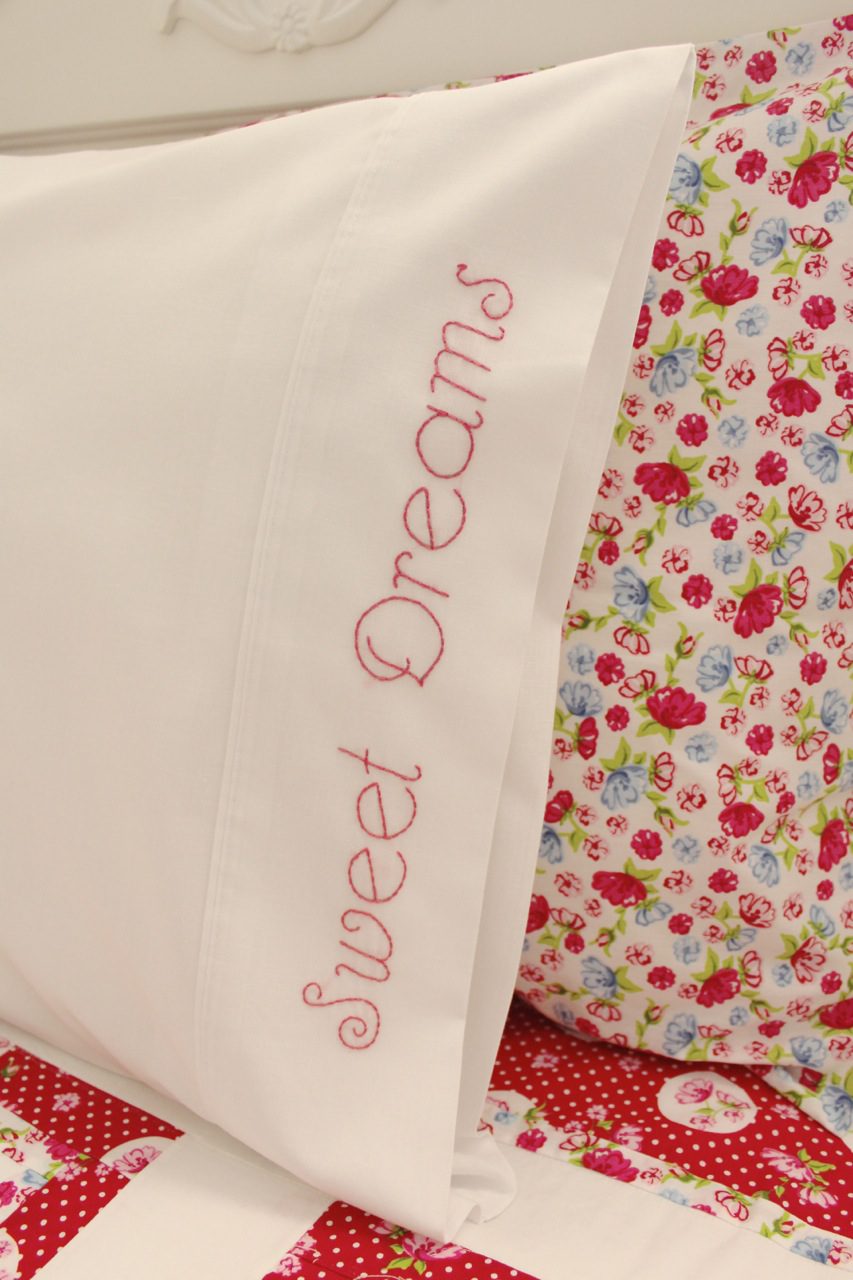
Choose your design to transfer to the pillowcase. You could use an image or picture but I wanted to write some text. So I popped onto the computer and created a Word document. I typed the words ‘Sweet Dreams’ and played around with the font style and size until I found something I liked, that I could also easily embroider. I choose ‘Rhumba Script’ in size 110. It’s a free font you can pick up at DaFont.com.

When you’re happy with your font and its size (or your image or design), print it out. Remember that whatever design you choose, it will be reversed during the transfer process. So if you’re working with text, it must be printed backwards. Your printer will have a setting for this. My Canon printer says ‘flip horizontally’.

Grab your print out, a piece of plain printer paper and your Sulky iron-on transfer pen. Set yourself up on a flat surface. Follow the instructions that come with the pen to get the ink following. Then trace your text onto the plain paper by using the print out as a template underneath it. If you’re having trouble seeing the text through your paper, hold it up against a well lit door or window. (This is a great tip for those of us who are yet to own a light box!).

Embroider a Pillowcase with Molly and Mama01

Iron your pillowcase so it’s ready for transfer, and place it with the cuff across the ironing board. Ensure the iron is on a warm, no-steam setting.

Embroider a Pillowcase with Molly and Mama02

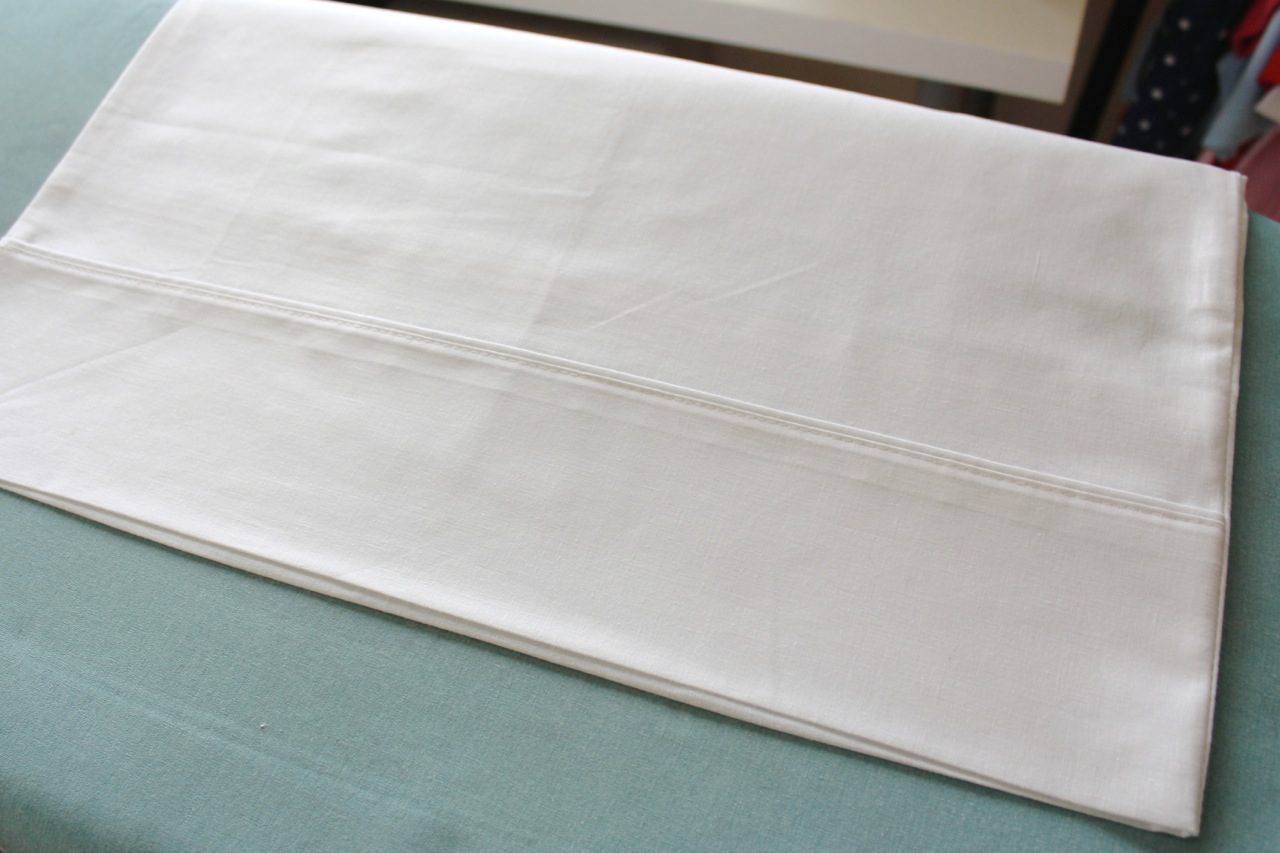
Place your traced design face down onto the cuff of your pillowcase. I’m super fussy, so I spent a bit of time measuring to make sure it was centred and straight.

Embroider a Pillowcase with Molly and Mama03

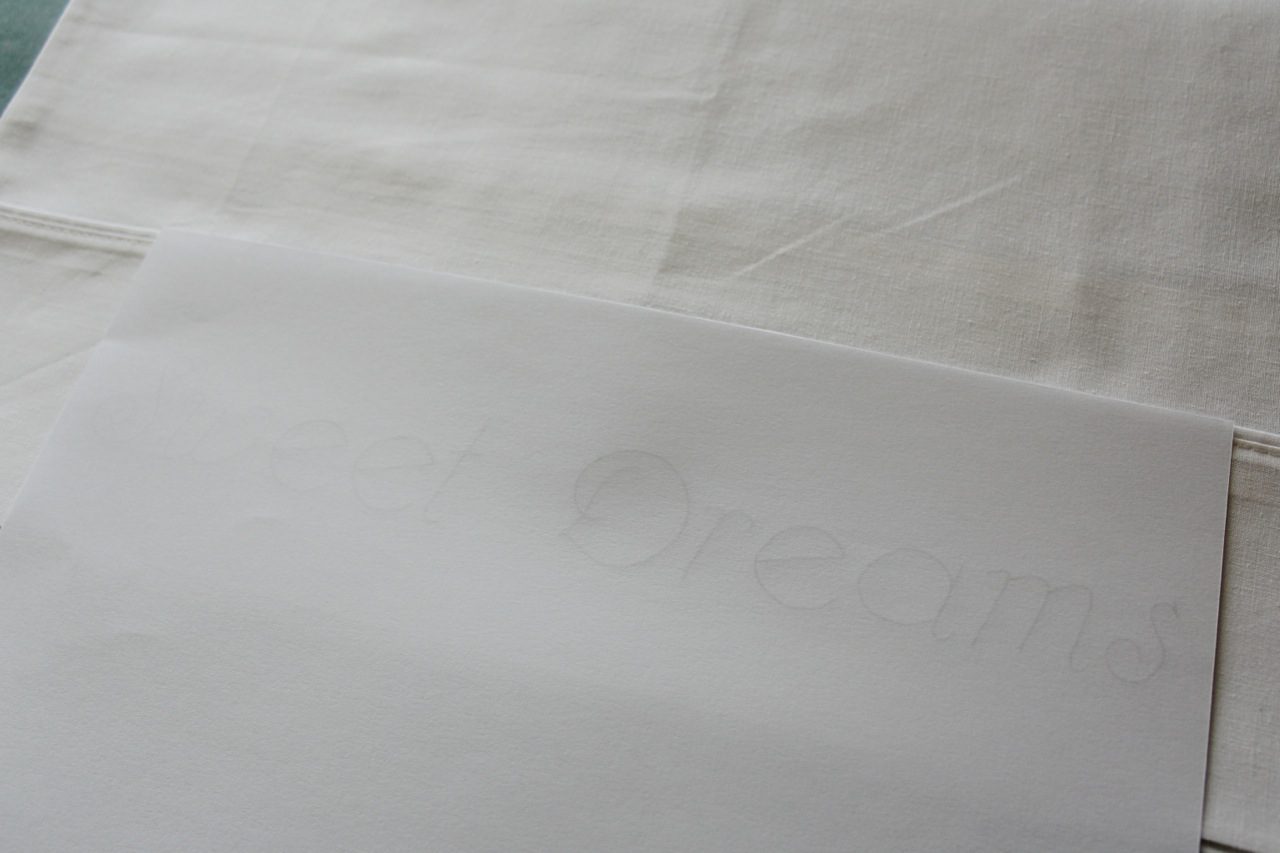
Follow the transfer instructions that come with your pen to iron your text to the pillowcase. You can see on my transfer that the heat wasn’t even during the ironing process as the ends are lighter. But it does the job.

Embroider a Pillowcase with Molly and Mama05

So now you’re all ready to get stitching!

EMBROIDER YOUR DESIGN

I love the look of simple back stitch. And it’s so easy to do! As I stitched this text, I kept my sewing hidden (between the two layers of cuff fabric), so that you can’t see the knots and stitching on the back of the pillowcase cuff. It’s not necessary to do this, but I love the clean finish it gives.

Split the six stranded embroidery floss in half (I used DMC 335), and thread the three strands onto your embroidery needle. Be sure to create a simple knot at the end and trim the excess thread. Bring the needle and thread up through the back of the pillow case cuff so that the needle pops up at the beginning of the first letter. As you pull the thread, separate the front and the back cuff fabric pieces. Give your thread a gentle tug so that the knot ‘pops’ through the back of the cuff and lodges itself behind the front piece of the cuff. That way your knot isn’t visible from the back.

You’re ready to start backstitching.

Embroider a Pillowcase with Molly and Mama07

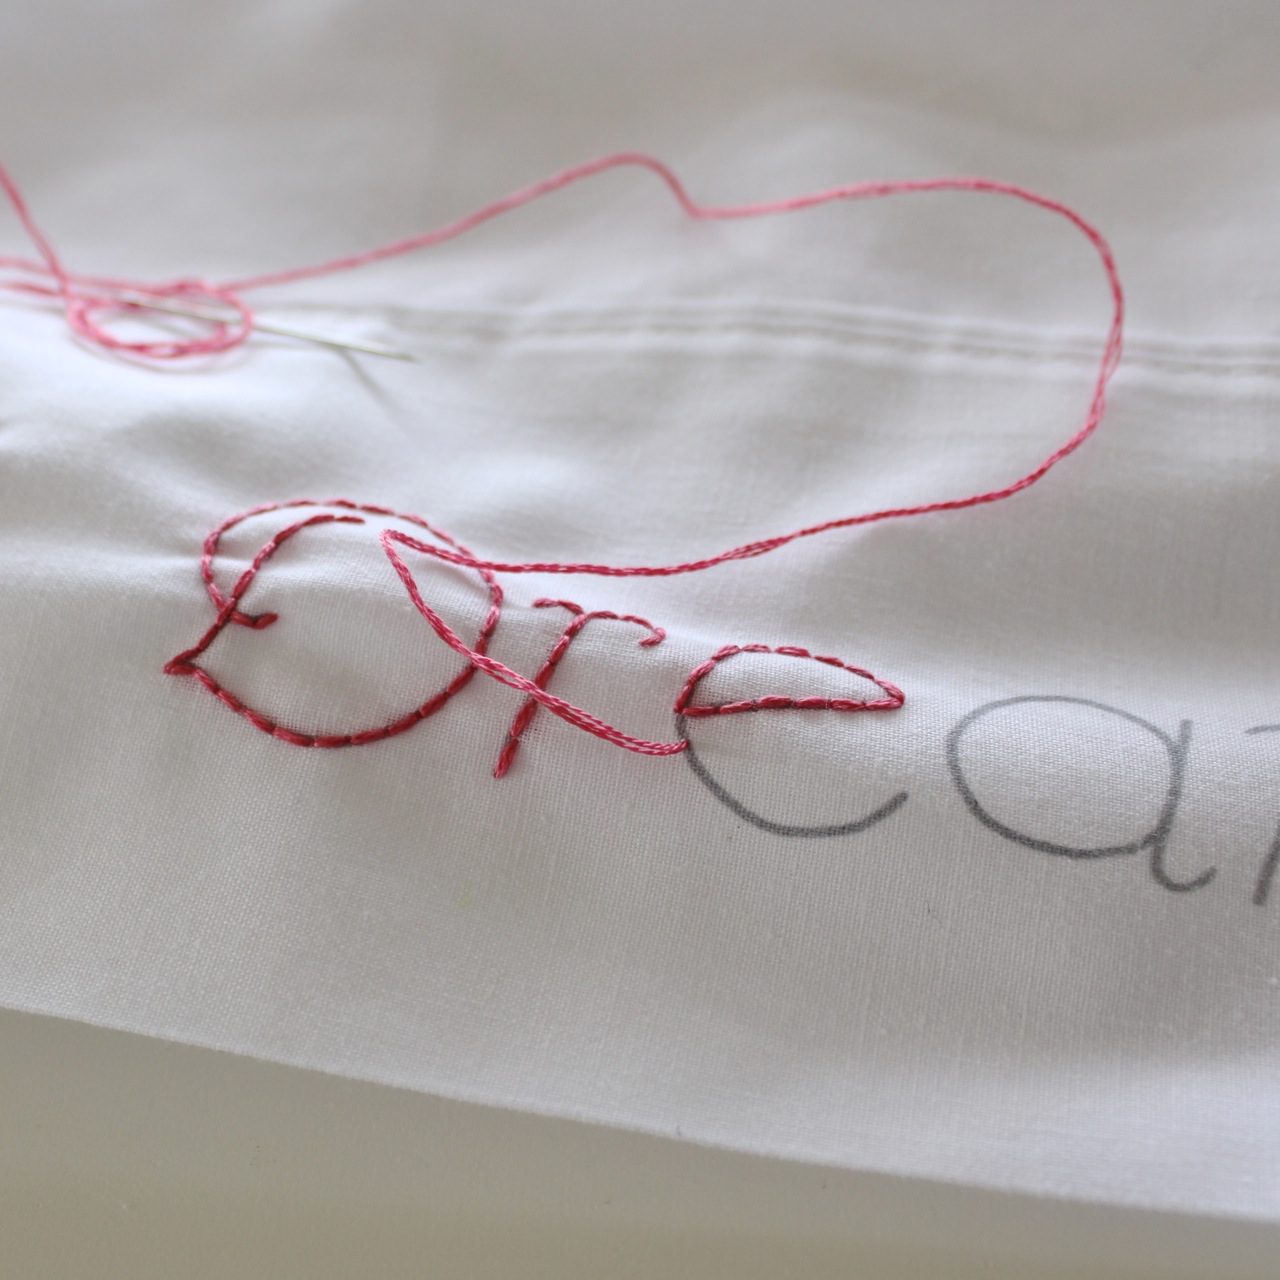
When backstitching, start by making a normal straight stitch. You’ve already brought your needle up to the start of your first letter. Make your stitch a few millimetres long. Press your needle down into the first piece of fabric, being careful not to catch the back piece of fabric. Then bring your needle and thread up a ‘stitch space’ ahead of your last stitch. Lastly, bring the needle down through the same hole as the end of the last stitch you made. As you do this, use your hands to help guide your needle between the two layers of fabric that make up the pillowcase cuff. 

Embroider a Pillowcase with Molly and Mama12

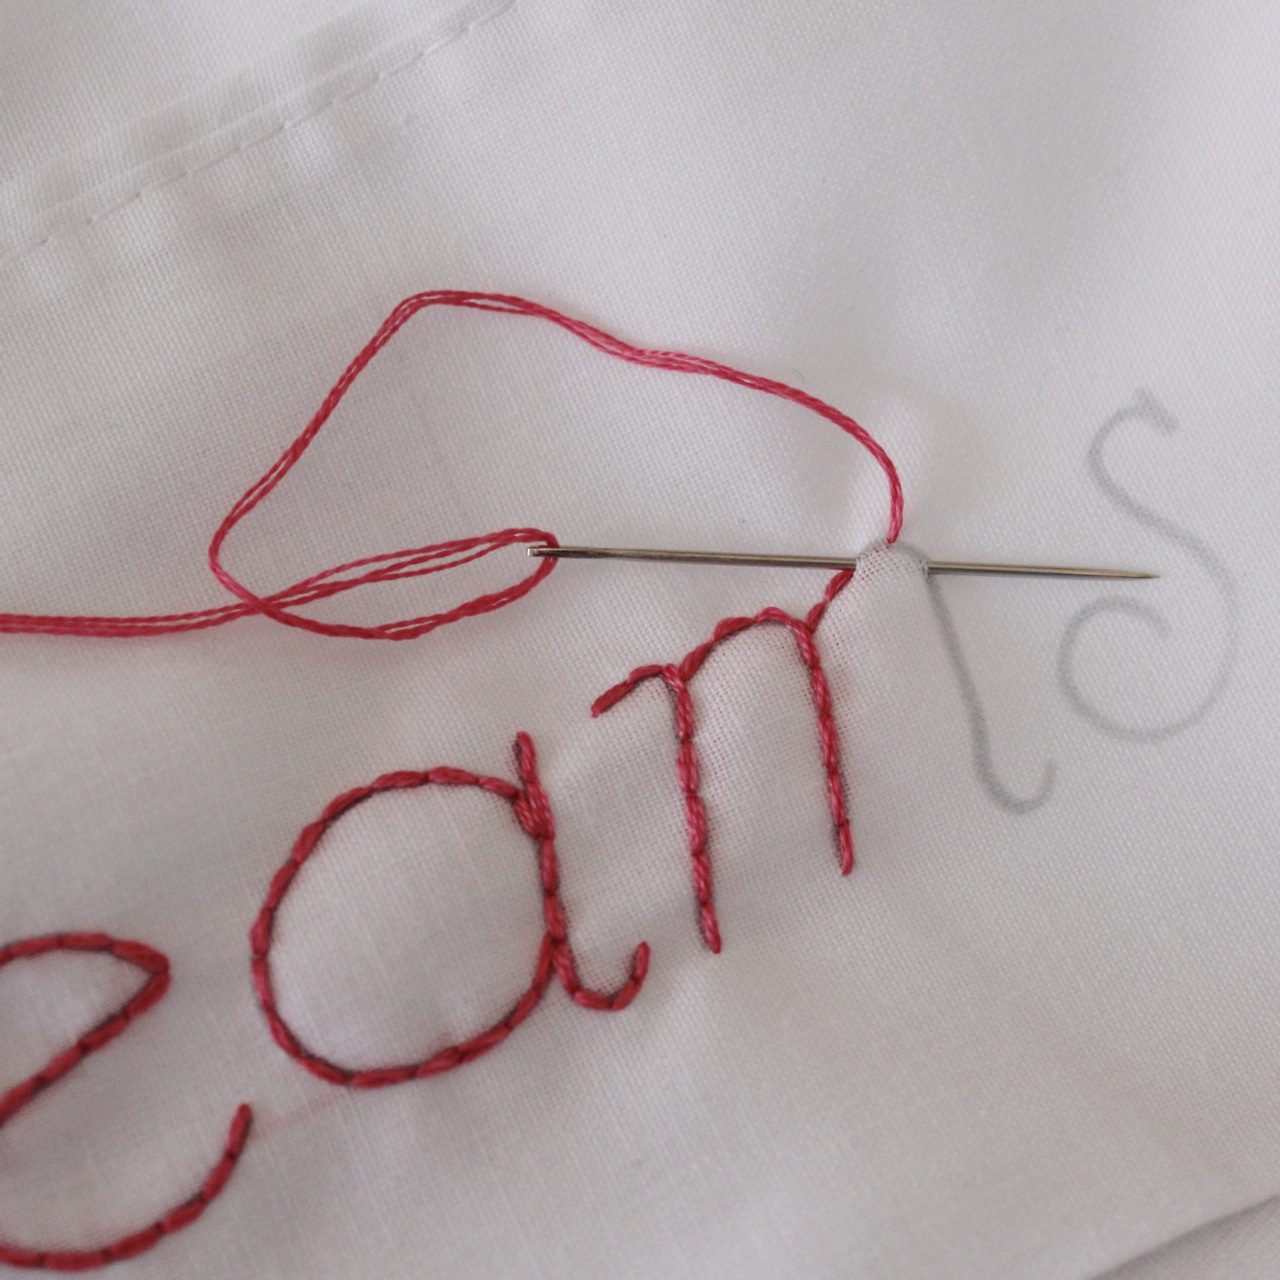
Continue backstitching your lettering, being careful to cover your transfer as you go. Try and keep your stitches the same length. However, make adjustments as you stitch so that you don’t end up with one unusually short or long stitch at the beginning or end of a letter.

Guide the needle to the start of each new letter as necessary. Consider the direction of stitching before you begin each letter, so you know exactly where you need to begin and end.

As you finish your thread, feed the needle down into the cuff and be careful to catch a number of your hidden stitches to help secure the thread. Bring the needle out through the back of the cuff and trim the excess thread away. Give the layers of the cuff a bit of a rub so that the cut thread disappears inside the fabric layers.

Embroider a Pillowcase with Molly and Mama09

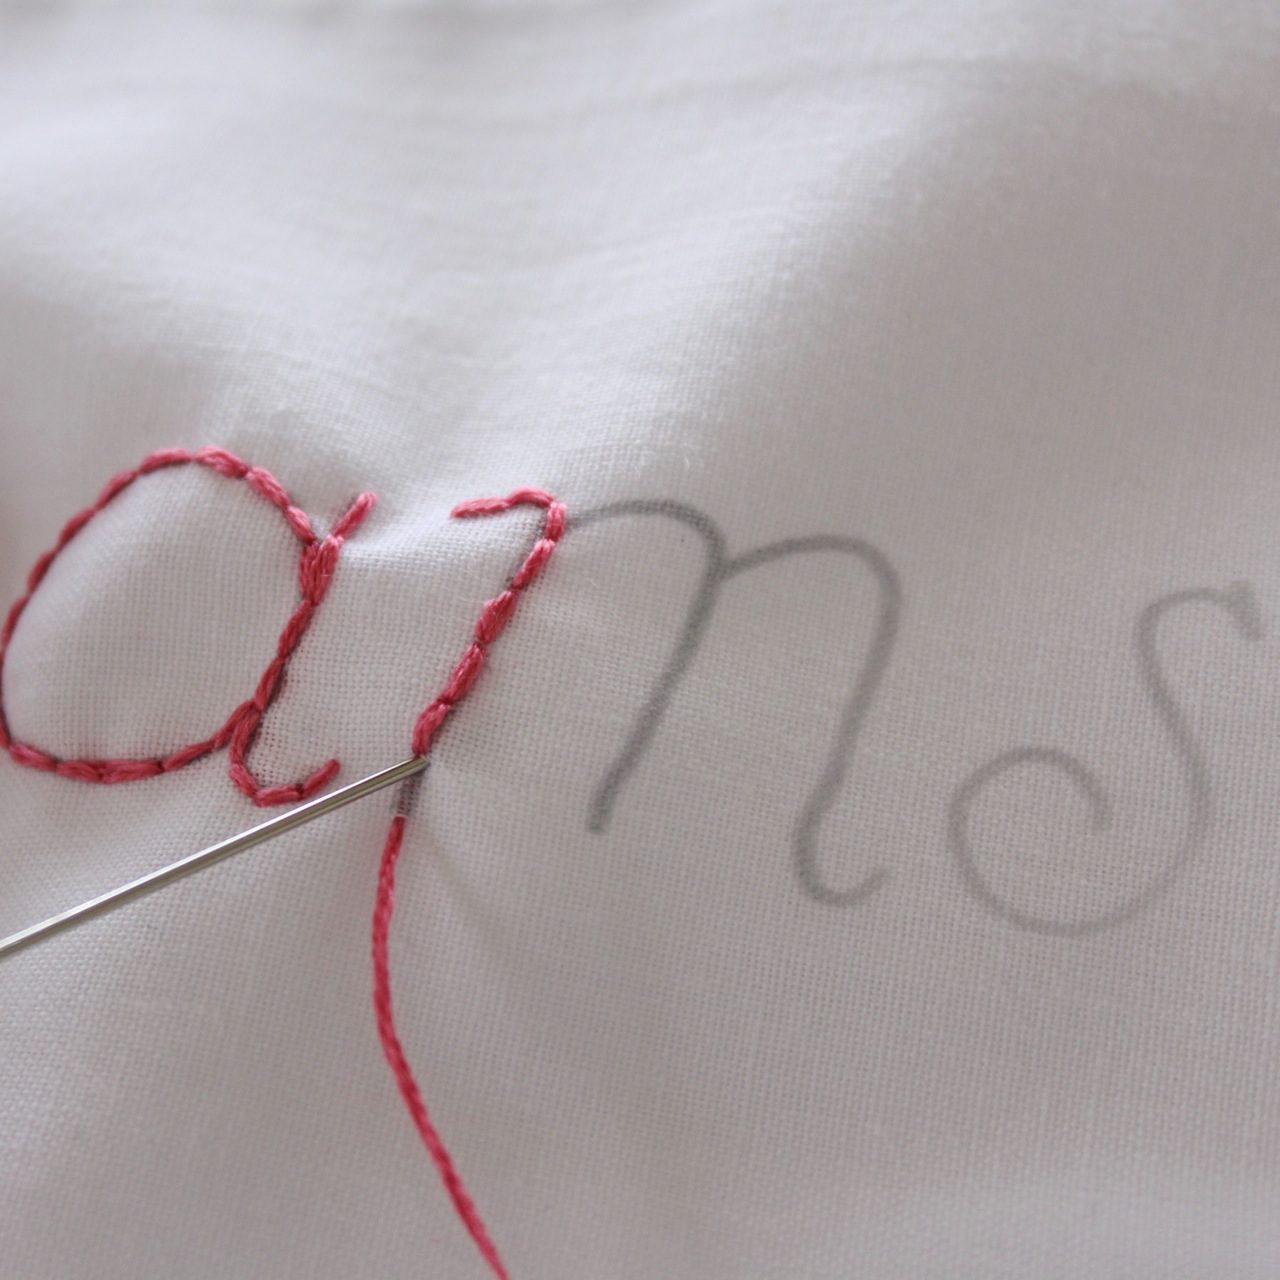
To start a new thread, follow the previous instructions to hide your knot and continue stitching.

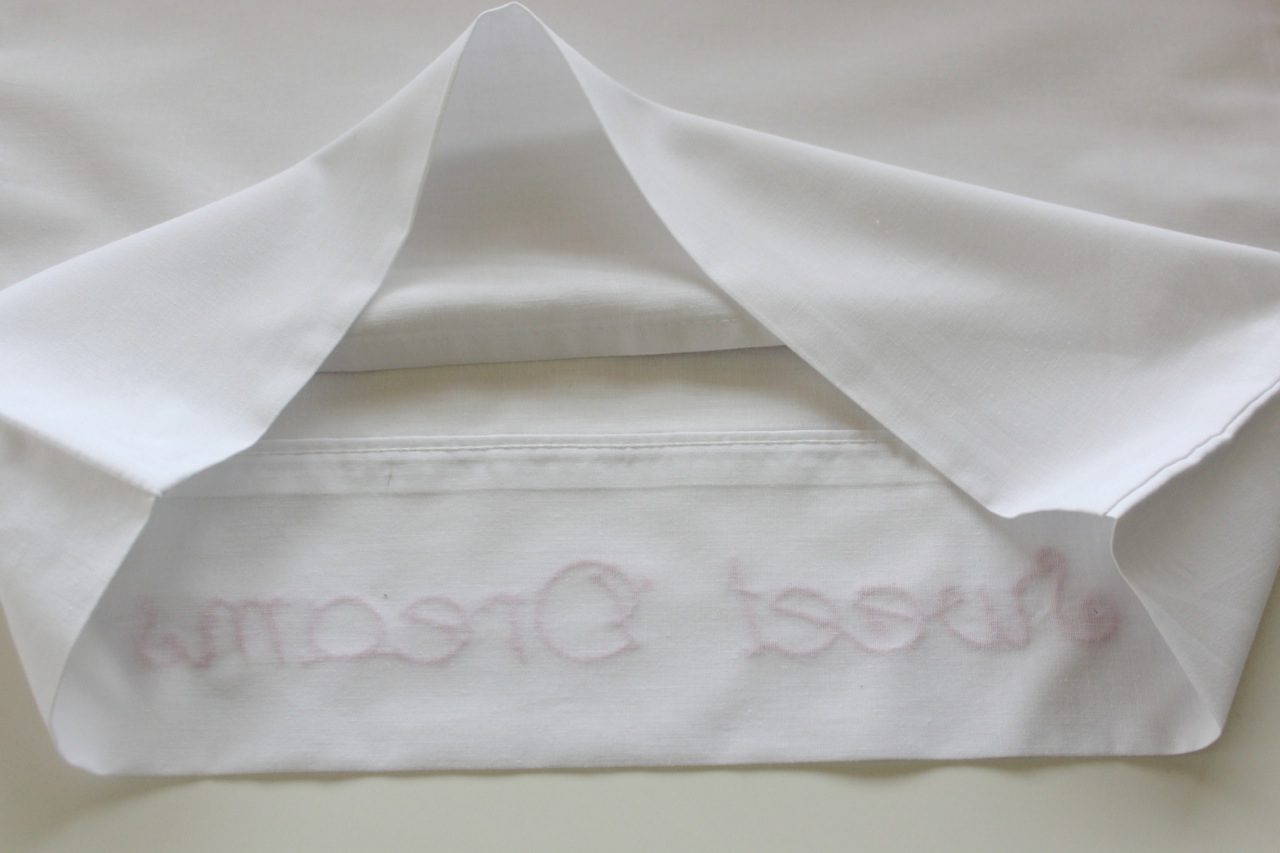
When complete, your stitching will look something like this from the back;

Embroider a Pillowcase with Molly and Mama21

And like this at the front;

Embroider a Pillowcase with Molly and Mama13

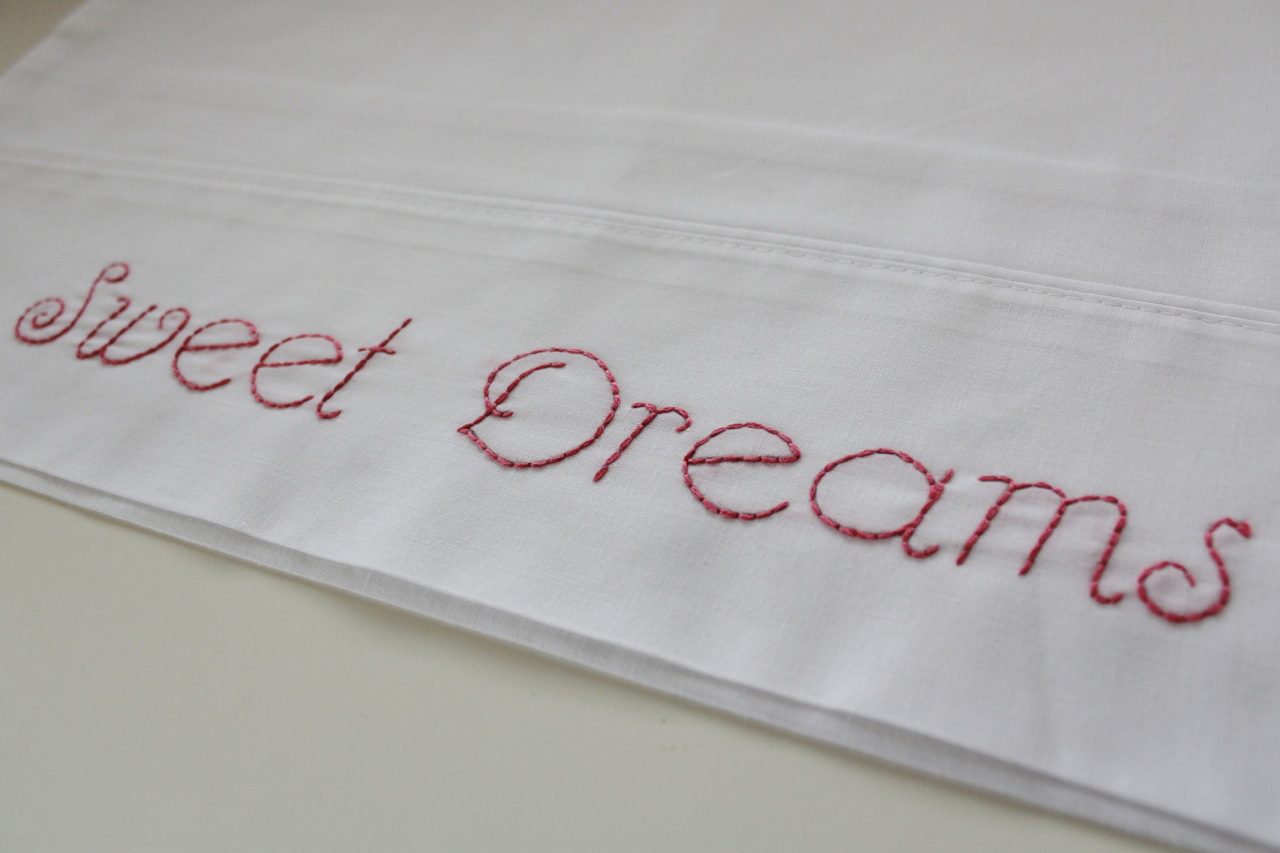
You could almost get away with telling someone you made the pillowcase yourself!

Give the finished pillowcase a quick press and you’re all ready for use!

Embroider a Pillowcase with Molly and Mama16

TIPS AND TRICKS

– Use light embroidery floss colours if you’re using a white or light coloured pillowcase. Darker thread colours will be more likely to show through from the back.

– For an everyday pillowcase that will be regularly laundered, be sure to really securely fasten your stitching. You’d hate to see your hard work come undone in the wash!

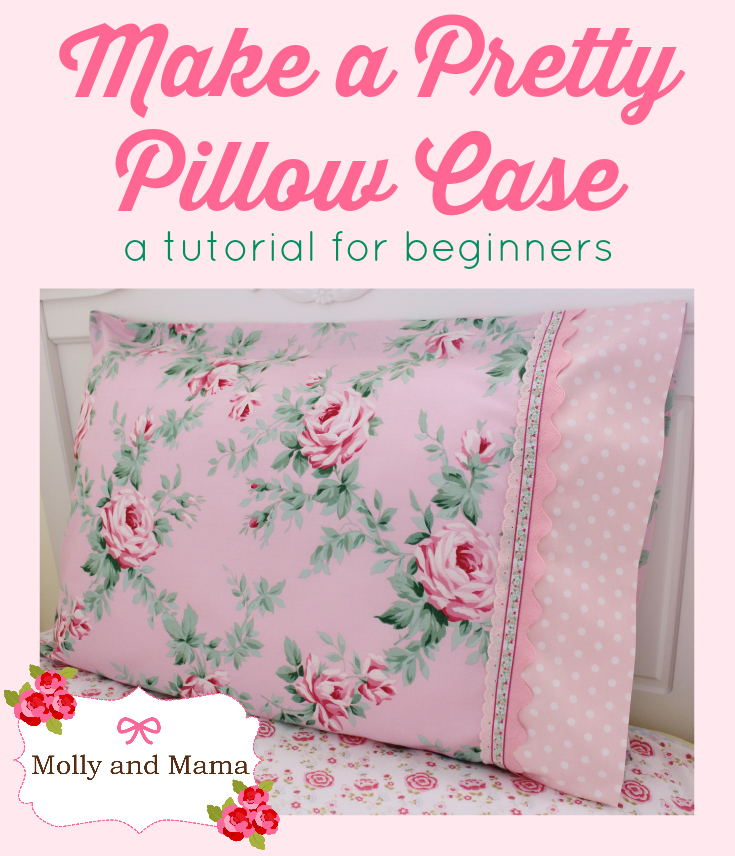
You can use the transfer technique and the backstitch instructions on any suitable project. If you’d like to have a go at making your own pillowcase, you can embroider your text or image before you start sewing. I put together a very simple ‘beginners’ pillowcase tutorial if you’re looking for instructions.

Sew a Pretty Pillowcase || a tutorial by Molly and Mama for www.SewMccool.com

If you’d like to see more inspiration, you can take a peek at my Girls Bedroom Ideas board on Pinterest. I really love seeing your creations, so please feel free to share your work on the Molly and Mama Facebook Page too.

Happy stitching, Lauren x

This post was written by Lauren Wright and appeared first on Molly and Mama  http://www.MollyandMama.wordpress.com

Filed Under: Tutorials Tagged With: back stitch, hand embroidery, iron on transfer, pillowcase

Comments

  1. Jackie Bisley says

    June 23, 2014 at 10:48 pm

    Lovely! Great tips on getting a clean finish <3

    Reply
    • Lauren at Molly and Mama says

      June 27, 2014 at 7:41 pm

      Thanks Jackie!

      Reply
  2. Madeleine (That Healthy Girl) says

    June 27, 2014 at 7:20 pm

    How adorable!

    Reply
    • Lauren at Molly and Mama says

      June 27, 2014 at 7:41 pm

      Thank you Madeleine!

      Reply
  3. Edward says

    October 1, 2017 at 3:28 am

    Looks good.. But I’m too bad with needle and threads.. Anyways.. Where do you buy your blank pillow case? Any idea where I can get bulk supply online? Need good quality.

    Reply
    • Lauren at Molly and Mama says

      October 7, 2017 at 3:37 pm

      Thanks for your comment Edward. I just buy my pillowcases from a department store. 🙂

      Reply

Trackbacks

  1. Make a Pretty Pillowcase | Molly and Mama says:
    October 5, 2014 at 9:45 am

    […] And if you’ve gotten this far, thanks for staying with me! I hope you’ve gotten something useful from the tutorial. I have another pillowcase tutorial which you may also enjoy HERE. […]

    Reply
  2. Little Girl’s Bedroom Makeover – Tutorial Series | Molly and Mama says:
    October 28, 2014 at 12:37 pm

    […] This tutorial is another variation on a personalised pillowcase. Simply embroider your favourite design onto a pre-made store bought pillowcase. It’s easy to transfer your design using an iron-on transfer pen. This pen has changed my life! If you’d like to read the tips and tricks for creating this easy project, stop by HERE. […]

    Reply
  3. Handmade Holidays Nov. 24: Thrifty Gifts | Sew Mama Sew | Outstanding sewing, quilting, and needlework tutorials since 2005. says:
    November 25, 2014 at 1:19 am

    […] Embroidery Pillowcase Embroidery makes the every day special, from Molly and […]

    Reply
  4. How to Back Stitch - practical tips for Hand Embroidery - Molly and Mama says:
    June 5, 2015 at 10:53 pm

    […] This FREE tutorial features back stitch and explains how to transfer text onto a pillowcase using an iron-on transfer pen. It also goes though the process of back stitching. […]

    Reply
  5. 31 Most Creative DIY Embroidery Ideas We Could Find - Diy says:
    June 5, 2017 at 5:57 am

    […] mollyandmama […]

    Reply
  6. 60 Perfect DIY Embroidery Ideas For Everyone | 101 DIY Crafts says:
    November 17, 2017 at 9:59 pm

    […] Image: mollyandmama.com.au […]

    Reply
  7. DIY Embroidery Projects That Will Change Your Life says:
    December 6, 2019 at 2:07 pm

    […] image via: Molly and mama […]

    Reply

Leave a Reply Cancel reply

Your email address will not be published. Required fields are marked *

Categories

  • Christmas (37)
  • Christmas Stocking Sew Along (6)
  • Easter (10)
  • Embroidery For Beginners (6)
  • English Paper Piecing (9)
  • Felt Fun (12)
  • Forest Family Quilt Along (10)
  • Holidays (11)
  • Molly and Mama Patterns (54)
  • Pattern and Book Reviews (38)
  • Projects (40)
  • Quilting Help (3)
  • This and That (50)
  • Tutorials (49)

Cart

mollyandmama

Studio For Pretty Stitches
After finishing my Summer Rose Pouch, I’m now wo After finishing my Summer Rose Pouch, I’m now working on a simple quilt made with @mabletandesigns new ‘Birds and Blooms’ collection with @pbsfabrics. I think it will be the perfect picnic companion. I love the way Mable’s prints and colours work together 🦜🌼. 

#mollyandmama #mabletandesigns #birdsandbloomsfabric #pbsfabrics #australianflorafabric #australianafabric #cockatoo #parakeet #parrot #quilting #quilt #quiltersofinstagram
It’s all in the details 🐰🌸💗 Ask for t It’s all in the details 🐰🌸💗 

Ask for the Easter Dilly Bag pattern at your favourite store (@creative_abundance can help with wholesale orders) or find the instant download pattern in my store(link in bio). Happy stitching! 

#mollyandmama #easterdillybag #tildahappycampers #drawstringbag #chocolatefreeeaster #tildahappycampersfabric #ilovetilda #twogreenzebras #tildaaustralia #devonstonesolids #tildameadow #embroidery #eastersewing #easterbag #easterbasket #easterdillybag #fabricyoyos #suffolkpuffs #yoyos #bunnyembroidery #flowerembroidery #creativeabundance
🪡NEW INSTA CHALLENGE! WHO’S IN?🪡 Like man 🪡NEW INSTA CHALLENGE! WHO’S IN?🪡

Like many of you, the new year has already begun with lots of sewing and fun in my studio. But sometimes the aftermath of all of that creating and making is overwhelming. I'm not convinced my sewing space is working for me, or that I have everything set up so that I can use my space, supplies and materials as easily as possible. I'd love to be more intentional about the way I use my sewing studio. My friend Ali from @arabesquescissors feels exactly the same way! 

For the month of February, Ali and I are going to co-host an instagram challenge that helps us sort out what's working in the studio, what's not, and what we can do about it. We'd be really thrilled if you joined us on the journey! We’ll be using the hashtag #seworderly to help bring you tips and tricks that are organised into weekly themes. We’d love to hear your tips too. Between all of us, we’re sure this amazing community can share some wonderful ideas! 

To celebrate the lead up to our challenge, we’re asking you to post a photo on your public profile using the #seworderly hashtag, and sharing where you’d like some organisational help. Who’ll share a ‘before’ shot of their sewing space 🙋🏼‍♀️? 

We’ll be sharing more in the coming week about how to join in and as a little incentive there’ll even be some prizes up for grabs! Follow @mollyandmama and @arabesquescissors to stay in the loop. I’m really looking forward to getting #seworderly! Are you? 

#mollyandmama #arabesquescissors #seworderly #sewingroomcleanup #instachallenge #instagramchallenge #loveyoursewingspace
✨🐝🌼 This was the very first prototype for ✨🐝🌼 This was the very first prototype for my Serious Sewist’s Pin Cushion. There’s something so warm and peaceful about those lemon tones. And I just love the addition of the sparkly gold thread! ✨✨

This sewing pattern now comes with a matching scissor charm too. So sweet! Check out the listing in my store for more details 😄

#mollyandmama #serioussewistsset #libertyfabric #libertytanalawn #iloveliberty #vintageliberty #felt #woolfelt  #feltapplique #appliquebee #feltbee #hexies #hexagons #englishpaperpiecing #epp #handstitched #slowsewing
Well my sneak preview has turned into a pouch! I d Well my sneak preview has turned into a pouch! I decided to use @mabletandesigns’ fabric ‘Birds & Blooms’ (with @pbsfabrics) to sew a new ipad cover using my Summer Rose Pouch pattern. But once I was finished, I realised it was perfect for a portable sewing kit too. I’m starting on a new colourway of the Nan’s Garden Stitchery in the hoop here. @creative_abundance wholesale the preprinted linens and creative cards for this project. But I will also have the PDF pattern ready to go in the next week! 

#mollyandmama #summerrosepouch #pouchpattern #nansgardenstitchery #creativeabundance #mabletandesigns #birdsandbloomsfabric #pbsfabrics #australianflorafabric #australianafabric #cockatoo #parakeet #parrot #aurifilthread #aurifloss #aurifilartisan #embroideryfloss #aurifilfloss #ipadcover #ipadpouch #hoopart #embroideryhoop
🐰🌸 Who’s thinking about Easter sewing alre 🐰🌸 Who’s thinking about Easter sewing already? I designed this little Easter Dilly Bag pattern as a cute little egg holder for chocolate egg hunts (see those front pockets?). But I’m realising that it will also be perfect for storing my #bittybunnies and the #rosierabbitornament collection, after Easter too! I also created a Christmas version to hold my felt gingerbread ornaments (scroll down my feed to see). 

You can find this pattern in my shop and stores can order wholesale from @creative_abundance 🐰🌸 

#mollyandmama #easterdillybag #tildahappycampers #drawstringbag #chocolatefreeeaster #tildahappycampersfabric #ilovetilda #twogreenzebras #tildaaustralia #devonstonesolids #tildameadow #embroidery #eastersewing #easterbag #easterbasket #easterdillybag #fabricyoyos #suffolkpuffs #yoyos #bunnyembroidery #flowerembroidery #creativeabundance
🐝🌸 You’ve seen my pretty floral Serious Se 🐝🌸 You’ve seen my pretty floral Serious Sewist’s Set, but here’s a sweet Liberty Wiltshire version. I love @libertyfabrics tana lawn, especially when it’s paired with linen.

Find out more about this new pattern in the listing details. Tap the photo or head to the shop link in my profile. 

#mollyandmama #serioussewistsset #libertyfabric #libertytanalawn #iloveliberty #libertywiltshire #felt #woolfelt  #feltapplique #appliquebee #feltbee #scissorkeeper #scissorcharm #hexies #hexagons #englishpaperpiecing #epp #handstitched #slowsewing #aurifil #aurifloss #aurifilfloss #embroideryfloss #aurifilartisan
I’m loving @mabletandesigns new collection ‘B I’m loving @mabletandesigns  new collection ‘Birds & Blooms’ for @pbsfabrics. And hand quilting with @aurifilthread embroidery floss is a dream! Can you guess which of my patterns this will become? 

#mollyandmama #mabletandesigns #birdsandbloomsfabric #pbsfabrics #australianflorafabric #australianafabric #cockatoo #parakeet #parrot #binding #summerrosepouch #fatquarterbundle #fabriccollection #fabricpull #aurifilthread #aurifloss #aurifilartisan #embroideryfloss #aurifilfloss
🐝🤍 It’s here! Thank you so much to those w 🐝🤍 It’s here! Thank you so much to those who have already purchased the Serious Sewist’s pin cushion and scissor charm pattern set. Tap the photo for a direct link, or head to my profile. 

#mollyandmama #serioussewistsset #felt #woolfelt  #feltapplique #appliquebee #feltbee #scissorkeeper #scissorcharm #hexies #hexagons #englishpaperpiecing #epp #handstitched #slowsewing #missrosesisterviolet #rileyblakedesigns #iloverileyblake #rileyblake #roseandvioletsgardenfabrics #aurifil #aurifloss #aurifilfloss #embroideryfloss #aurifilartisan #fatquarterbundle #roseandvioletsgardenfabric
Load More… Follow on Instagram
© Copyright 2020 - Molly and Mama