Molly and Mama

Studio for Pretty Stitches - Inspiring ideas for Felt, Stitchery and Patchwork

  • Home
  • Start Here!
  • PATTERNS
    • PDF Pattern Shop
    • Paper Pattern Stockists
    • Pattern Corrections
  • TUTORIALS
  • Classes
  • BOOK
  • Contact

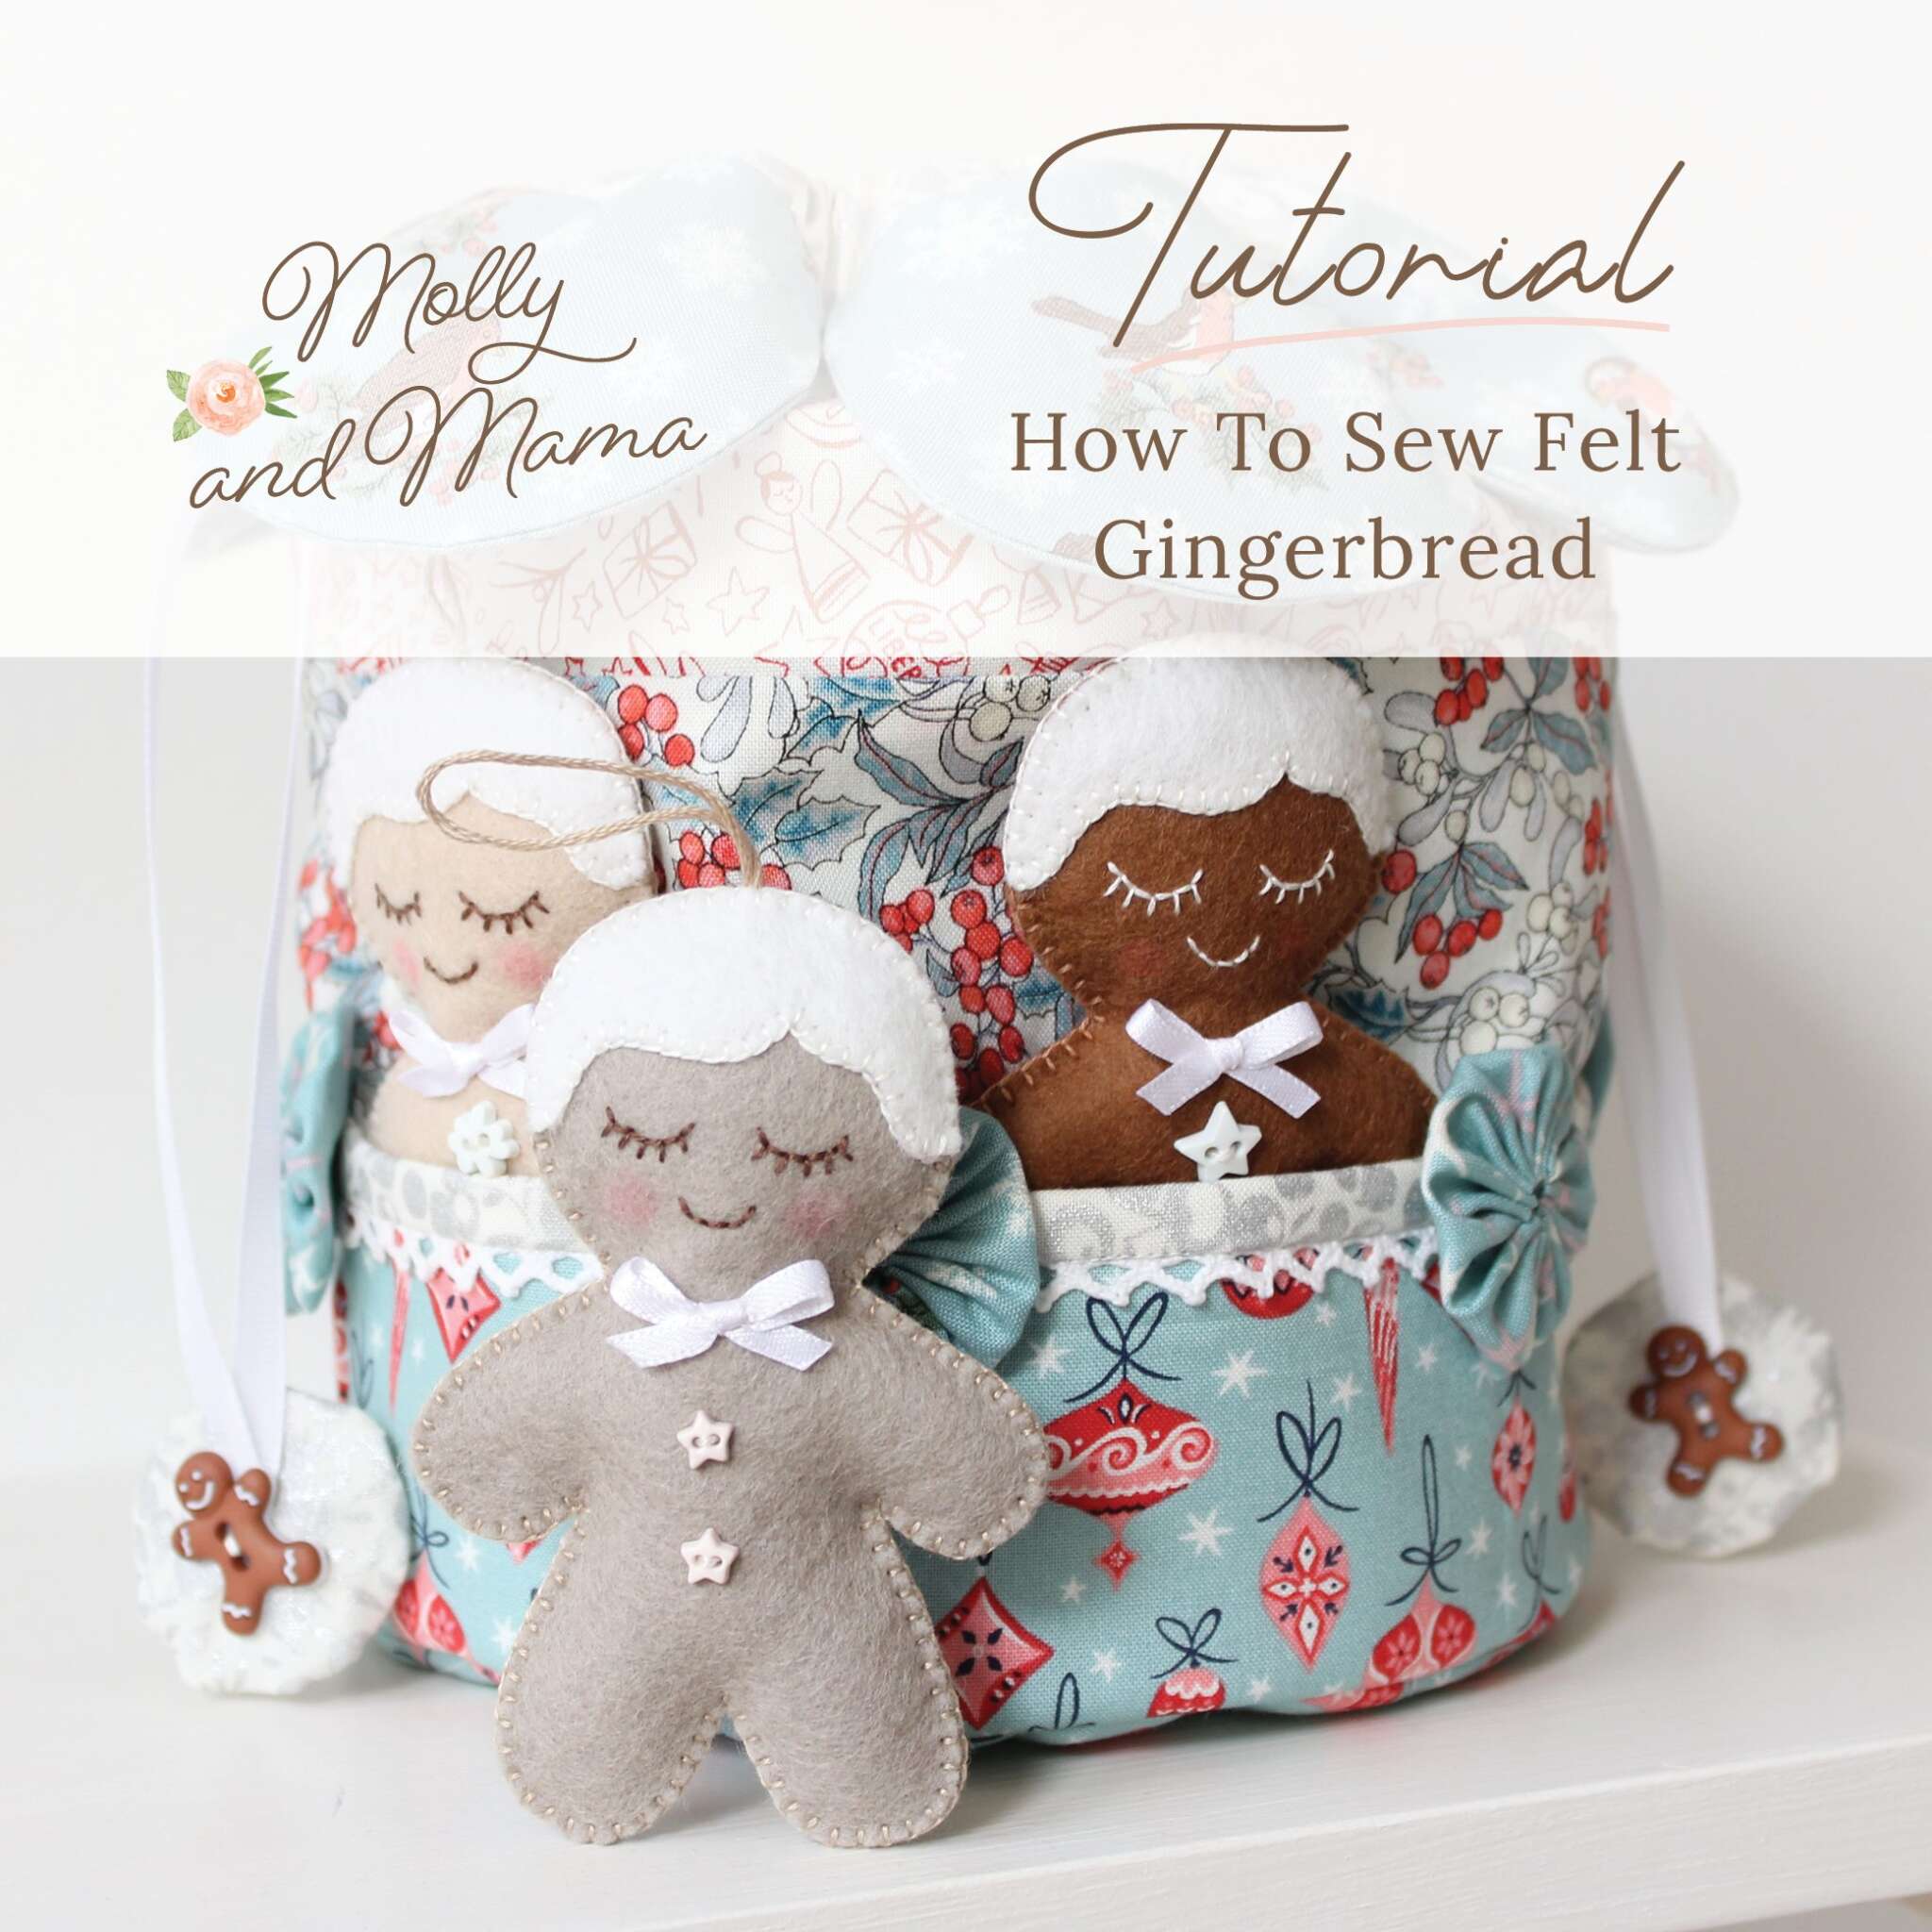
Sew A Gingerbread Ornament and Pretty Christmas Dilly Bag

November 24, 2020 By Lauren at Molly and Mama 6 Comments

Last week I added a new sewing pattern to my range; the Easter Dilly Bag. It was designed earlier in the year for the Tilda Club and it’s just been made available for release. It’s such a pretty and sweet project and I love it dearly.

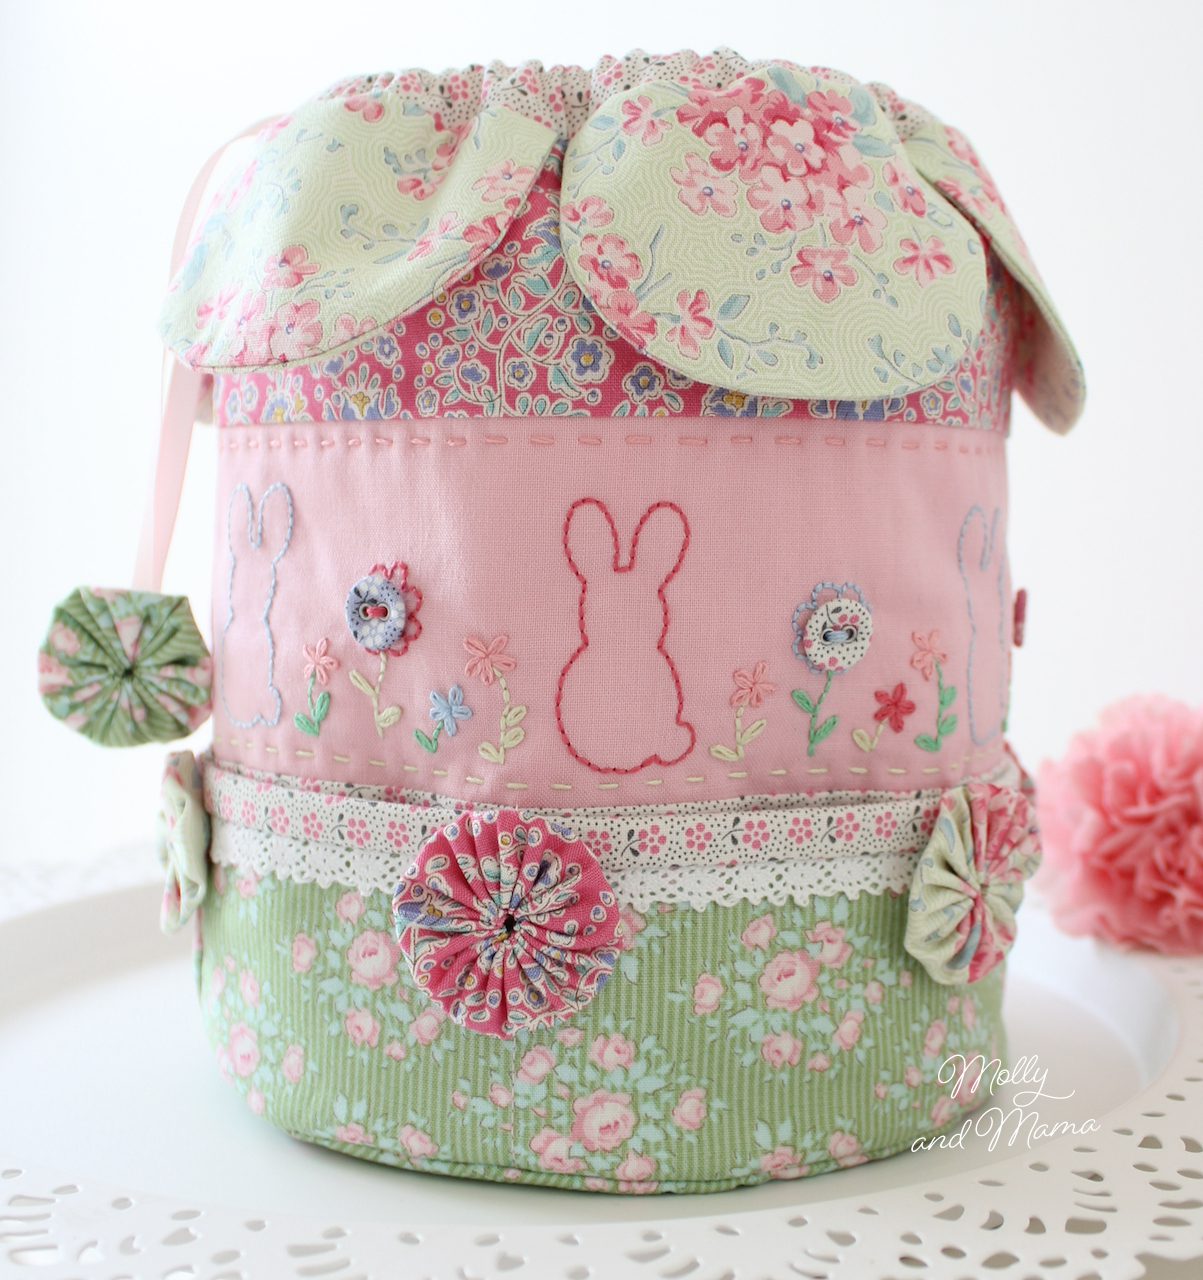
But it’s hardly suitable for the festive season! So I decided it was perfect timing to sew another version of the bag in these gorgeous Liberty quilting cottons from the ‘Festive Collection’ range, thanks to Riley Blake.

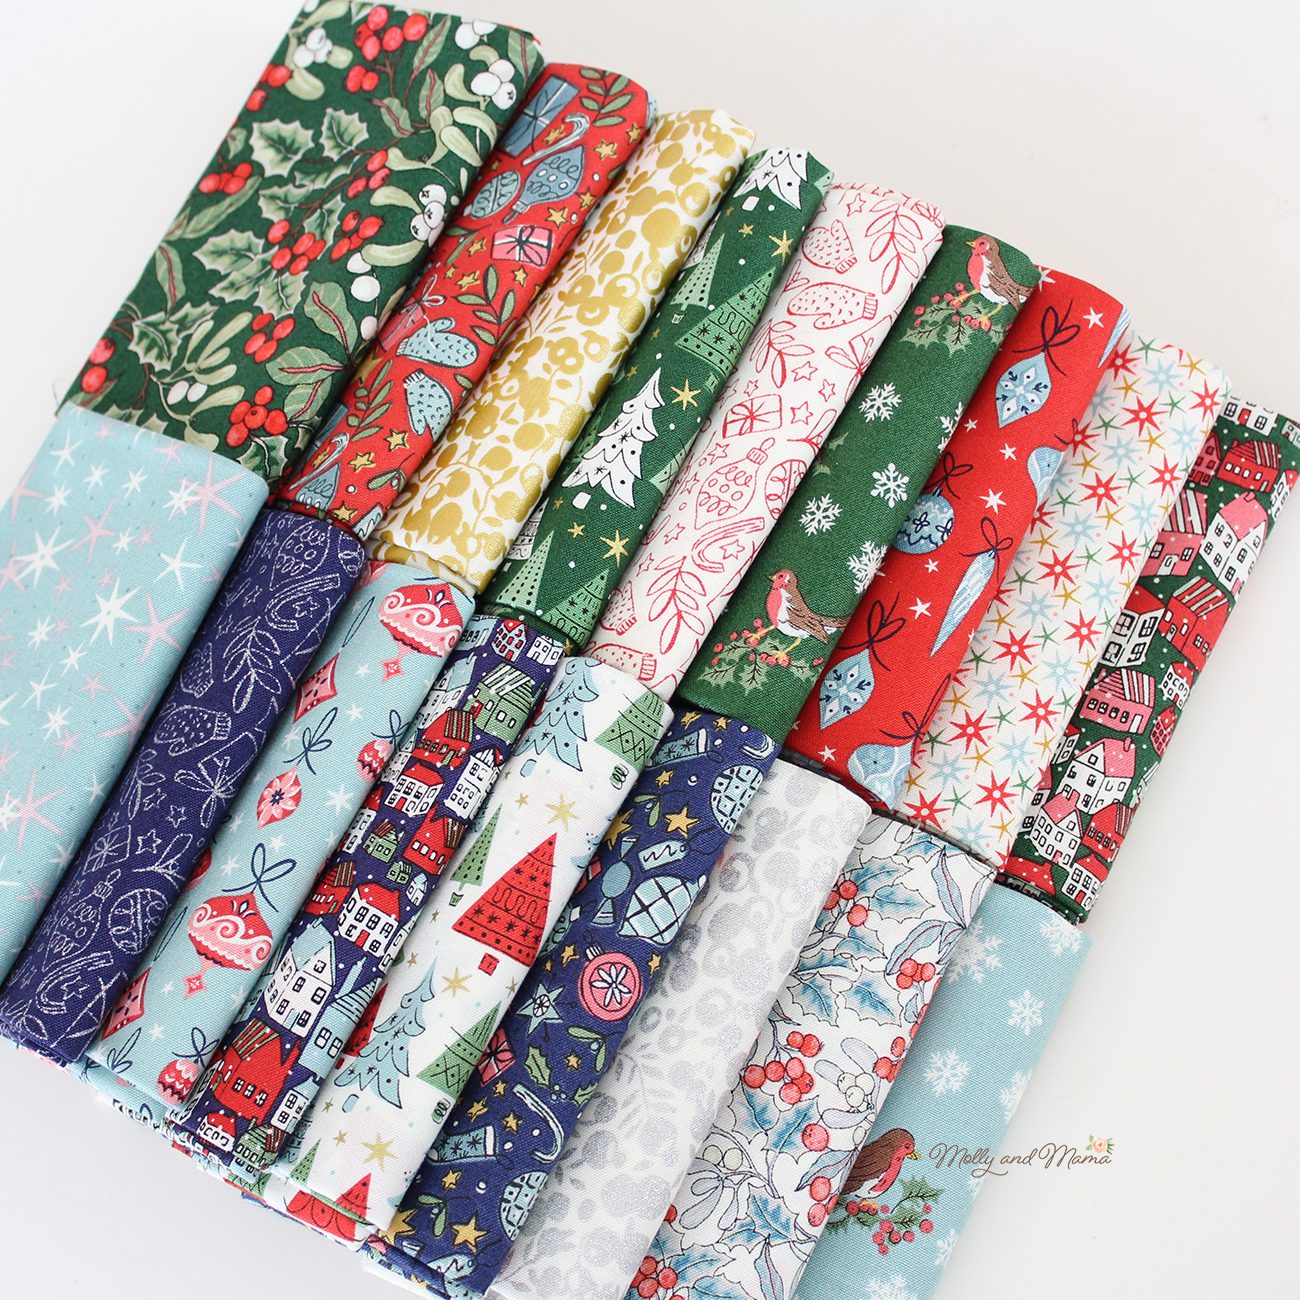
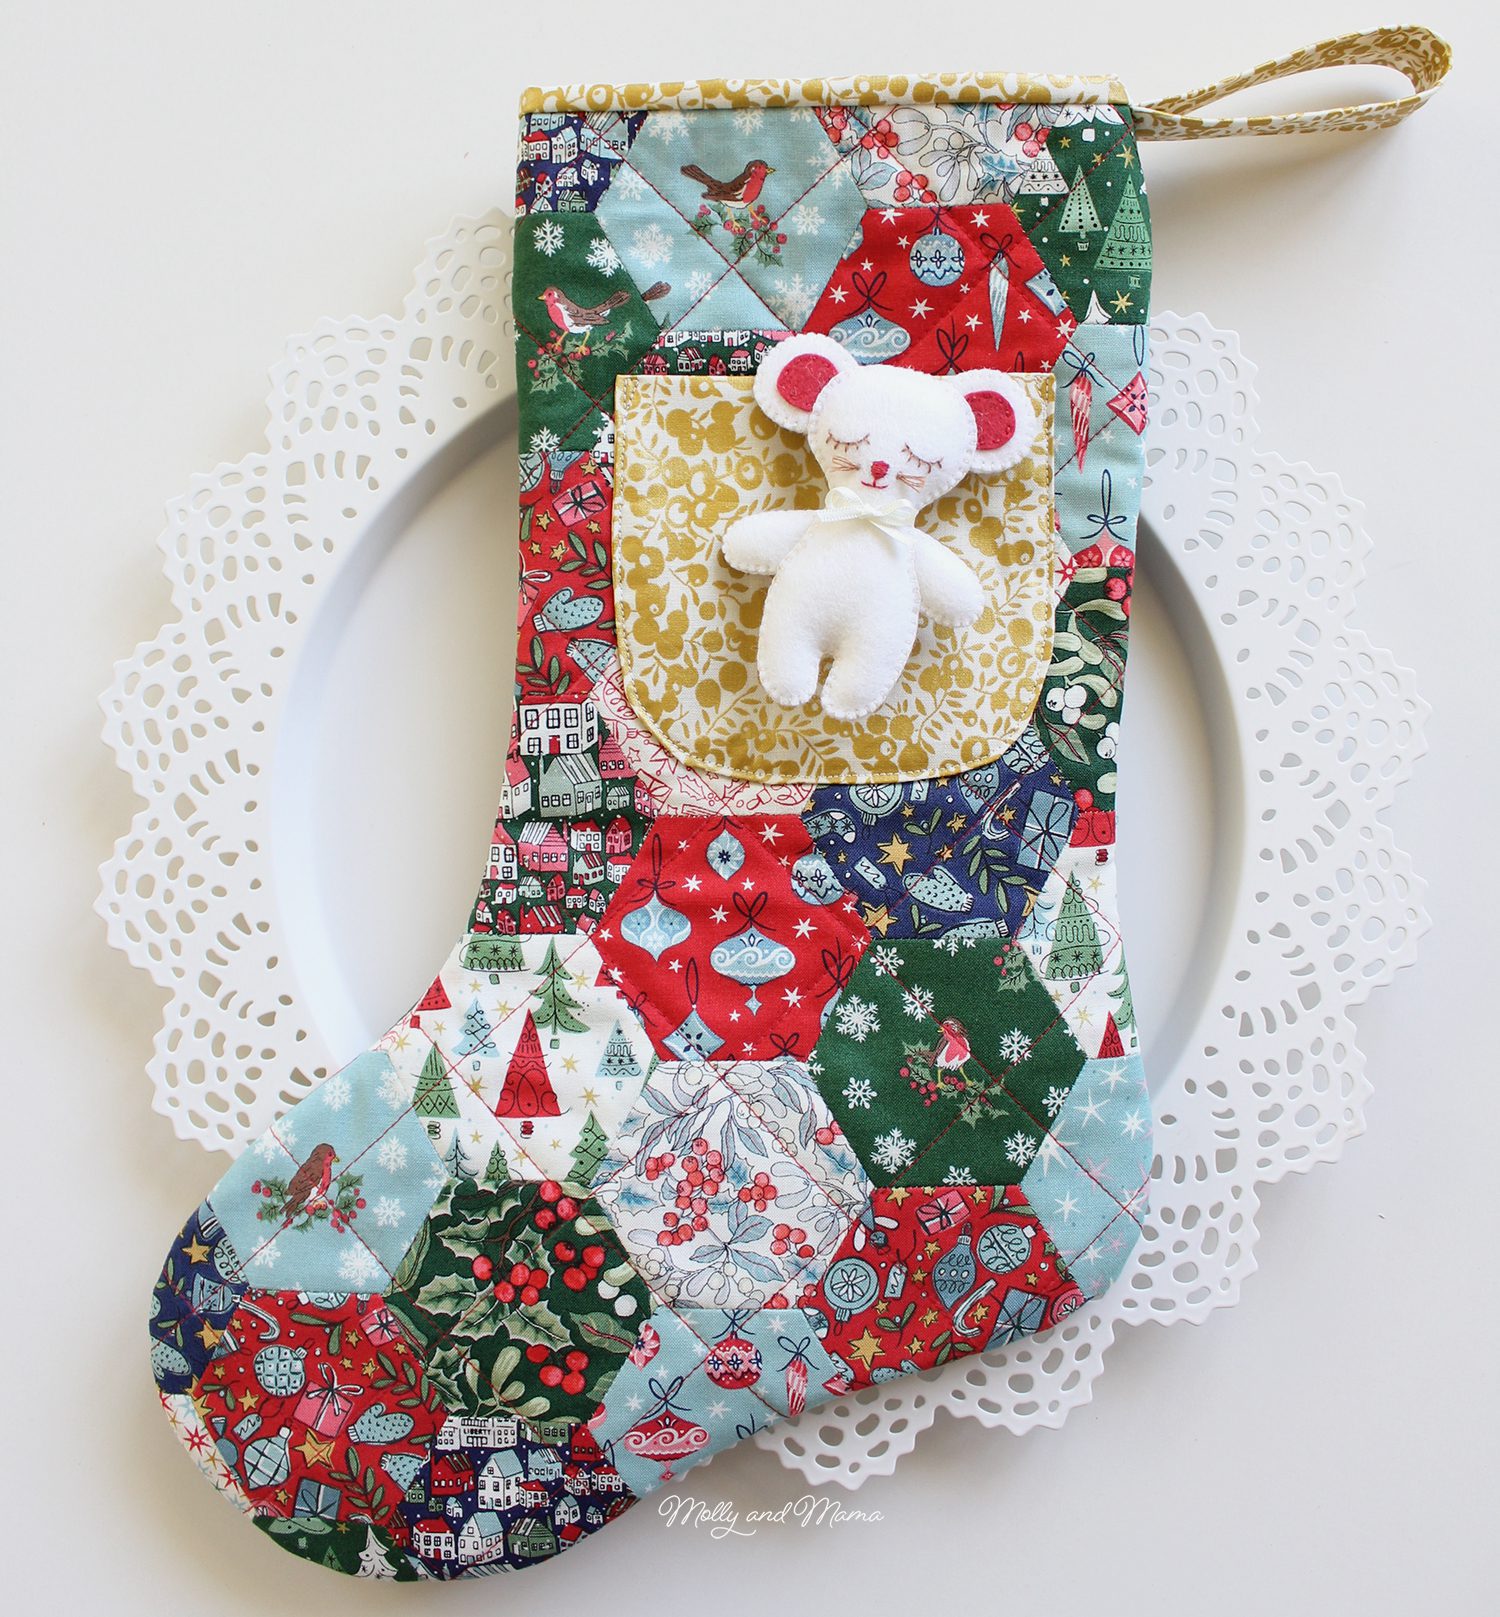
I recently used these lovely prints to create a new version of my ‘Night Before Christmas Stocking‘ pattern. You can read more about it here. But there were too many pretty left-overs just calling to be used again.

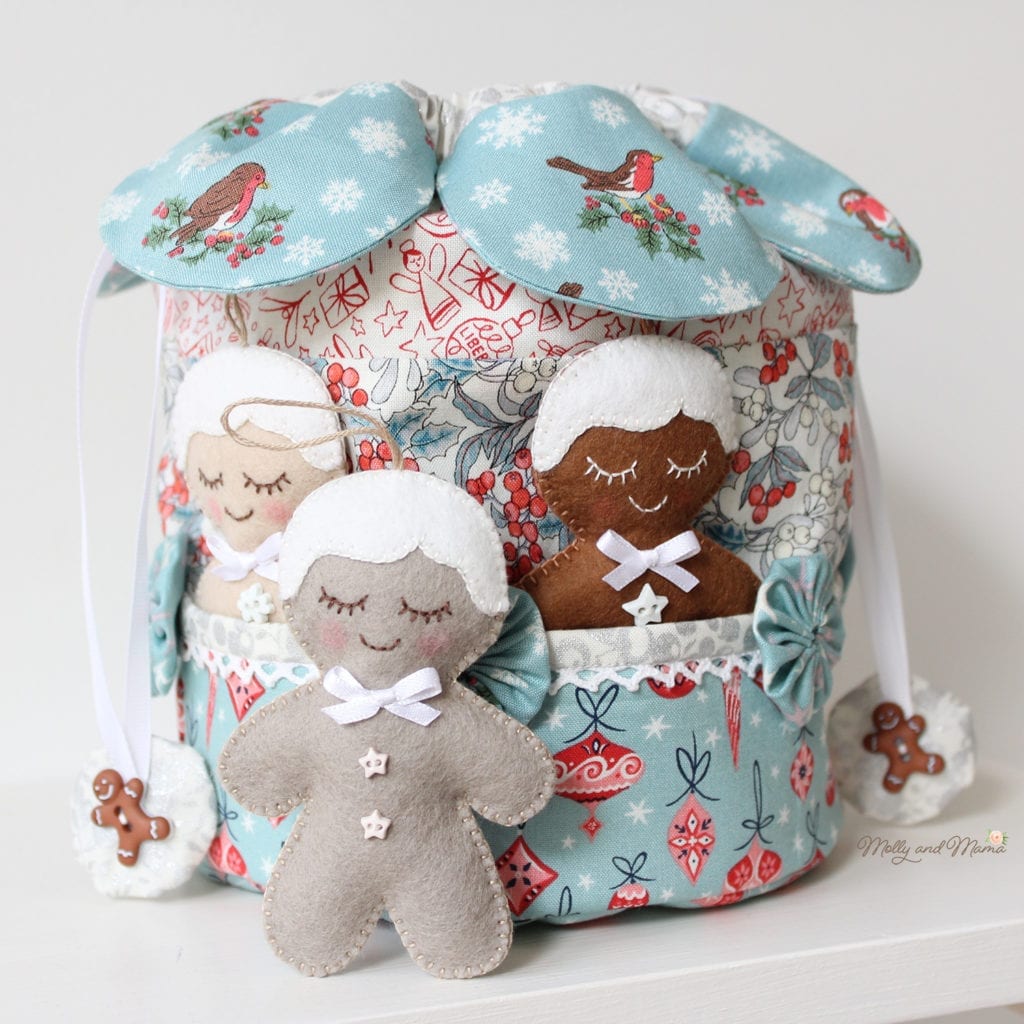
So I created the Christmas Dilly Bag by simply replacing the embroidered panel with a print fabric instead. All the other steps and instructions have been followed.

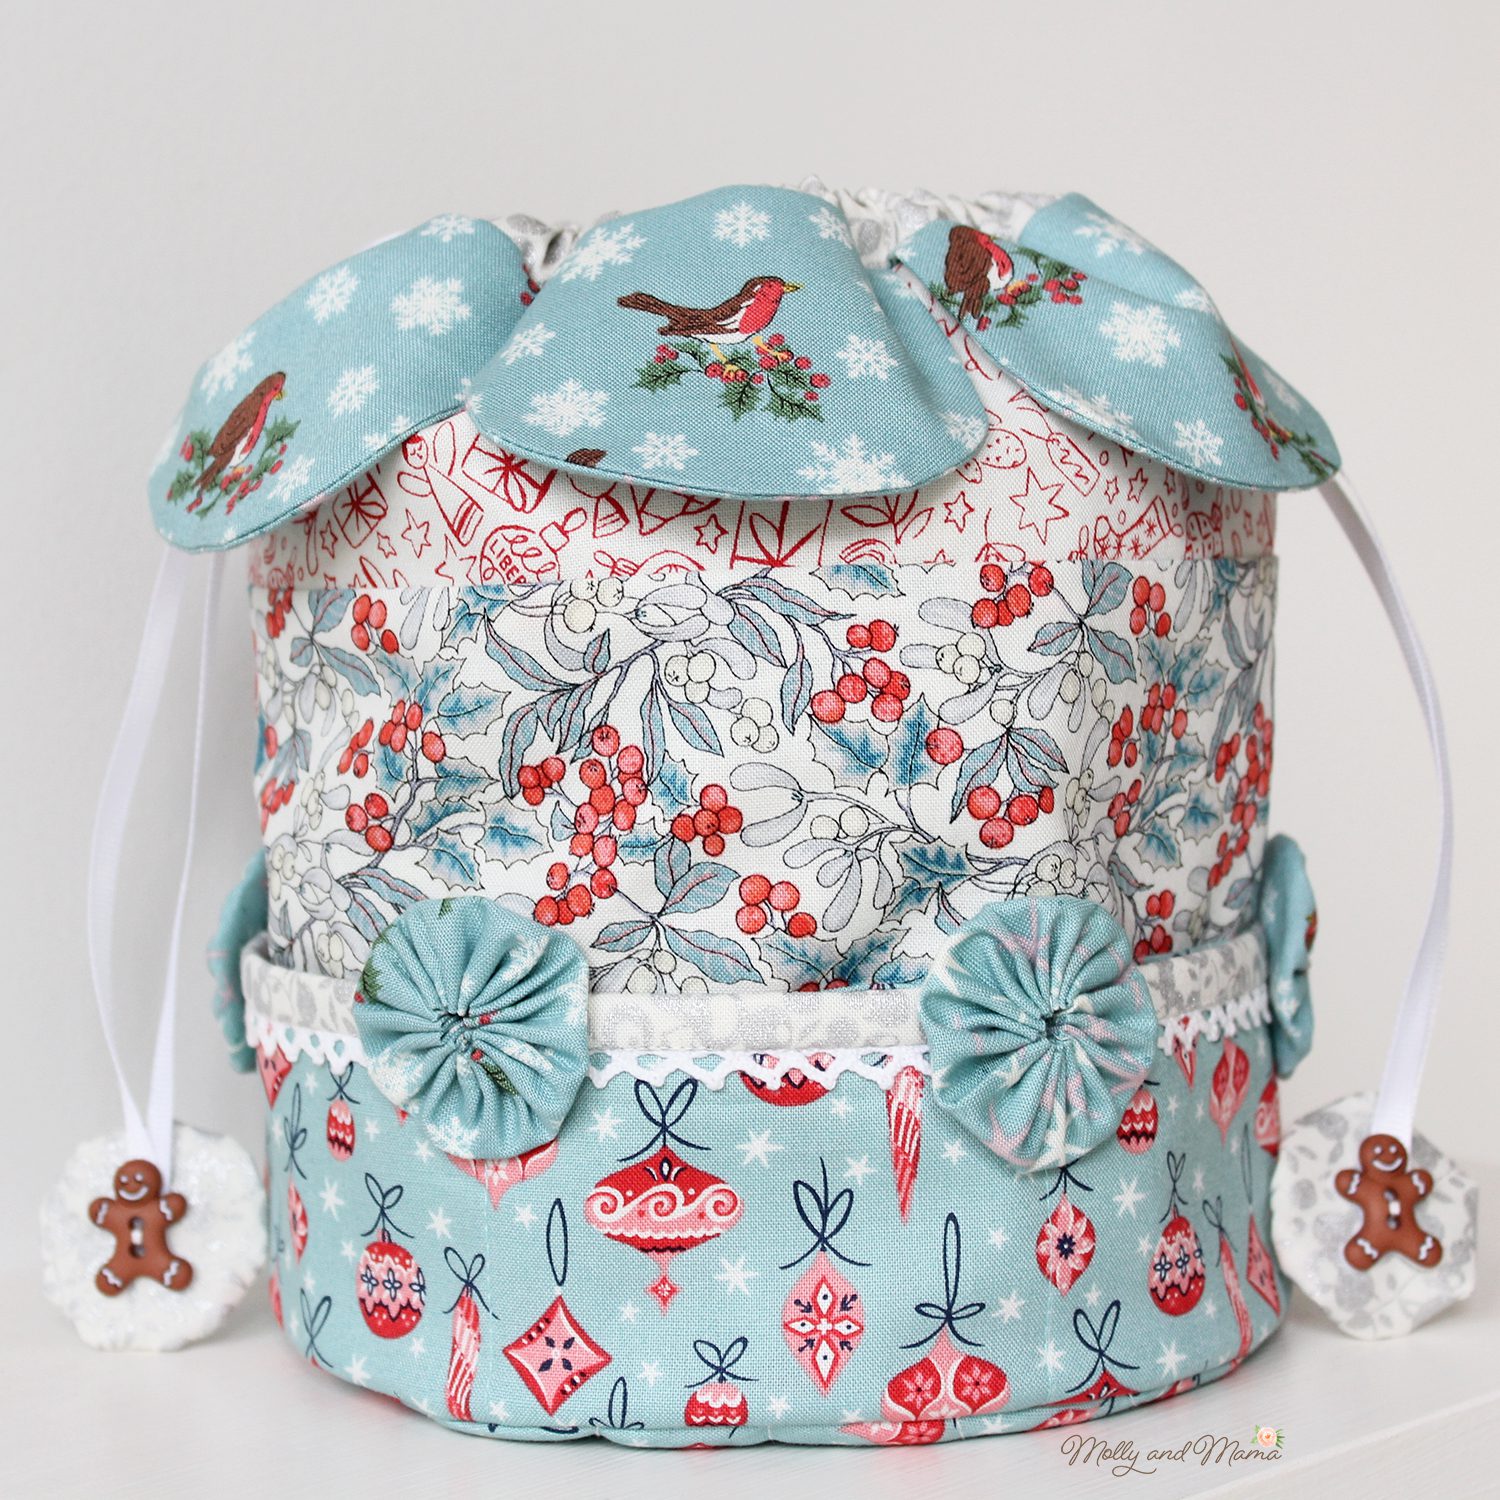
The only difference is the cute gingerbread buttons I added to the ribbon pulls!

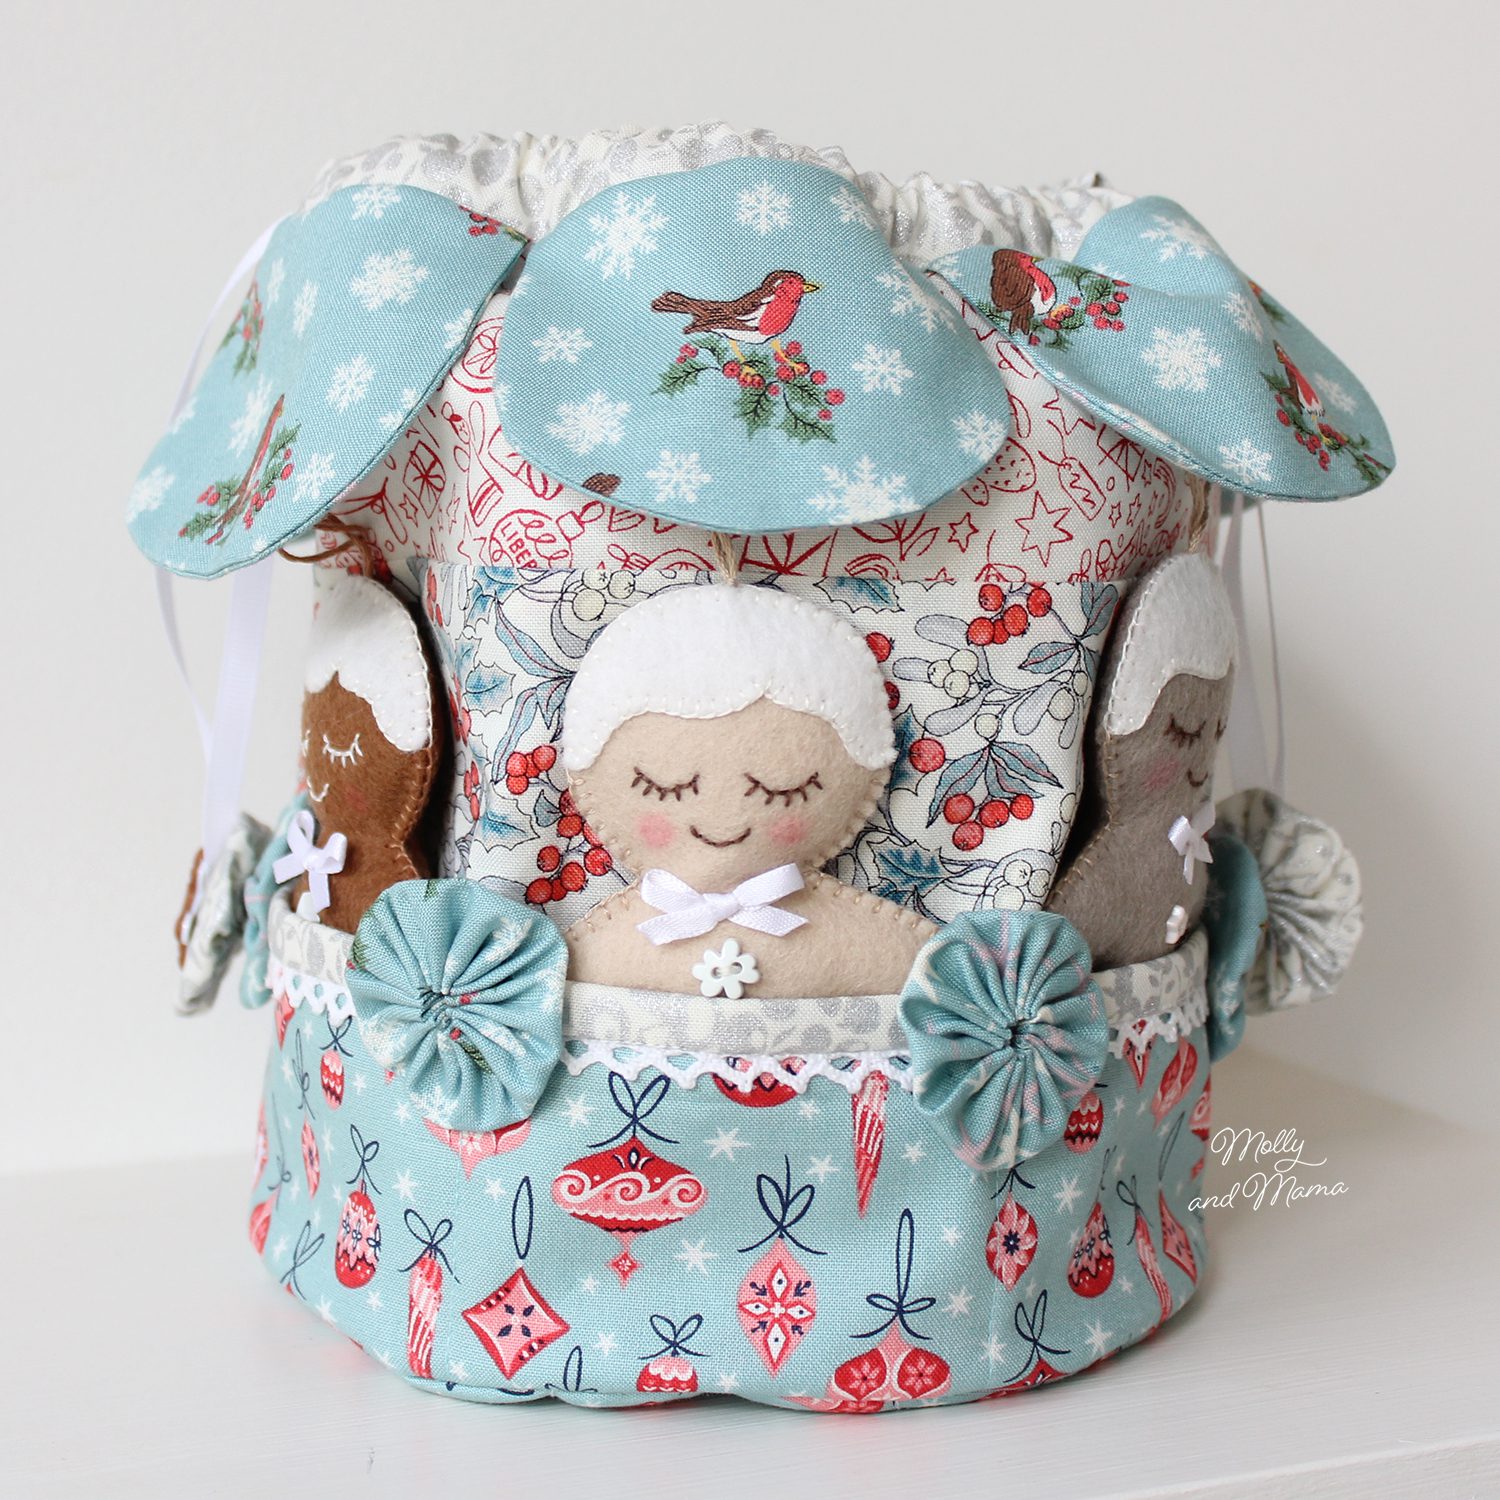
The Easter version was designed to hold Easter eggs. And I couldn’t leave those pockets empty, so I decided to make some scrumptious little felt gingerbread ornaments for my new Christmas version. They fit perfectly in the pockets and you could also fill the bag with more. What a terrific way to give this project a Christmas makeover that was perfectly timed for the Festive Sew A Softie tutorial hop.

If you’d like to create your own dilly bag, please head to the store to grab an instant download pattern. Then scroll on for the full instructions to sew the gingerbread ornaments.

BUY THE BAG PATTERN

Make A Gingerbread Ornament!

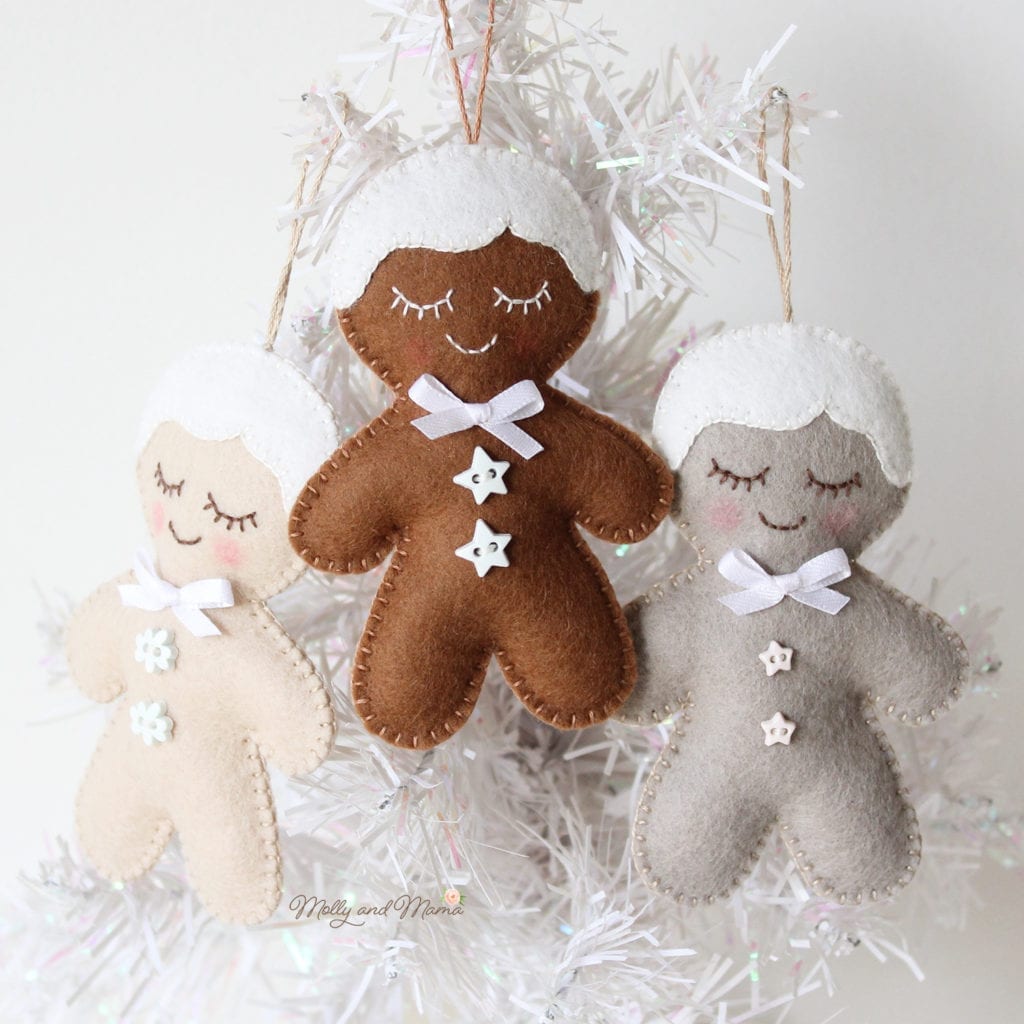
FINISHED SIZE: These ornaments are 4 1/4″ (11cm) tall

You Will Need;

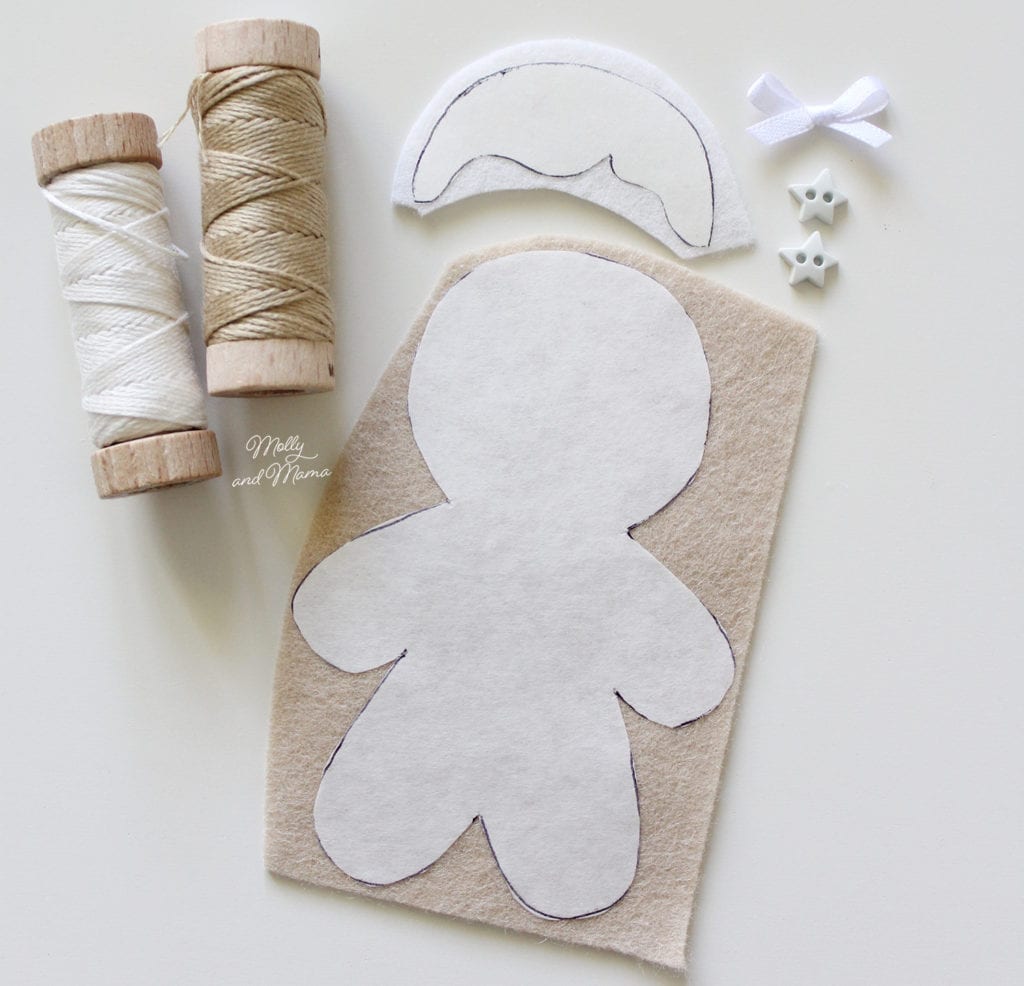
  • 7″ (18cm) x 4.5″ (12cm) of gingerbread coloured felt. I love to use 100% wool felt and here’s why.
  • 2.5″ (6.5cm) x 1.5″ 4cm) of cream coloured felt
  • embroidery floss in gingerbread, cream and brown (I use Aurifil Cotton Floss)
  • embroidery needle
  • 5″ (13cm) square of freezer paper
  • 2.5″ (6.5cm) square of tissue paper or fine tracing paper
  • pink colouring pencil
  • 6″ (15cm) narrow ribbon for a bow
  • 2 small decorative buttons
  • handful of polyester hobbyfill
  • general sewing supplies
  • print out of the template
DOWNLOAD THE TEMPLATE

Let’s Get Stitching

Print out the Gingerbread Ornament Template without any scaling or cropping, then measure the 1 inch test box to ensure the template printed at the correct size. (Modify the print size by adjusting your printer settings to create gingerbread ornaments that are larger or smaller if you wish).

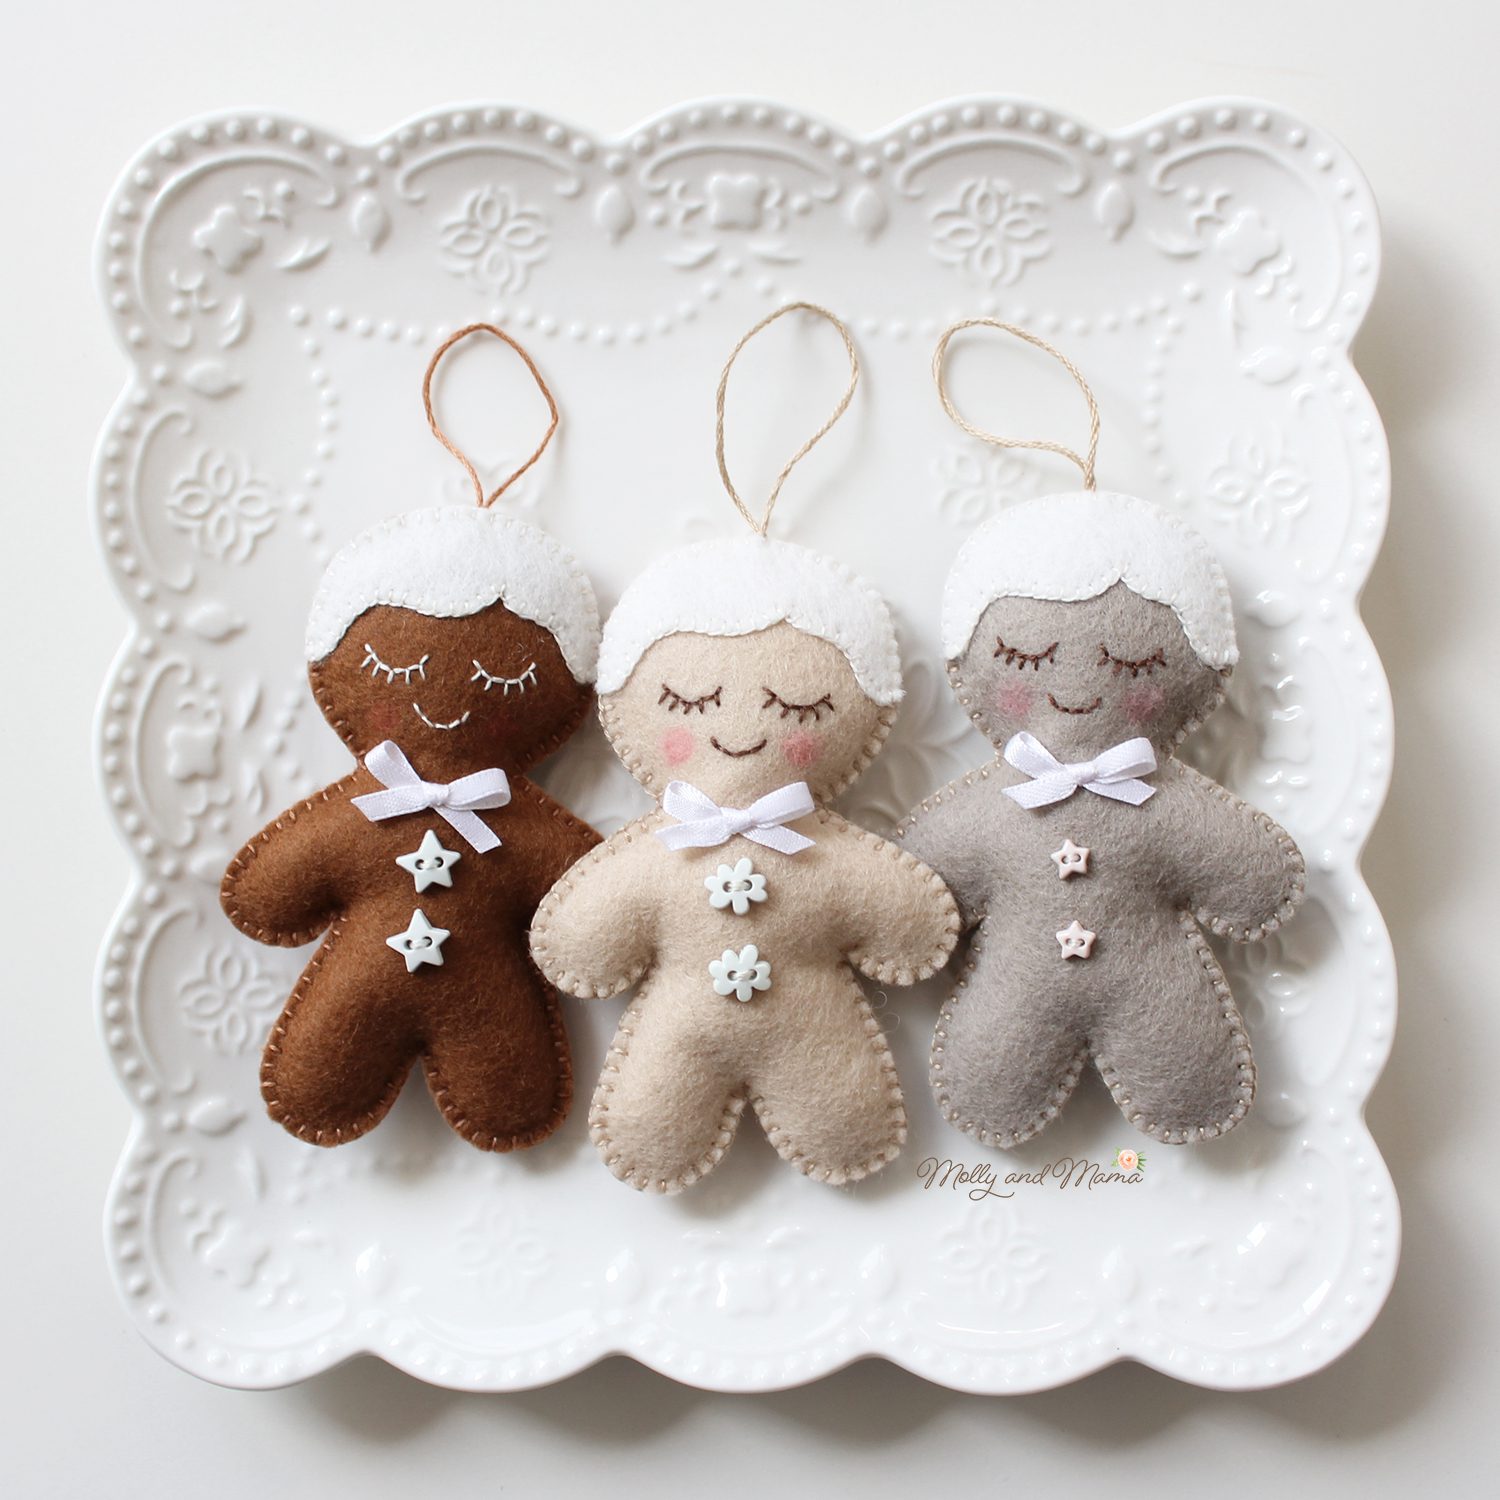
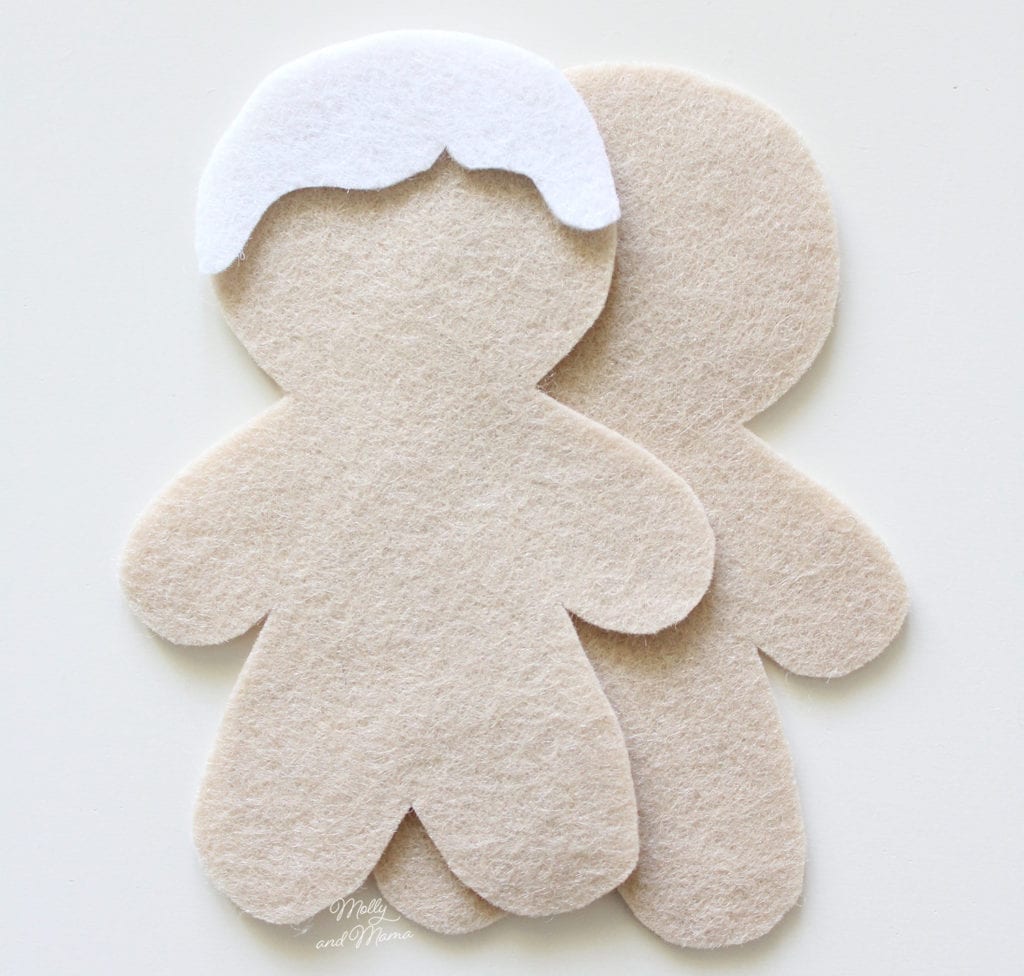
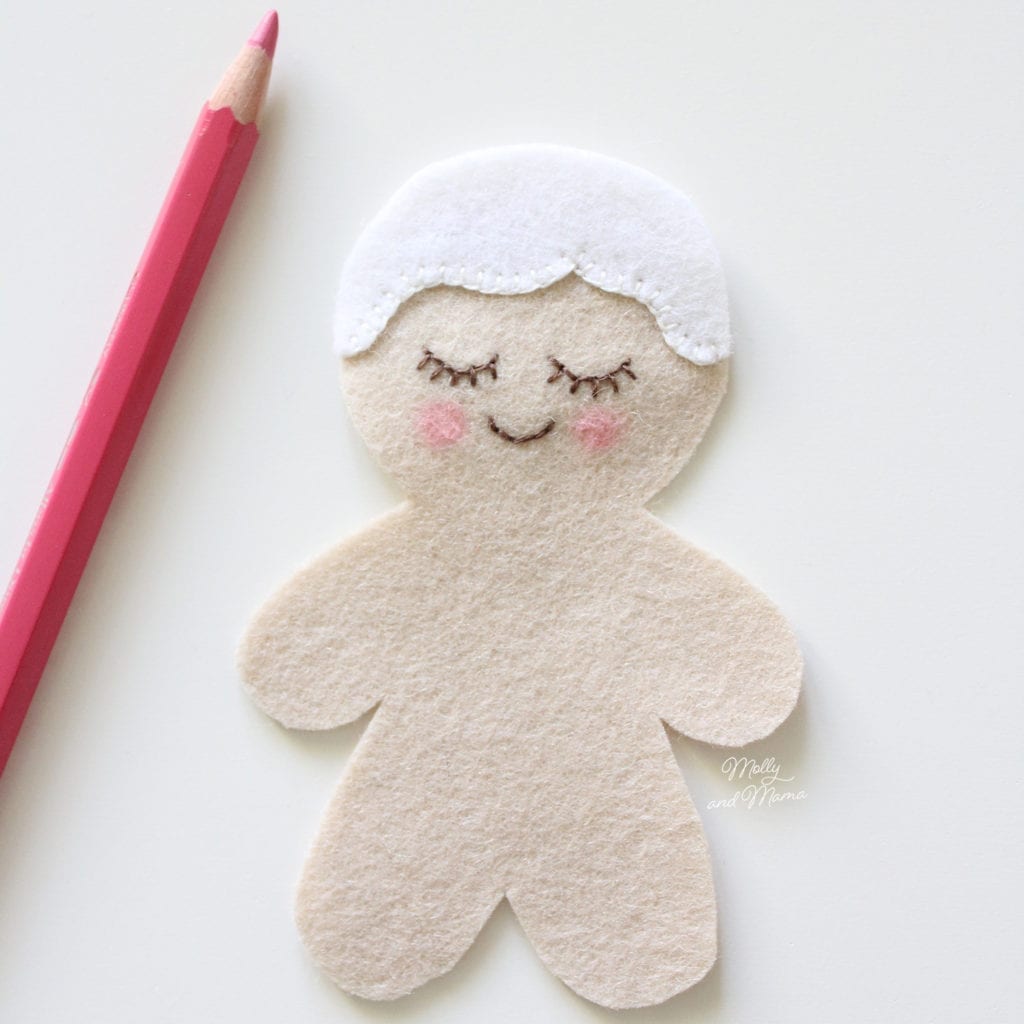
Use the template to trace and cut out two felt gingerbread shapes from your chosen colour, and one hair piece from the cream felt. I made three different versions, each in a different shade of beige / brown. Use your preferred method or visit this blog post that explains the Freezer Paper Method I use. I trace the shapes onto freezer paper, iron the shapes onto the wool felt and then cut out the templates on the line. This gives very accurate results and the templates are reusable.

Here are my felt shapes ready for assembly.

Place the hair piece over the top of one of the gingerbread shapes and pin or clip in place (putting the second gingerbread shape aside).

Using two strands of embroidery floss, blanket stitch the hairline only (the fringe or bangs) in place, across the felt. For more tips on Blanket Stitch visit my Beginner’s Stitch Tutorial.

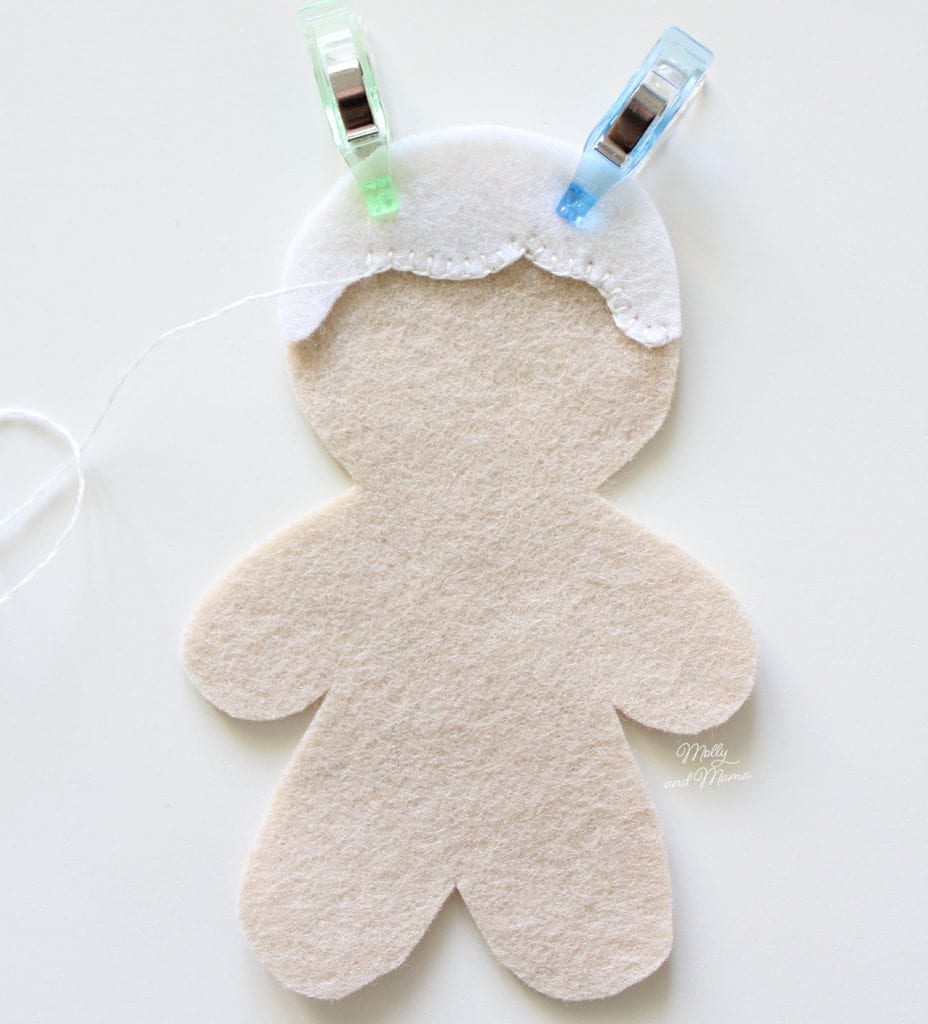
When you reach the other side of the head, finish off your stitching (hiding the floss tail on the underside of the felt).

Now trace the face and hair shapes and the facial embroidery details onto tracing paper. Cut out the paper around the head shape and then pin or clip this over the gingerbread shape (lining up the hair line and shoulder notches). You can read more about using this method for transferring embroidered details to felt HERE.

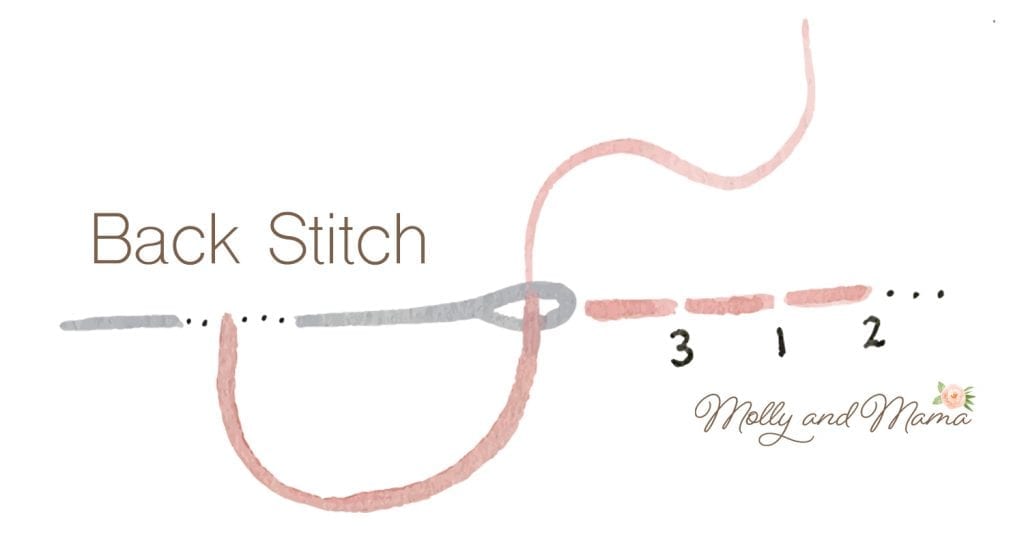
Using two strands of contrasting floss, back stitch directly through the tracing paper to create an accurate stitch line for the eyes and mouth.

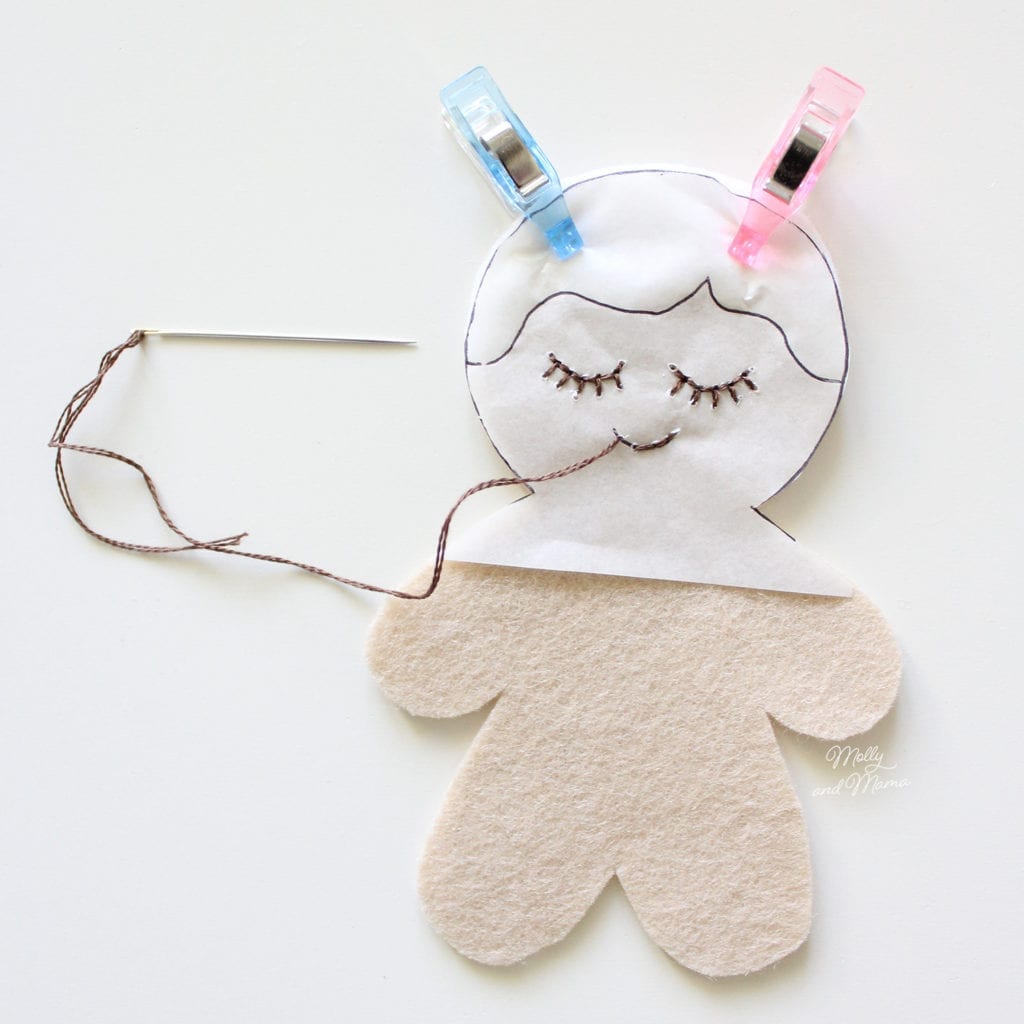
Once complete, hold the stitches while gently tearing the paper away. Use a needle to tease out any stray bits of paper.

Using the template as a positioning guide, colour in some cheeks on the gingerbread face using a pink colouring pencil.

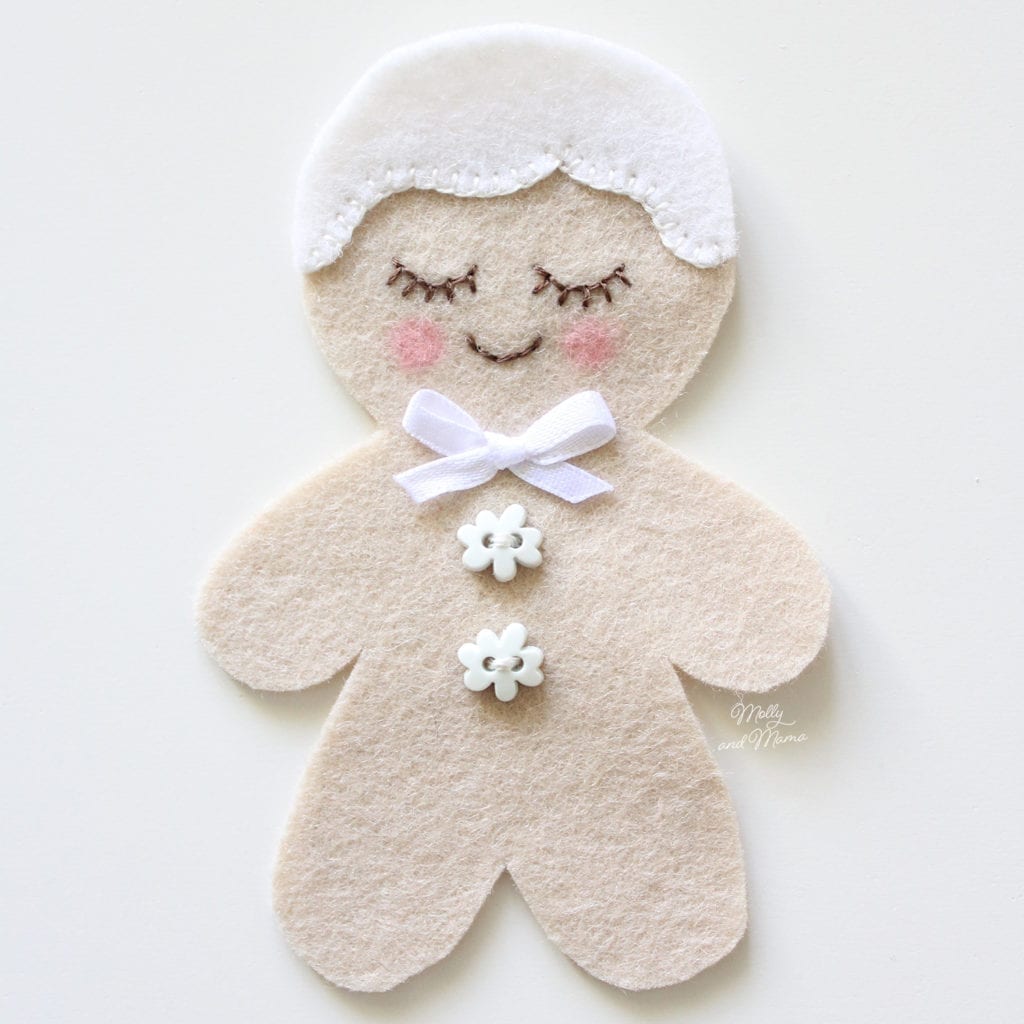
Tie a tiny bow and heat seal the ends with a lighter so that they don’t fray. Sew the bow at the gingerbread’s neck. Then sew two decorative buttons below that. Your gingerbread top is complete. Now it’s time for the assembly!

Place the second gingerbread felt shape behind the one we’ve just stitched, and pin or clip them together. Rethread your needle with two strands of cream floss. Starting at one side of the head, hide your knot inside the seam then blanket stitch around the outside of the head shape from one side, across the top, to the other side. Be sure to catch the second gingerbread head shape in the stitches. Finish your stitching and hide the floss tail.

Cut a length of gingerbread coloured floss about 5″ (12.5cm) long and knot one end with a double knot. Thread the looped end onto a large eyed needle.

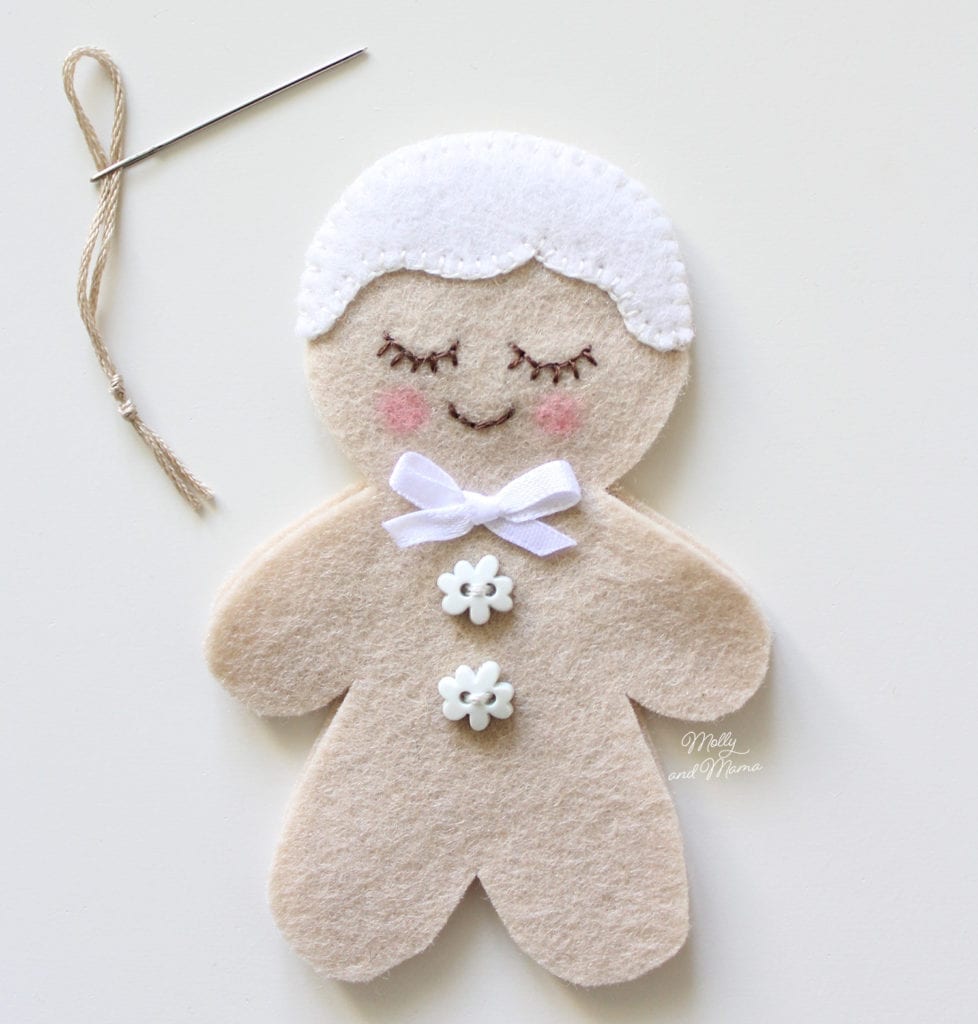
Open the gingerbread shapes and insert the needle inside between them, right through the stitches at the centre top of the gingerbread’s head and out through the other side. Pull the thread until the knot stops the loop from coming through.

Unthread the needle. Wasn’t that a great way to add a hanging loop?

Use two strands of floss to blanket stitch the entire ornament together. Start at one side of the head (where the cream stitching ends). Sew down the face, around one arm, and one leg, to the start of the second leg.

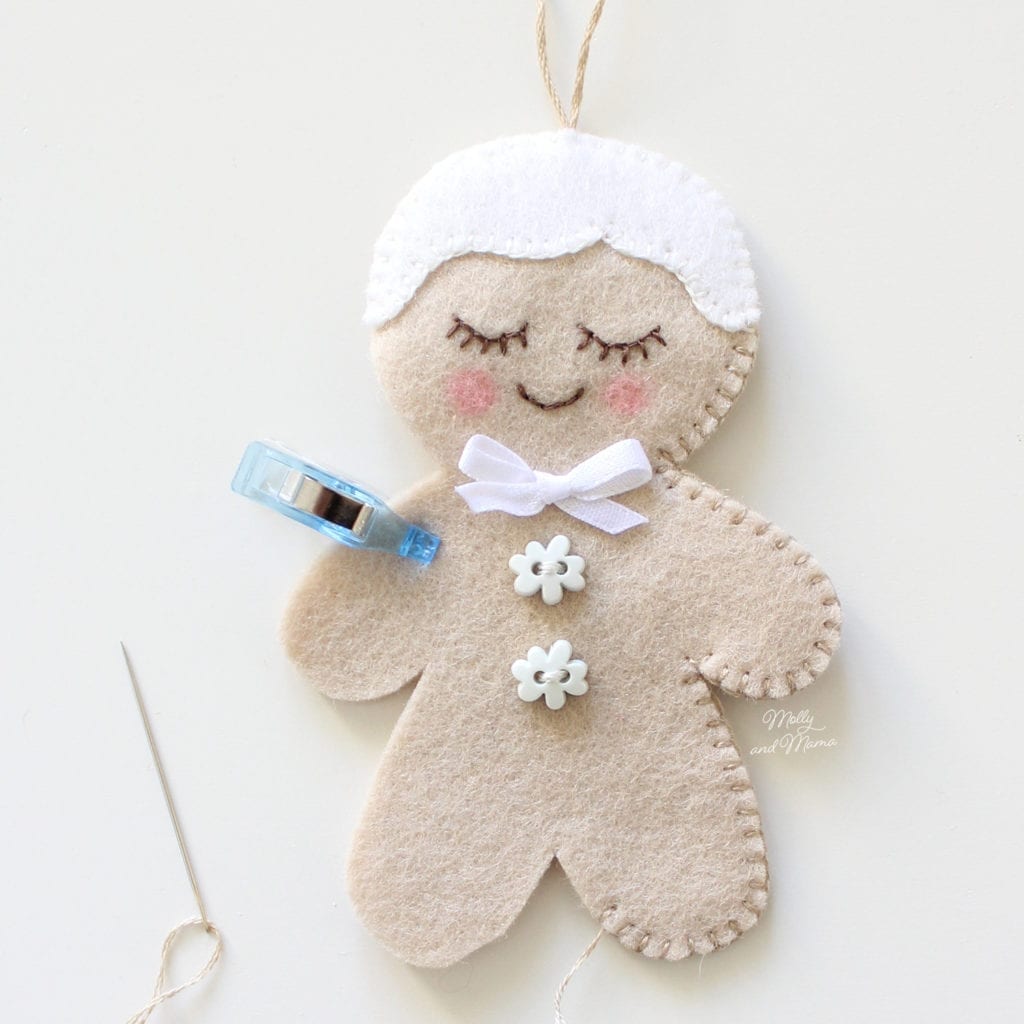
Start to insert very small amounts of balled up polyester hobbyfill inside the shape, using a chop stick or similar tool to manoeuvre the filling in place.

Fill the second leg and second arm after each one is stitched. Then fill the body and head before completing the blanket stitch and sealing the ornament closed. Your gingerbread is now done!

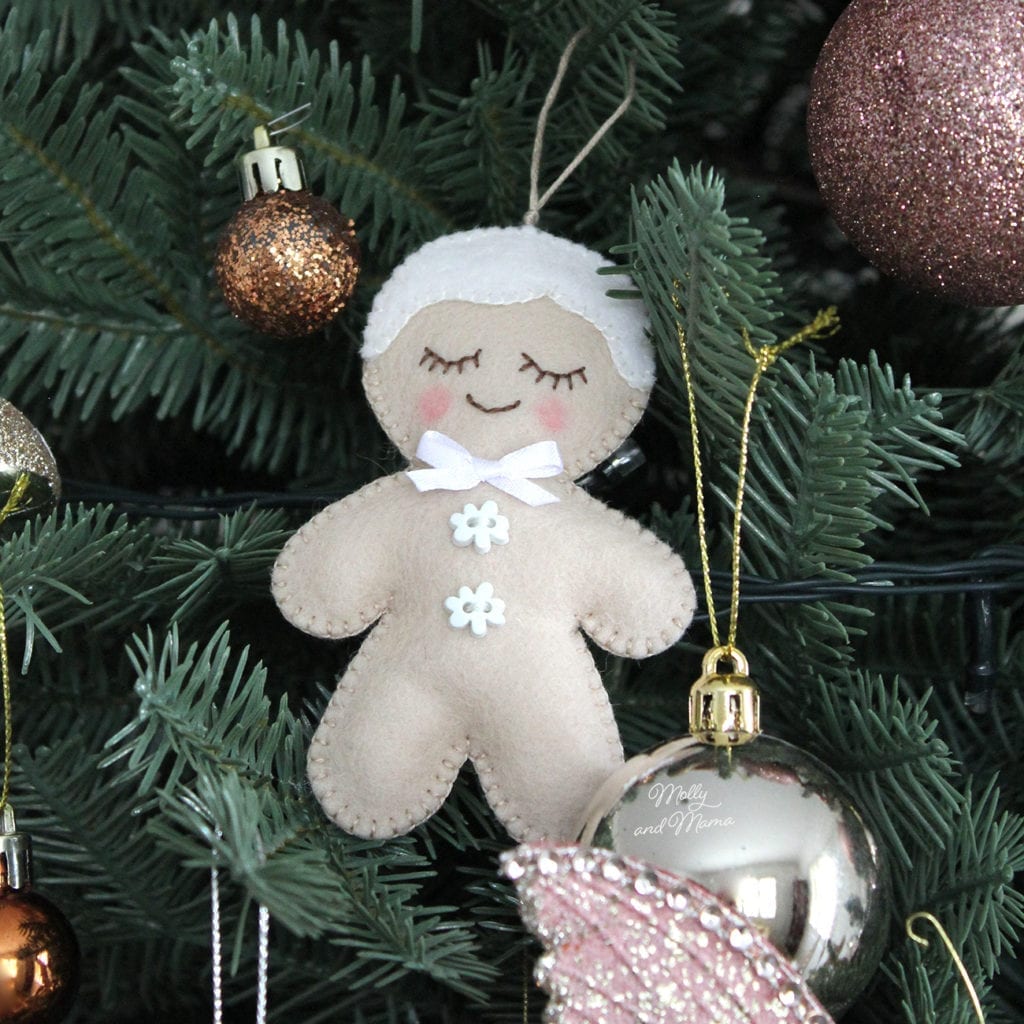
Pop the ornaments into the bag pockets for a cute Christmas storage idea!

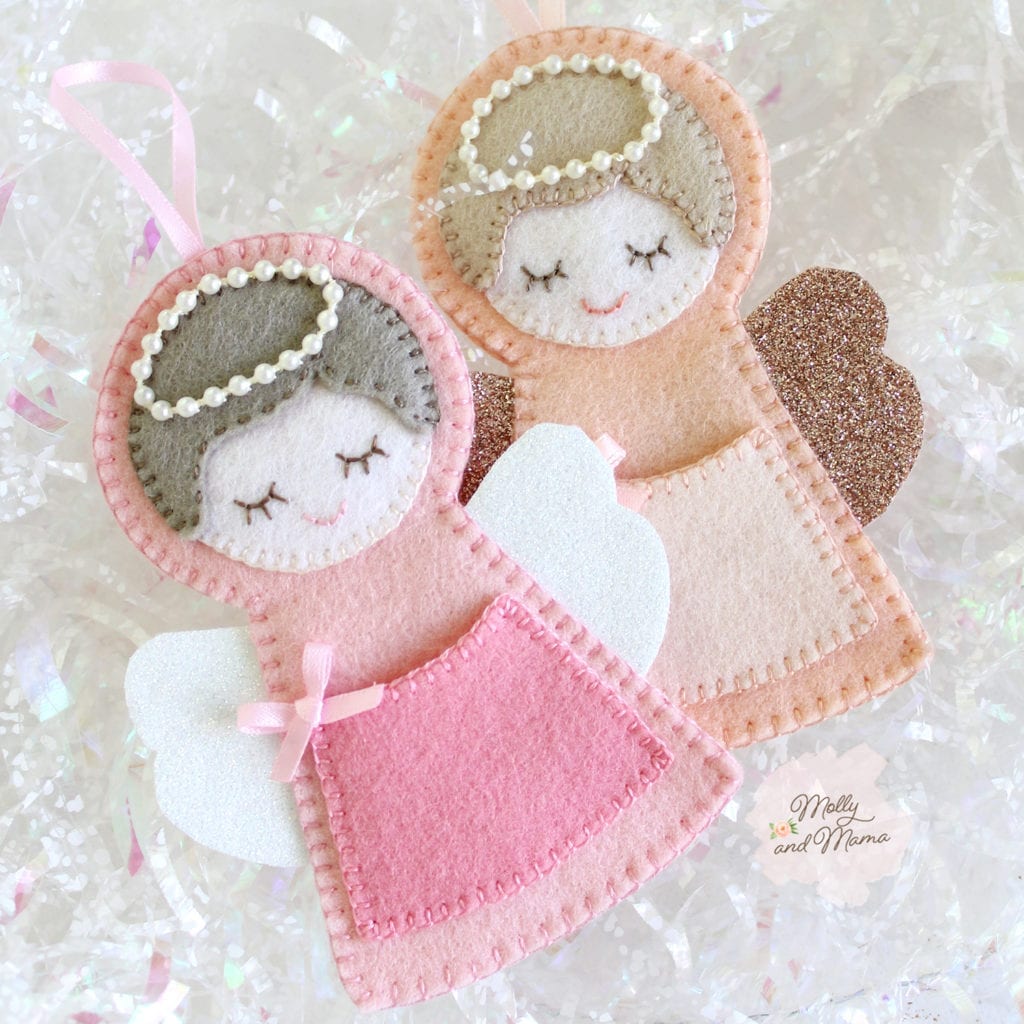
I really hope you’ve enjoyed this tutorial. Perhaps you’d like some of my other Christmas projects too. This Christmas Angel ornament would be sweet paired with the Gingerbread, that’s for sure!

If you’ve enjoyed working with this wool felt, you might like my other felt projects too. Just head to the store to see more!

Thanks for being here. I’d love to invite you to sign up for my newsletter so that you’ll receive links to these sorts of free projects and more, straight into your inbox. Get this free embroidery pattern available when you sign up too!

Happy stitching, Lauren x

Filed Under: Christmas, Tutorials Tagged With: felt, felt ornament, gingerbread ornament, wool felt

Comments

  1. Virginia says

    November 27, 2020 at 1:35 am

    Gracias por compartir!!!

    Reply
  2. Michelle says

    December 3, 2020 at 12:14 am

    I have to buy wool stuffing online (no synthetics for me), and it’s sold in grams. How much goes into a normal sized decoration? Don’t want to buy 100g and not be able to make more than one or two ornaments, but also don’t want to buy 500g and never be able to use it all. Googling hasn’t given me any indication at all, everything just says buy a bag and start stuffing.

    Reply
    • Lauren at Molly and Mama says

      December 3, 2020 at 7:04 am

      Hi Mchelle, Great question! I use a handful of polyester fill which weighs about 10 grams. You really don’t need much at all. If you can use cotton, I would suggest using cotton wool balls. Just unroll them and plump them out before use. Alternatively, you could even stuff the gingerbread with cut up fabric or wool felt scraps. I hope that helps. Best of luck, Lauren.

      Reply
      • Michelle says

        December 3, 2020 at 8:22 pm

        I never thought of using cotton wool balls, thanks so much for your reply Lauren 🙂

        Reply
  3. Dacia Reid says

    December 7, 2020 at 4:51 am

    These are adorable! I know what I am doing with the rest of my Sunday.

    Reply
    • Lauren at Molly and Mama says

      December 11, 2020 at 5:04 pm

      Thank you! Enjoy stitching them up.

      Reply

Leave a Reply to Michelle Cancel reply

Your email address will not be published. Required fields are marked *

Categories

  • Christmas (37)
  • Christmas Stocking Sew Along (6)
  • Easter (10)
  • Embroidery For Beginners (6)
  • English Paper Piecing (9)
  • Felt Fun (12)
  • Forest Family Quilt Along (10)
  • Holidays (11)
  • Molly and Mama Patterns (54)
  • Pattern and Book Reviews (38)
  • Projects (40)
  • Quilting Help (3)
  • This and That (52)
  • Tutorials (49)

Cart

mollyandmama

Studio For Pretty Stitches
🧵🪡 Our fourth week of the #seworderly challe 🧵🪡 Our fourth week of the #seworderly challenge that I am cohosting with Ali from  @arabesquescissors has already begun! For our final week we’re discussing how you organise your projects for SEWING ON THE GO! This might look a little different for you at the moment (depending on where you live) but how and what do you pack to maximise sewing whilst travelling or out-and-about? 

Travel sewing kits are especially applicable for hand sewing projects like English paper piecing and embroidery (even if you’re moving from the sewing room to the couch🤣). But you may also have tips for traveling with your machine and quilt WIPs too, particularly if you have enjoyed sewing on holidays or attending retreats. 

To join the challenge, simply share a public photo showing us how you plan for sewing on the go. Tag us and use the #seworderly hashtag so others can find you. We’re thrilled to see the generosity with which you’re sharing ideas, tips and more! 

Your post will put you in the running to win this gorgeous bundle of three PDF ‘Cathedral Window’ patterns from @arabesquescissors. So cute, right? Please see Ali’s prize post for more information. And don’t forget that we’ll also be selecting a Grand Prize Winner at the end of the month. Good luck everyone! 💗
🧵🪡 Week 3 of the #SewOrderly challenge with 🧵🪡 Week 3 of the #SewOrderly challenge with me and Ali from @arabesquescissors has come to an end. For the past week you’ve been sharing your tips and tricks for storing and organising your Work In Progress (WIP) projects and we’ve been loving reading all the suggestions and seeing all of your photos. 

We’ve selected @kirsty_sews and @mtnlaurel96 as our winners of the Molly and Mama Pattern pack including the #SimpleSewingFolder, #SummerRosePouch and #MissMollyandFriends. Congratulations ladies! 

I’m looking forward to putting together a blog post with some of the fantastic ideas that have been shared this week. Here’s a couple of my favourites. 

-	Small square pastry or cake containers work well for storing WIPs, as do scrapbooking shelves and containers. 
-	If a WIP is something you’d like to work on more, put it somewhere that you’re likely to see, so you’re more likely to pick it up and get some stitching done! 
-	Label each box or tub with the name of the project, the date it was started, the fabrics used, and any other relevant information you want to keep at hand. 
-	@amandalovestocreate shared a terrific tip of adding an adhesive photo of the project to the label! I love that idea!
-	Make a note in your diary or set an alarm on your phone to remind you to check in with your WIPs and their progress. This might give you a much needed push to get stuck into a project you may have otherwise forgotten about.
-	Find a likeminded maker and ask them to become your Accountability Partner so you can periodically check in with each other and give yourselves a gentle nudge to make some progress on your WIPS! 

If you have more ideas, we’d still love to hear them. Ali has put together a great round up of ideas on her blog too. 

Stay tuned as we now share more information about our fourth and final week, with Sewing on the go! 

#mollyandmama #arabesquescissors #seworderly #sewsorted #seworganised #seworganized #sewingroom #craftroom  #craftroomorganization #quiltstorage #quilting #sewingwips
Did you see my posts over at @aurifilthread this w Did you see my posts over at @aurifilthread this weekend? I did an Instagram takeover which was heaps of fun! Pop over to see what I shared. One of the posts included my Top 5 Tips for Embroidery Success, and I thought it was silly of me not to share those tips here too! But really, these tips apply to all sewing. They’re simple but true! 

1.	Choose the right tool for the job. You don’t need to spend a lot of money, but using a needle you can easily thread with the right type of thread for the job, can make all the difference to your experience. 

2.	Start simple. As a beginner, starting a large and intricate design might become overwhelming if only because of the amount of time it will take to complete. Start with a smaller design and move on to more detailed projects as your skills progress. 

3.	Get help from the experts. Watch You Tube videos, read blog posts, enrol in online courses. Over time you’ll develop a whole new skill set that you’ll be able to pass on to someone one day too. 

4.	Don’t rush. It’s not a race, and embroidery is all about slow stitching. 

5.	Leave out your embroidery so you’re more likely to pick it up and continue stitching when you have a spare moment. The more you stitch, the better you’ll become. And it’s a wonderful mindfulness activity! 

#mollyandmama #mollyandmamastitchlibrary #prettystitchesclub #aurifil #aurifilfloss #aurifilthread #embroideryfloss #embroidery #embroiderythread #embroiderytips #embroiderersofinstagram #sewingtips #stitching #handstitching #handsewing #stitchingtips #slowsewing #slowstitching
One of the sewing patterns up for grabs in this we One of the sewing patterns up for grabs in this week’s prize pack for the #SewOrderly challenge is my Simple Sewing Folder. So I just wanted to show you a little more about this pattern in my store. 

Featuring a hand embroidered front panel, little hexie details, and simple patchwork, the cover is all about showcasing the ‘pretty’. 

Open it up (swipe to see) and it’s all about the practical! There’s a lace zipper pocket, tabs for tools, a wool felt needle and pin minder, a thread holder and spaces for hoop storage. 

This folder is perfect for storing ‘work in progress’ projects - the focus of this week’s theme for our sewing room organisation challenge, hosted by me and @arabesquescissors. 

If you’d like to know more, there are links in my profile to my store and my blog. I’d love you to get involved! 

#mollyandmama #seworderly #simplesewingfolder #embroidery #embroiderydesign #sewingfolder #projectfolder #sewingroomstorage #sewingspace #notionstorage #sewingonthego #hexies #hexagons #quilting #quiltedpouch #sewingpouch #tildateatowel
I don’t show my face on here anywhere near as of I don’t show my face on here anywhere near as often as I should. And it’s funny because you’ll have a picture of someone in your head and they often don’t look anything like what you imagine. So for what it is worth, this is me, Lauren. I wanted to say hi and share a bit more about me, as there’s so many new faces here lately. Thank you so much for joining us! 

Here’s 5 facts about me;

1️⃣ My first degree was in Behavioural Science, but I used my second degree in Education to become a primary school teacher. 

2️⃣ After having our two kids, we decided I’d work from home and I’ve been sewing, blogging and designing ever since! 

3️⃣ My maternal grandmother’s name was Molly and my kids call my mum ‘Mama’. I named my business after Molly and Mama in honour of the skills, lessons and traits they passed down to me. I’m so blessed to be able to  share that love of creative expression with all of you! 

4️⃣ My favourite colour is pink. Big surprise there 😂! And I have a love for all things pretty and sweet. 

5️⃣ I love drawing and illustrating and hope to bring more of that to my work in the future! 

I’d love to meet more of you and hear where you are from. Feel free to leave me a reply.  Thanks for your support and encouragement of my little biz. It means the world to me! Lauren 💗
🌼🌸🪡There’s something new and very excit 🌼🌸🪡There’s something new and very exciting coming to Molly and Mama soon! Are you subscribed to the newsletter? Find a link to join in my profile, so you can stay tuned for the release of the ‘Pretty Stitches Club’. It’s all about sharing my love of embroidery, slow sewing and beautiful stitchery🪡🌸🌼

#mollyandmama #prettystitchesclub #studioforprettystitches #embroidery #embroideryclub #stitcheryclub #sewingclub #sewingsubscription #embroiderypatterns #monthlyembroideryclub #handstitching #slowsewing #aurifilthread #aurifilfloss #aurifilartisan #aurifloss #tinystitches #floralembroidery #embroiderywreath
Our Week Three prize pack for the #seworderly chal Our Week Three prize pack for the #seworderly challenge with @arabesquescissors includes three of my @mollyandmama  PDF sewing patterns; the #SimpleSewingFolder, the #SummerRosePouch and the #MissMollyAndFriends pin cushion pattern. 

 Ali and I will each select a winner on Monday, 22nd February, 2021.

To enter, post a photo or video on your public profile showcasing how you store your projects and quilts as you’re working on them or even when they are completed. Tag @mollyandmama and @arabesquescissors and use the #seworderly hashtag so others can find you. 

T&Cs
- the giveaway is open worldwide to participants 18 years and over, with a public Instagram profile, and who post in alignment with the guidelines outlined above. 
- Entries will close at 11.59pm AEST on Sunday, 21th Feb 2021. 
- The two winners will be announced here on Monday, 22nd Feb, 2021 and will need to provide an email address to receive their prize. 
- This giveaway is in no way associated with, sponsored by or endorsed by Instagram. 

Thanks so much for sharing the #seworderly love! And you can find out more about these patterns in the store - there’s a link in my profile. The Simple Sewing Folder is a fantastic project folder for embroidery or EPP storage, perfect for WIPs. How do you store your ‘work in progress’ projects and quilts?
Have you been participating in the #seworderly cha Have you been participating in the #seworderly challenge with me and Ali from @arabesquescissors? We’re sorting our sewing rooms for the month of February and have already tackled NOTIONS and FABRIC. 

This week we’re exploring how to store and organise our completed QUILTS AND PROJECTS and those we’re still working on (WIPs). Would you like to join us? There’ll be a sweet @mollyandmama prize pack up for grabs, but more importantly, you’ll be having fun sorting your sewing space knowing that there are likeminded friends joining you! 

Share a photo of your quilt and project storage, tag @mollyandmama and @arabesquescissors, use the hashtag #seworderly, ask questions or share tips and advice. We’d love you to join us! 

#mollyandmama #arabesquescissors #sewsorted #seworganised #seworganized #fabricbundle #sewingroom #craftroom #quilts #craftroomorganization #quiltstorage #quilting #quiltfolding #serioussewistsset #beeapplique #libertyfabric #libertytanalawn #epp #englishpaperpiecing #libertywiltshire
Ali from @arabesquescissors and I are wrapping up Ali from @arabesquescissors and I are wrapping up week 2 of our #seworderly challenge. This week has been a HUGE one, where we’ve focussed on FABRIC STORAGE. We’ve been overwhelmed by the number of you who have wholeheartedly jumped onboard and unreservedly shared your sewing spaces and craft rooms. So thank you and congratulations on the success you have achieved this week; from tidying just a small stash, a basket or a drawer, to refolding and sorting all the fabrics in your entire room! 

So many of you have tackled your yardage, pre-cuts, scraps, fusibles, interfacings, batting and more! And you’ve been so generous with your tips and ideas. So thank you! I’m sure those of you who are yet to tackle your stash will get a lot of inspiration from heading to the #seworderly hashtag! 

We can’t always keep our fabrics in pretty little arrangements like my first photo of Liberty here. So swipe to see my second photo – a more realistic view, taken from the inside of one of my newly organised Billy bookshelves from Ikea. I like to keep my fabrics folded, in plastic tubs, behind solid cupboard doors, so I can avoid sun damage and reduce the effects of dust, pests and moisture. They’re organised by type and size (so yardage, fat quarters, smaller pre-cuts and scraps are generally all separated), then by colour or their use. How do you organise yours? 

I’ll be compiling all the tips and tricks I learned from my own experiences and from reading all of your posts, into a blog post really soon. So stay tuned for that. 

And Ali and I have both chosen a winner for the @arabesquescissors pattern prize pack for this week. Please see Ali’s post to see if it’s you! Thank you so much to all who participated. We’re looking forward to kicking off Week 3 shortly. Let’s explore PROJECTS & QUILTS. Please join us (find out more about the #seworderly challenge on the blog, using the link in my profile). 

Happy sorting, Lauren x 

#mollyandmama #arabesquescissors #sewsorted #seworganised #seworganized #stashbusting #stashstorage #fabricstorage #fabricsorting #fabricstash #libertytanalawn #libertyfabrics #libertybundle #fabricbundle #fabriccontainers #sewingroom #craftroom
Load More… Follow on Instagram
© Copyright 2020 - Molly and Mama